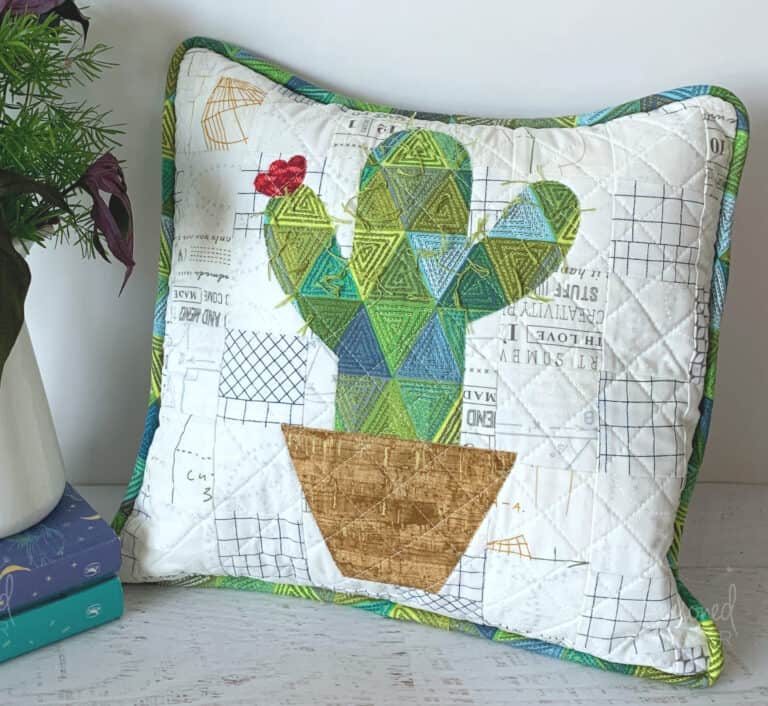
Last week I extolled the virtues of owning a Silhouette Cameo. Today, I want to get practical and show how I cut fabric with a Silhouette.
I’ve said this before: I make a LOT of baby gifts. And my Silhouette makes this an easy task. Here’s how to cut fabric with a Silhouette Cameo.
Here’s what you need:
- 2 Pre-fold Cloth Diapers
- Fabric Scraps
- Fusible Web such as Heat’n Bond Lite (affiliate)
- Spray Starch
- Silhouette Cameo or Silhouette Portrait (affiliate)
I start by ironing the pre-fold diapers and then setting them aside. I prefer the pre-folds that are heavier (I think they come 5 in a package at Target or Walmart). However, for this tutorial I am using both a thicker pre-fold diaper and a gauzy pre-fold diaper.
Step 1: Prepare the Design
When you purchase a Silhouette, it comes with design software* that works with the machine. There is an upgraded version of the software that costs about $50 {but was a free upgrade when I bought my Silhouette}. Both versions will work for this application.
Once the software is open, it is easy to create this design. I will be using a combination of lettering and a design I purchased {for $.99} from the SilhouetteOnline store. The online store is what really sold me on the Silhouette. There are a ton of designs that all cost $.99 and there is usually a sale every month or so with the designs being $.50-$.75. (affiliate)
*Note: You can download the software for free which allows you to purchase designs from the Silhouette Store and hand cut them.
I am using the font Fat Free which I tweaked. The whale is from the Silhouette store. He needed a little editing, but this took all of 5 minutes.
Step 2: Prepare the Fabric
Cut a piece of fabric that is 12″ x 12″. Make sure that it is free of wispy threads. Spray the fabric with spray starch and then press with a steam iron.
Cut a piece of fusible web that is 11 3/4″ x 11 3/4″. Fuse the web to the back of the fabric scrap according to the manufacturer’s instructions. Once it has cooled, peel away the paper backing. {If you are like me and get fusible web on your iron, use a little Hot Iron Cleaner to get the goo off.}
Place the fabric right side up on the Silhouette mat. There is a little more to this than just slappin’ it down on the mat. It is imperative that the fabric be well-adhered to the mat. If your mat is full of lint or paper bits, then the cut may not go so well. If the mat has started to lose some of its stickiness, then spray an adhesive spray like KK2000 (affiliate) to the back of the fabric/fusible web before placing on the mat.
Load the mat into the machine.
Step 3: Cutting out the Design
The Silhouette offers two types of blades: one for paper and one for fabric. The blades are identical, except the fabric blade is blue. This is only to distinguish blades, because once you’ve cut fabric with a blade it doesn’t work so well on paper and vice versa. It is best to have two separate blades.
Be sure to change the blade to the fabric cutting blade {the blue one}.
Back in the software it is time to set the Silhouette. First, I choose my Cut setting which is Fabric Cotton Print. When I choose this setting, the software sets the thickness of the cut. In order to get great fabric cuts, I’ve found that I like to set my blade at 4.
It is now time to send the design to the Silhouette to cut.
All that’s left to do is iron the design onto a burp cloth and top stitch around the design.
This is where the creativity begins. I really like to cut out my letters and designs in different fabrics. It makes the burp cloth a whole lot cuter.
This also works well on onesies, t-shirts, pillows, blankets, quilts, and anything you can dream up.
Want for detailed information on using a Silhouette Cameo? Check out this awesome Craftsy class. (affiliate)
Sooooo…when you wrote about the Silhouette Store a few months ago, I didn’t realize it was for a product called a Silhouette! I was more into looking at the designs than reading the text, ha ha!
The baby gifts you make are super cute!
Thanks! For a long time I would see bloggers talking about a Silhouette and had no idea what it was or what it did. That’s why I am writing these posts. We MUST know what is available for all of our crafting and sewing needs.
Super Cute! I just bought a Silhouette from Amazon… Did you use a sewing machine to make the boarder on the letters?
I used a simple zigzag stitch to secure the edges of the letters.
I love love love my Silhouette Cameo as well! It is such an awesome tool for any crafter. I’ve also heard that you can use the Silhouette to cut designs from your embroidery software as well!
Another thing I’d like to add is that Silhouette offers great subscriptions in their online store. They have several options available and you can get designs for as low as 11 cents per design! Even less if you happen to get the subscription on sale! So if you are like me and find yourself buying lots of fun designs then the subscription is definitely the way to go!!
Thanks for these tips Jennifer. I’d love to know more about cutting designs from embroidery software ~ any idea where I can find that info???
I was reading your message and was curious about cutting fabric using embroidery software designs. And you do that how? scanning the designing or sending the design to the Silhouette?
You have to scan the design into the computer then send the design to the Silhouette software. The software takes it from there.
Yes you can! I use my florani software to save my design as a DXF auto cad file to documents. then you can open that file in your silhouette.
Thank you, thank you, thank you for sharing this. Can’t wait to try this.
Those burp cloths are adorable! Thanks for linking up to Project Inspire{d}!
Leslie, I finally used my Silhouette!! I cut out some vinyl lettering yesterday, and now I am hooked. I make a lot of baby things too, so I will definitely be trying out cutting fabric with it. Thanks so much for the great info, I look forward to learning more about what this machine can do 🙂
It is so much fun. I plan to cut some vinyl letting soon. I need to get on a few baby things myself.
Oh my gosh!! This is amazing! I can’t wait to use this idea for my baby!!! Thanks for sharing!
Absolutely perfect for baby clean ups.
New follower… Found your blog thru the Someday Crafts link party. Thank you for this easy tutorial. I have a Silhouette Portrait that I’ve really just started using and I love it. I can’t wait to start cutting fabric!
Wow, I’ve been cutting fabric circles for a baby mobile I’m making and wondered if I could cut the fabric with my Silhouette. Then I saw your tutorial on Lil Luna link party. So perfect! Thanks for sharing.
I just started a craft blog, too!
This is a much needed and great tutorial! There aren’t that many good ones out there for cutting fabric on the Silhouette. I’m sure this will be helpful for me; I’m still working out the kinks for cutting fabric. Does it work better with a stiffer fabric or is that why you use spray starch?
Thanks for commenting. I think the fabric works much better with spray starch. I like the Mary Ellen’s Best Press because it doesn’t flake or scorch but still has excellent stiffening ability.
Do you feel my Silhouette envy?? I can normally rationalize the fact that they are too expensive to own because to buy vinyl to cut would be a huge added expense to the machine–but the fact that you can cut fabric with it??!! That is not such an added expense and now I am so really wanting to figure out a way I can get my hands on this machine!
I hope you can find a great deal on a Silhouette. Do your homework and wait for the best sale! That’s what I did.
This is absolutely adorable!!! The whale is SO cute! Thanks so much for sharing!
Those are super cute burp clothes! I have yet to use my Silhouette to cut fabric even though I have been wanting too for some time!
Thanks so much for linking up to this week’s Catch a Glimpse party. I’ll be featuring this tomorrow! 🙂
I am loving this! I really need to learn how to use my machine better. One day 🙂
Hi Leslie! Great tutorial and love the finished project! Thanks for joining us and sharing at Best of the Weekend. Pinning to our party board! Have a fantastic weekend and please join us next Friday!
I haven’t been using my Silhouette in a while because I need to buy new blades. I haven’t tried using it on fabric though. Thank you for this great tutorial!
Remember to get the fabric blade. It’s totally worth the extra expense…
How does this hold up when washing
What a lovely project Leslie. I have a Cameo myself but I just hadn’t have the motivation or inspiration to try fabrics on it. This is such a wonderful inspiration I can tell is so cute that makes me want to make something for my girl!!!
Thank you so much for this! I’ve been wanting to make some personalized items but didn’t know how to cut fabric with my Silhouette. I love all your pictures and simple instructions. Thank you!
I’m so glad I could inspire you to make a few things on the Silhouette.
Your so creative! I am stopping by from Inspire Me Monday Blog Hop!
Thx for the tutorial. I have a Silhouette and want to try this. I need to buy the fabric cutter first. You have inspired me.
Always happy to share a little with friends. Today, I was working on some more fabric cutting with a Silhouette. I’ll be sharing the pieces soon.
So cute. thanks for sharing.
I was wondering if you could explain the top stitching? I’m an amateur with the sewing machine. 😛
Absolutely. Top stitching is when you stitch on top of a seam. Check my tutorials on Sewing Machine Feet. There is a post about the Edge Stitch Foot which explains this best.
Seriously? Oh my, I’ve been eyeing the Silhouette Cameo for awhile. MUST GET. I’m heading over to your post about the Silhouette right now …
What a great baby gift! I love personalized gifts.
Great tutorial! I love my silhouette. I’ve never used it to cut fabric though. Going to have to try that one out..then I will need to learn how to top stitch
Top stitching is easy. I have a tutorial for that!
The gang at My Personal Accent thinks your post about Cutting Fabric With A Silhouette is WONDERFUL.
Hi Leslie, great tutorial – thanks. Do you use Silhouette’s fusing/interfacing or buy your own? I tried using some from our local craft store and it didn’t work well at all.
I use Steam A Seam2 or WonderUnder and set my Silhouette on the setting for cutting fabric with interfacing. Be sure to follow the manufacturer’s directions for applying the fusible web.
Hi Leslie,
These are adorable. How did you do the stitching? With a regular sewing machine? This is the part that might trip me up? Can you tell me what you set your sewing machine at?
Thank you!
Sara
I use the default zigzag stitch on my Bernina. It’s the perfect size for applique.
I actually have the Portrait and am looking into using the fabric blade and I love how descriptive you were with this one. I use mine for cutting stencils for spray painting shirts and just started looking into how to cut and attach a white knit fabric to a dark colored shirt, this is a great help. And Silhouette does frown on using things other than their products with the cutters but they ARE expensive and the cutters can really handle a lot more material types then you’d think – I should know, you wouldn’t believe some of the things I put in mine. The best part of the cutter is that you can use your own images and there are so many free ones online though I do use my Paint Shop Pro program to edit them since it does tie up the Silhouette program too much.
After viewing this I will give cutting material another try…I was so frustrated I wanted to throw my machine in the fireplace..I have no problem cutting vinyl
What machine did you use to do the top stitch around the design?
I used a regular sewing machine….
Thank you! I’ve been frustrated with the ragged edges when I cut fabric with my Silhouette, but I think some adhesive spray and Ellen’s on my fabric may help with that. Also, I had tried the “3” blade setting, and “5”, but not “4” for some reason…
Leslie thank you so much for this tutorial! I can’t wait to use my cameo (coming in the mail in 3 days) especially with fabric. I too do a lot of baby items. I got my cutting machine at Costco and for a great price. It’s a bundle which includes all kinds of extras ie: vinyl, transfer paper, etc. Great thing about Costco, it can be returned with no time restraint. Thank you again!
Hi!! I loved your tutuorial! I looove your design. I was wondering if you could tell me how to get the embroidered edge around the fabric design?? I’m new to all of this stuff and I’m always looking to learn new stuff! Thanks in advance!!
I know this is an old post… but is the fat free font in silhouette online store because I couldn’t locate it. Please advise. Thanks, T
Fat Free is installed in my fonts. I don’t know if this font was already installed on my computer (MacBook Pro) or one I had. Wish I could be of more help…
Great tutorial…. Just getting started with my Silhouette and loving it….. I am reading and watching a lot of tutorials so as to not be wasteful. Did you do the top stitching on the burp clothes with a sewing machine or by hand?
This is an awesome tutorial. I just wish I could sew in order to get that finished look. Thanks for sharing!
I’ve wanted to make quilt for the longest time but I honestly don’t have the patience to cut and measure all the squares yneeded. I thought I’d use my Cameo for it, but does using the fuse paper make the fabric stiffer? Like, is there anyway to get the fuse paper OFF the fabric once you’ve cut it? I just don’t want to make an uncomfortable quilt.
Thanks for the post, btw – it looks so cool!!
The Silhouette is best for cutting appliqué. Check the Applique drop down under sewing on the Nav. Bar for tutorials on this. If you want a way to save time cutting out quilts then I recommend the Accuquilt cutter. You can cut out an entire quilt in about an hour – I know, I’ve done this before. (affiliate link)
Awesome. Thanks for the advice.
Thank you so much for sharing this, unfortunately I do not know how to sew. Is there a way to do something like this minus the sewing part. Pleas let me know! Thank you!
I am considering buying a machine because I like to do fusible applique quilts. Can you download or scan appliques designs from a quilt book to cut those specific shapes?
Yes, you can scan a design into the Silhouette software (which is free!). That said, it’s not easy-peasy. You will have to work with the software to get the file correctly sized and smooth the edges. Fortunately, there are several videos from Silhouette on how to do this. Just check on their website FMI.
Would you need backing to cut cordura?
I don’t think I’d try cutting cordura on the Silhouette. It’s way too thick and heavy.
Best. Tutorial. Ever. After spending all morning contemplating throwing my Silhouette out the window, combined with ANOTHER trip to JoAnn’s (I completely demolished my initial batch of fabric), I ran across your site. THANK YOU.
Thanks for the awesome step by step pictures and instructions. Only question is about the border around the letters. Did you see around them it use a different technique?
Thanks Lori.
These posts should help: http://www.seasonedhomemaker.com/category/sewing/applique-sewing/
I hope I’m not repeating a question that has already been asked. I wanted to cut out fabric on my Silhouette and then iron it onto either a canvas bag or a t shirt without sewing. The idea of vinyl on a t shirt seems strange to me. Ay thoughts?
It will depend upon a few things.
1. Use a high quality fusible product.
2. Be sure to pre-wash the the garment and the applique fabric. You will get better adhesion.
3. Occasionally reset the applique with a hot iron. If you don’t sew it down, the edges will curl when you wash the item.
Cool idea.Good instructions.Some tutorials are not as informative. Thank you.
Hello,
thanks for this tutorial. I can’t see the speed and thickness… I see the cut is 4…
the picture is blurring
sorry for my french, i find how do my “starch spray”
have a good day
annelaure
This information will show up in the software.
Oh wow !!! That’s was great, you did such a great job of explaining things for beginners. …..thank you
Thank you for the clear easy to follow instructions!
Can you cut felt squares also?
Yes, but you need to carefully prepare for it. There are instructions on the Silhouette blog.
Hey quick question, how do you sew around your letters? Do you use an embroidery machine or just a regular machine?
I usually straight stitch or zigzag.
I don’t recall Cricut having a special needle to cut cloth, do you know what it is called?
Silhouette has a blue blade for cutting fabric. It is the same as the other one, but colored blue so you don’t cut paper then fabric then paper. A regular Cricut blade should work.
I love it. I am just curious how did you top stitch around? I am thinking of purchasing a silhouette myself, I do have a embroidery machine I am just not sure how to work it yet. I a new to sewing and all of this but I love crafts and always have. Look forward to hearing more, thanks!
Check out my appliqué tutorials. Navigation Bar > Sewing > Appliqué. You should find all the details on how to cut with a Silhouette and appliqué.
Looked on Google for this exact topic and boom it came up. Thanks for answering my question.
I am thinking of getting a silhouette machine. I’m curious if it will cut “wool” felt for embroidery purposes?
Yes, there should be a setting for this. I would look for a tutorial on Youtube for blade settings.
Do you pull the backing off of the bonding before putting it on the mat? I did my first cut and it came out perfect, but it was a booger getting the paper off of my mat after I removed the fabric. Thanks!!
Yes, peel away the paper once the fusible product is adhered to the fabric, prior to putting on the cutting mat.
I’m new to cutting fabric applique with my Silhouette. Your tutorial was great, thank you! But when cutting I found that it cut into my mat. Doesn’t this ruin your mat rather quickly? I’ve only used it to cut vinyl before and since the vinyl has a backing it doesn’t cut into the mat at all.
Thank you!
You’ve made the classic mistake of setting your blade too deep. It should not cut into the mat. Also, look for my post on how to clean a Silhouette blade. It will save you tons of money on blades.
do you know how to cut a 4 way stretch fabric for gymnastics leotards?
It doesn’t work the way you describes. the fabric is’t cut that well and sometimes it sticks behind the blade (blue).
I also used ‘Terial Magic’ but still it doesn’t work that well.
I hop you have some suggestions