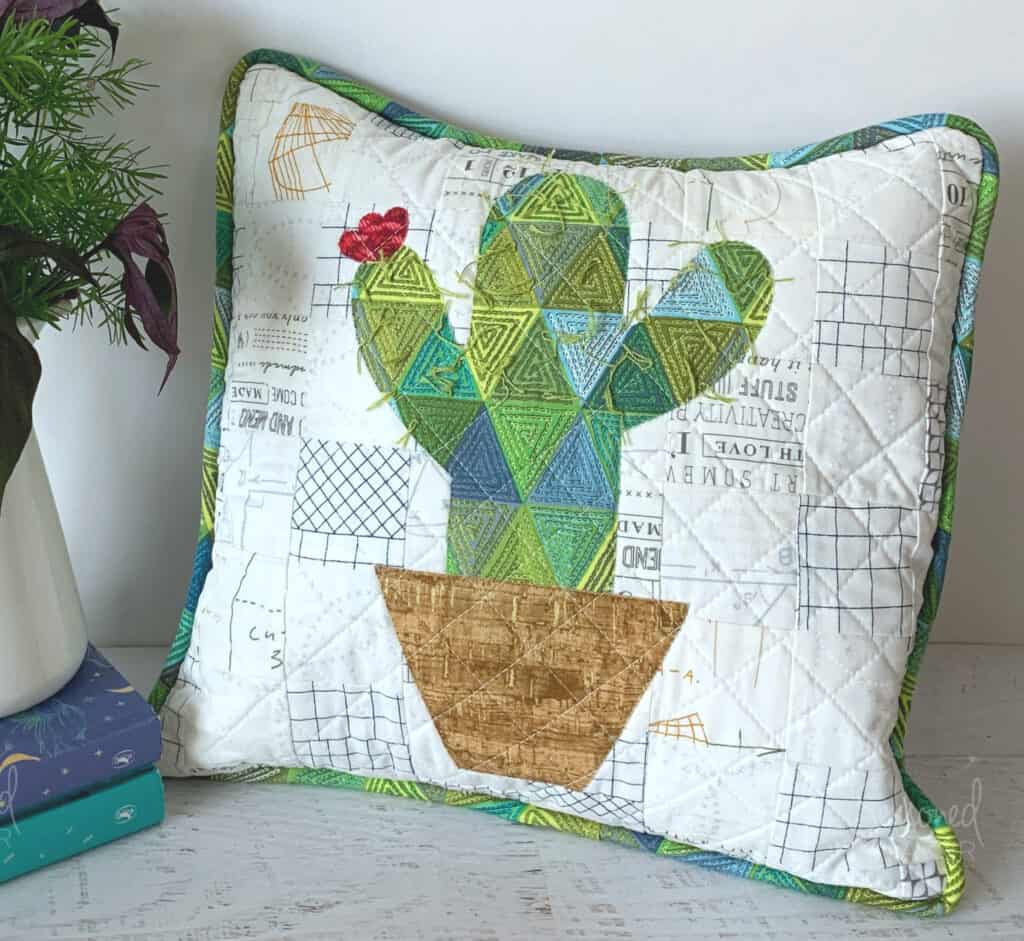
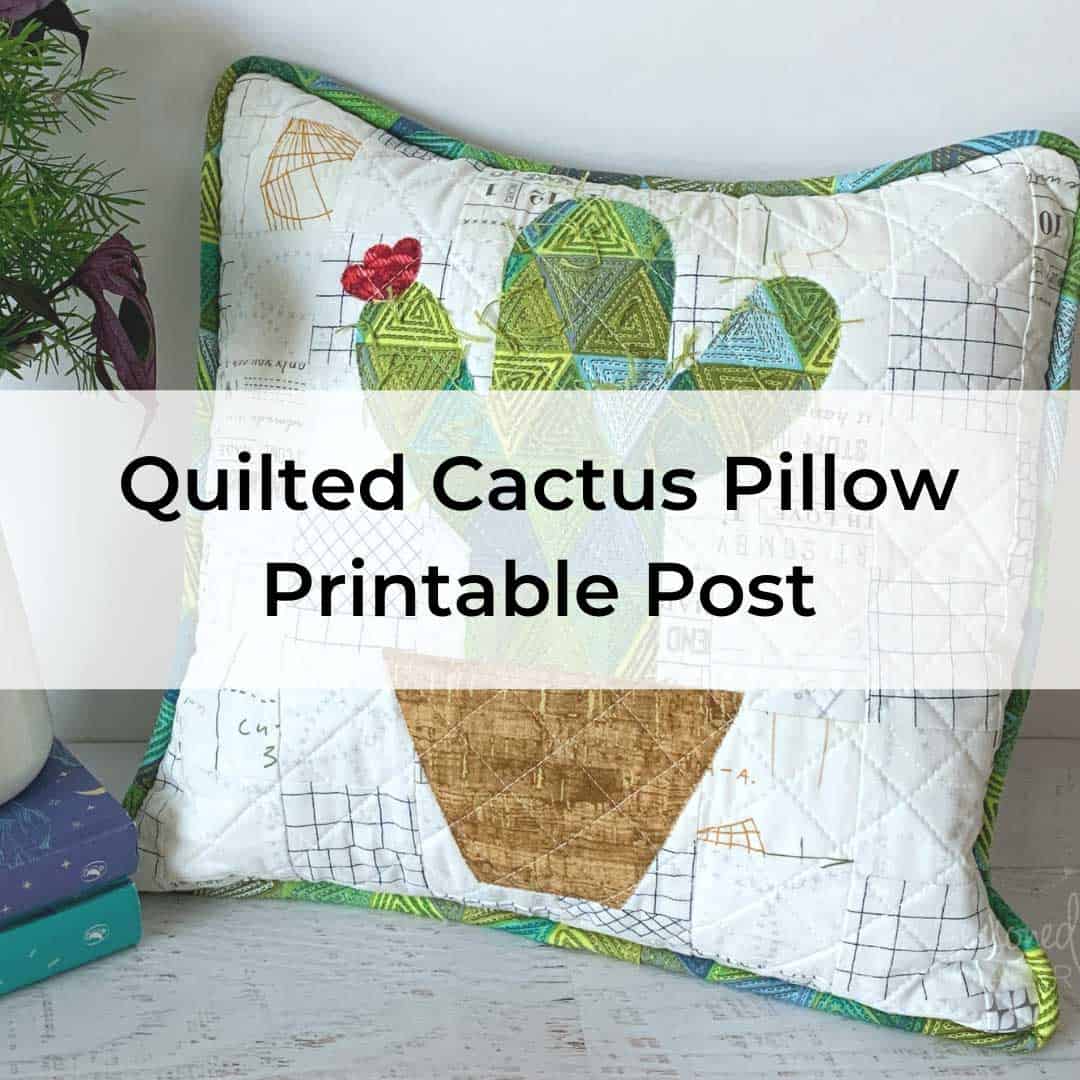
Quilted Cactus Pillow Tutorial
This post may contain affiliate links which won’t change your price but will share a commission.

Inside: Quilted Cactus Pillow Tutorial
One of the best ways to brighten a room is with pillows. And, if you want to add a bit of quilting to the room without committing to an entire quilt, then a quilted pillow is the perfect project.
A quilted pillow is also a great way to try out a new technique. And that’s what this Quilted Cactus Pillow Tutorial is all about.
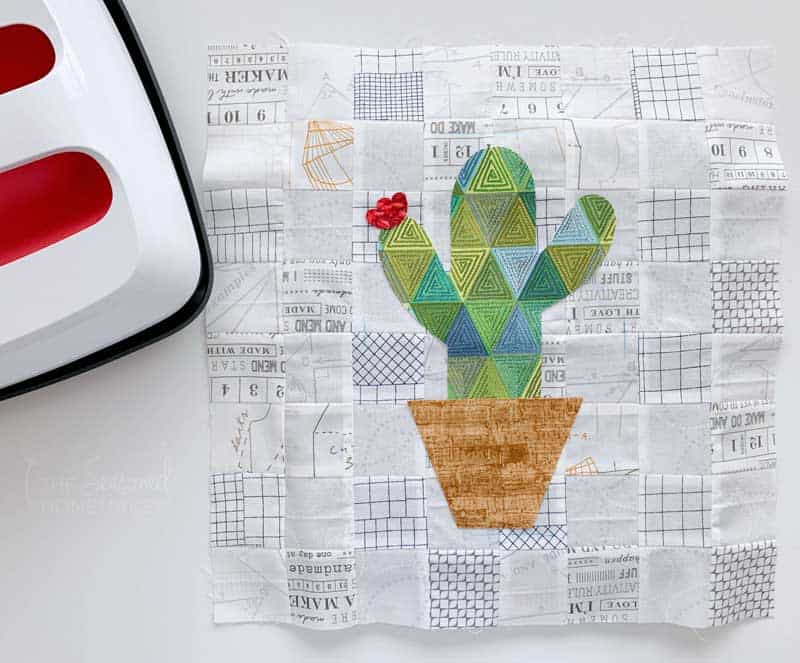
It uses the Strip Piecing technique and low volume fabrics to make the pillow background and then adds a little whimsey with a festive cactus appliqué.
Best of all – it’s easier than you think.
>>> Want an ad-free, printable copy of this tutorial? Scroll to the bottom of this post for more details!
How to Make a Quilted Cactus Pillow
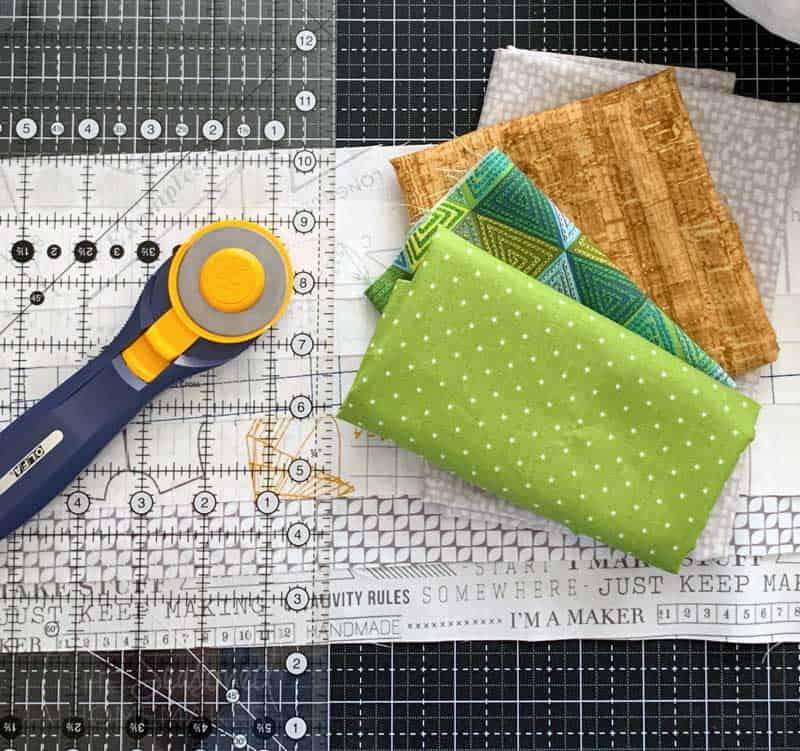
Materials
- Mr. Cactus Applique Design Set
- (8) 2.5″ x 20″ Low Volume Fabric Strips
- (1) 18″ x 20″ Fat Quarter for quilt top backing
- (1) 18″ x 20″ Fat Quarter for pillow back
- Fabric scraps for applique design
- Lightweight Interfacing
- 13″ x 13″ pillow form
- 1 pkg. Clover Wonder Fuse
- Superior MonoPoly Thread
- Green Embroidery Floss
- Fusible Batting: 24” x 24”
- Aurifil 50 wt. Cotton Thread
Supplies
- Sewing Machine
- Quarter Inch foot for your sewing machine
- Water-Erasable Pen
- Wonder Clips or Straight Pins
- Walking Foot with a guide
- Rotary Cutter with sharp blade
- Acrylic Ruler
- Self-Healing Rotary Cutting Mat
- Iron & Ironing Board
- Large Square Ruler (optional)
Making the Quilt Top
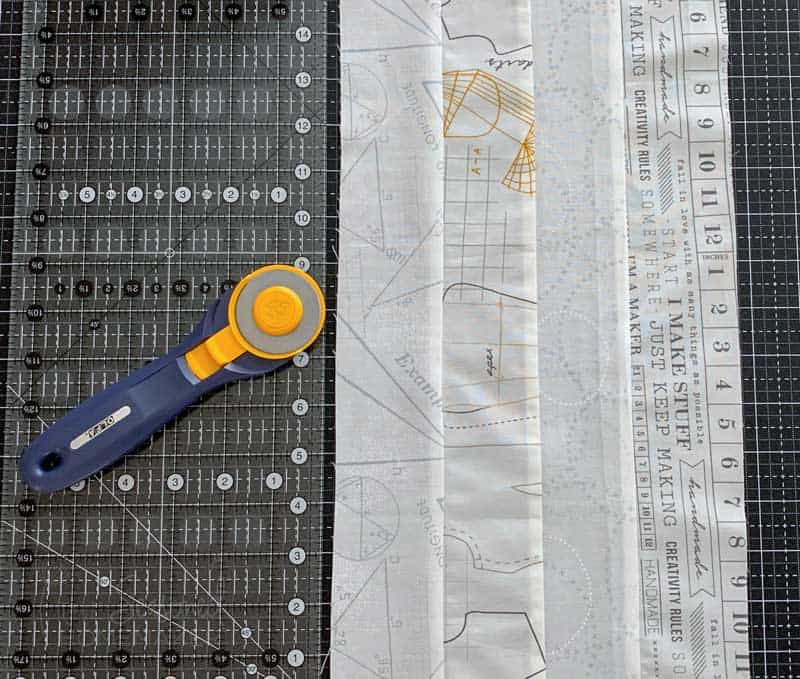
Step 1: Assembling Strip Sets
Note: If you’re unfamiliar with strip piecing, see this tutorial on Strip Piecing Basics before beginning.
- Strip piece the low volume fabrics in sets of four following the directions in the Strip Piecing Basics tutorial.
- Be sure to mix and match your low volume fabrics. One way to do this is to pair the strips in a lighter/darker pattern.
- Press all of the seams in one direction.
Repeat these steps so you will have two strip sets that are 8.5″ x 20″.
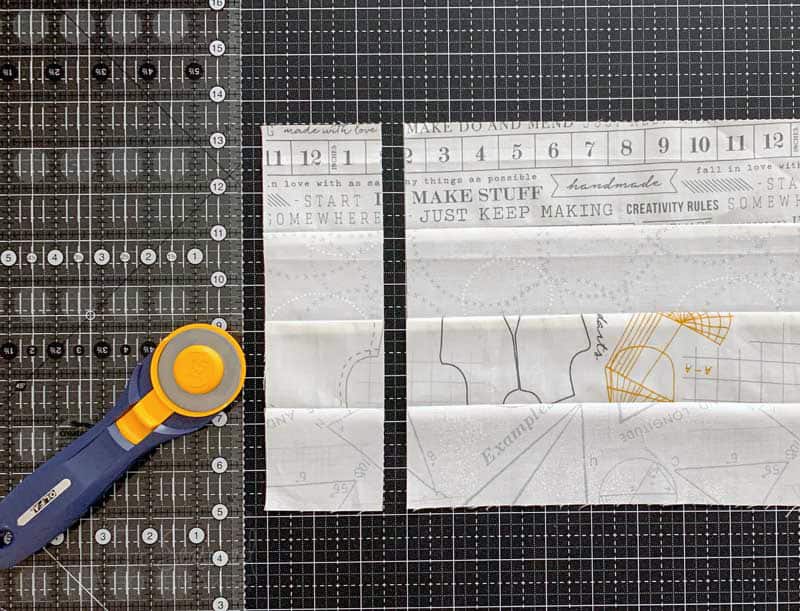
Step 2: Sub-cutting Strip Sets
Sub-cut the strip sets into 2.5″ x 8.5″ sub-sets.
You should be able to get 8 sub-sets from each strip set. Repeat this for the second strip set you cut in Step 1.
You should now have a total of 16 sub-sets that you will reassemble into (4) 8″ quilt blocks.
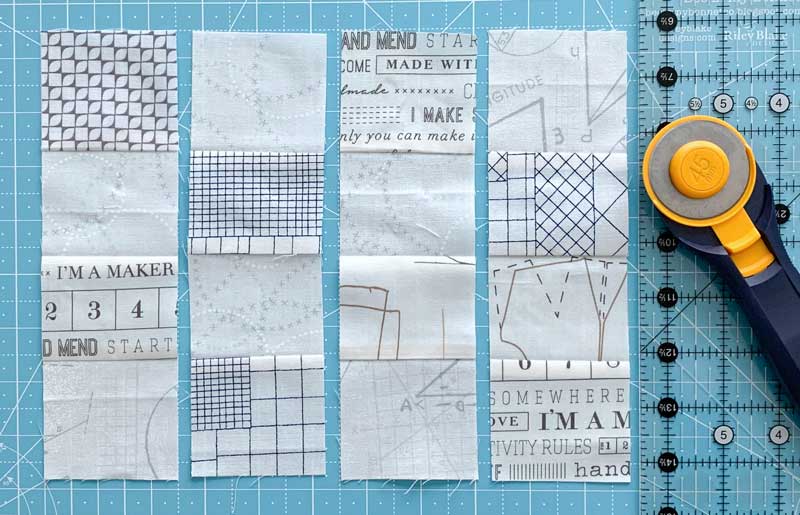
Step 3: Rearrange & Sew
- Rearrange these strip sets so that when lined up the same pattern isn’t touching.
- Sew together four sub-sets using a scant 1/4″ seam allowance. Be sure to nest the seams.
- Repeat until you have 4 strip set blocks.
Pro Tip: If you’ve pressed your seams correctly they should nest beautifully!
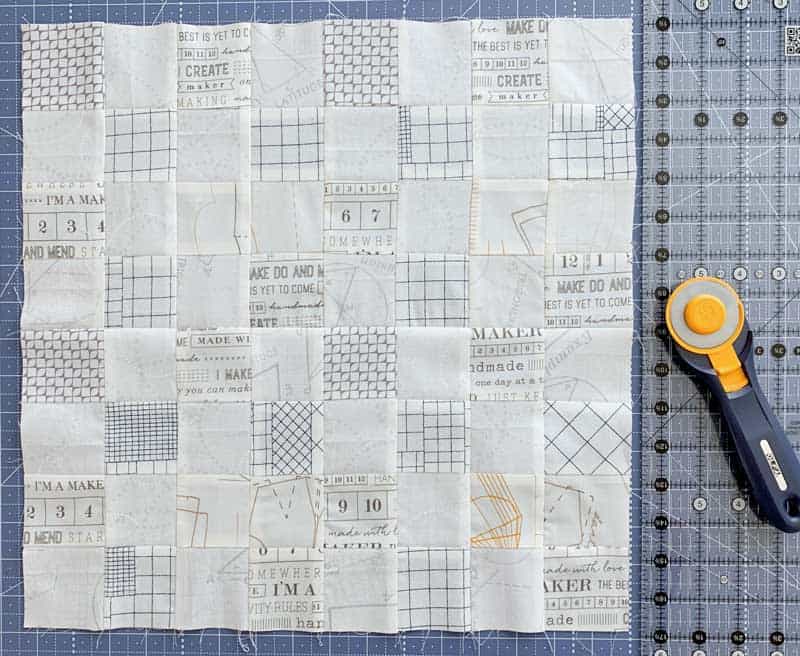
Step 4: Create Quilt Top
- Arrange your four 8.5″ blocks in such a way that the exact same fabrics don’t touch.

- Using a scant 1/4″ seam allowance, sew the four strip-set blocks together in rows.
- Sew the two top blocks together to create a top row. Press the seam allowance in one direction.
- Sew the two bottom blocks together to create a bottom row. Press seam allowance in opposite direction.
- Set your stitch length to 1.5mm. Using a scant 1/4″ seam allowance, stitch the top row and bottom row together. Press this seam open to reduce bulk.
You should now have a 16.5″ x 16.5″ quilt top. Note: Don’t worry if the quilt top is a little smaller than 16.5″ x 16.5″. You will be trimming it down after quilting.
Set the quilt top aside and move on to the appliqué steps for the pillow top.
Note: If you choose not to add an applique, skip to the Quilting the Pillow Top section.
Appliqué the Cactus Design to the Quilt Top
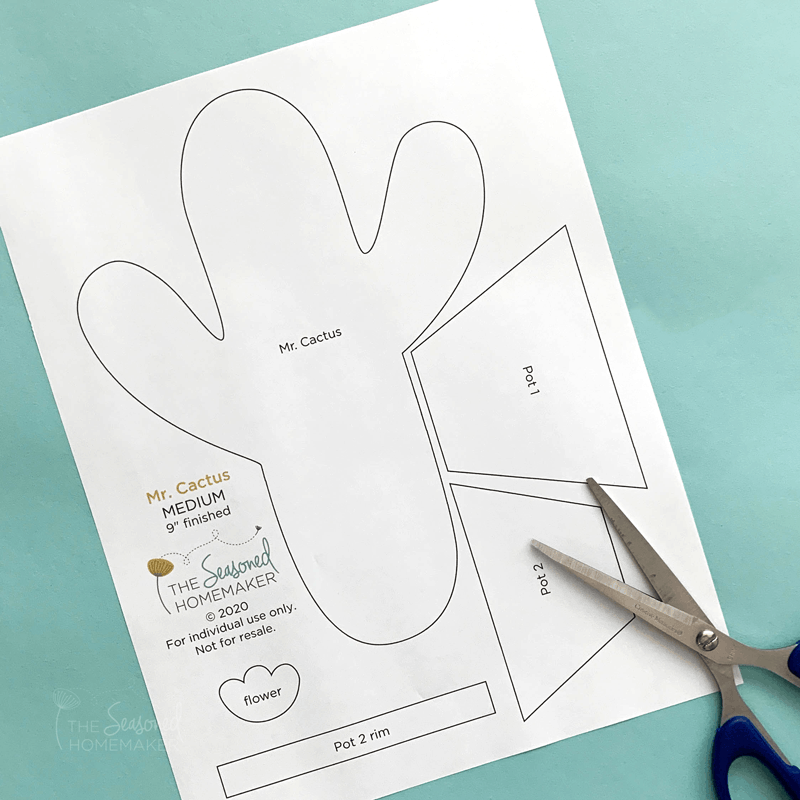
If desired, you can add an applique design to your quilt top. I’m demonstrating with my Mr. Cactus Applique Design Set.
Hand-Cutting Instructions
Step 1: Preparing the Designs
Hand cut your appliqué designs using these traditional methods. Watch this short video on How to Appliqué or learn more about appliqué with my eBook Appliqué Made Easy.
Optional Cricut Instructions
Note: This step is optional.
I cut out all of my designs on my Cricut Maker. For more detailed information about cutting out appliqué designs on a Cricut Maker, please see the tutorials below.
Cutting with the Cricut Maker
- Load the 9″ design set into Cricut’s Design Space software.
- Mirror the cactus design (if desired).
- Fuse Clover Wonder Fuse to the wrong side of your fabrics
- Place fabric right side down on Cricut’s Pink FabricGrip Mat
- Choose “cotton” for your Set Material.
- Follow Design Space cutting instructions
- Use Clover Wonder Fuse for the fusible adhesive. It’s a softer, light-weight material that will not make your pillow stiff or uncomfortable.
- Be sure to “mirror” your cactus design.
- Trace the different designs onto the paper-backed side of the Wonder Fuse. Rough cut around the design(s), leaving a 1/4″ margin.
- Fuse the design(s) to the wrong side of your fabric.
- Cut out the designs on the traced line.
Step 2: Placing the Appliqué Designs
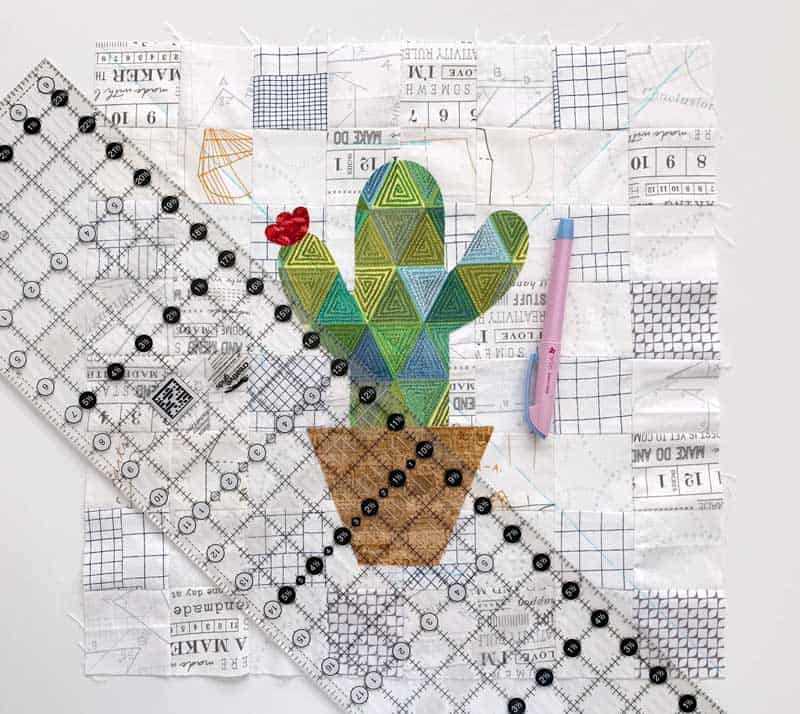
- Using a water erasable pen, map out the design placement on the quilt top fabric.
- Determine where you want to place your cactus, pot, and flower. Keep in mind, you’ll be trimming this down after you quilt. Be sure to leave a few inches at the top, bottom, and sides of the design to allow room to square after you’ve quilted.
- Place the designs shiny side down.
- Using a dry iron or the EasyPress 2 (305º for 20 seconds), fuse the designs to the top fabric. Let cool.
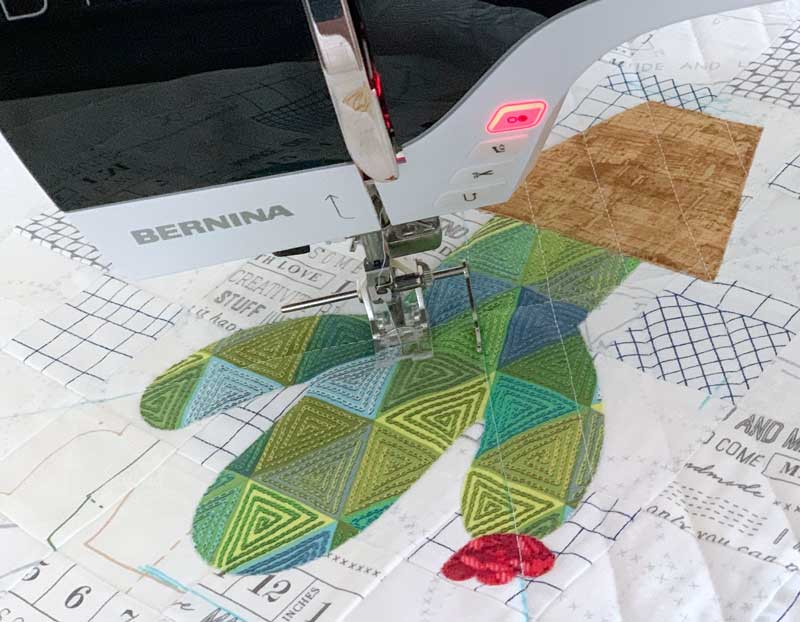
Step 3: Stitching Down the Design
Since this project is for a pillow (versus a wall hanging), I recommend stitching down the appliqué design.
For this step I used Superior Threads Mono-Poly Thread invisible thread. This thread is nothing to be afraid of – the key is in changing the tension setting on your sewing machine and using your ZigZag Foot or an Open Toe Foot.
Here’s the secret to using the Mono-Poly thread. You have to lower your sewing machine tension. This will take a little fiddling around. For me I found that lowering my tension to 1.5 worked perfectly with Aufil 50 wt. thread in the bobbin.
Next, you’ll want to use a very narrow zigzag stitch. Lower your zigzag stitch length and stitch width to 1.5 – 2.0mm.
Before stitching down, I recommend you practice a little to make sure your tension is set correctly.
Of course, you could use a straight stitch, regular zigzag, or even a satin stitch. See this tutorial for a few different options.
Note: I made a quilt sandwich for the pillow top before I stitched down my design. I did this so my design would pop out a little more.
Make a quilt sandwich using fusible batting. Fuse the batting by pressing the front and back with a dry iron or the EasyPress. Be sure your quilt backing and batting have an additional 1-2″ margin around your quilt top.

Quilting the Pillow Top
For this quilt top, I recommend quilting a diagonal design.
- Using a water erasable pen, draw a diagonal line from corner to corner in both directions. You will now have a large “X” on your quilt top.
- Attach the Walking Foot (if available) to your machine.
- Set stitch length to 3mm.
- Stitch from one corner to the next.
- Place the guide 1″ away from the first stitching line and stitch. Continue in this direction until quilted from left to right.
- Turn the quilt top and repeat on the opposite side.
- Once quilting is completed, use a Large Square Ruler to trim down pillow top to 14″ x 14″. Be sure all sides are evenly spaced so your design is centered.
Adding the Cactus Spines (optional)
If you want to add dimension to your pillow, add a few cactus spines. For my spine thread I used an Olive Green Aurifil Embroidery Floss, but DMC embroidery floss will work as well.
- Use the different diamond shapes in the quilting to determine where to place your spines.
- Pull a small length of thread from the back to the front.
- Tie off using a square knot.
- Trim the spines thread to about 1″.
Note: Double your thread for more visible spines.

Making the Pillow Cover
You’re now ready to turn your quilt top into a pillow! For this section I’m sending you to another tutorial which goes into more detail about how to make an envelope pillow.
Follow this tutorial to turn your quilt top into an envelope pillow. How to Make an Envelope Pillow. Note: This tutorial has directions that include French Seams which could be bulky with a quilt top – especially if you decide to add piping. You can skip the French Seams and just zigzag or serge your edges.
Follow this tutorial if you want to add piping to your pillow. How to Add Piping to an Envelope Pillow. Note: For the pillow on this page I’ve used a (#2 size) 1/4″ piping cord; however, the pillow in the tutorial uses a (#1 size) 1/2″ piping cord.
>>> Want an ad-free, printable version of this post? Click the pink button below and download the Printable PDF instructions.
This tutorial is so fast and easy. Once you get the hang of making the low volume, strip-pieced background fabric for your applique projects, then you can create unlimited possibilities.
Below are a few other projects you may want to try.