How to Gather Fabric and Make Ruffles
This post may contain affiliate links which won’t change your price but will share a commission.
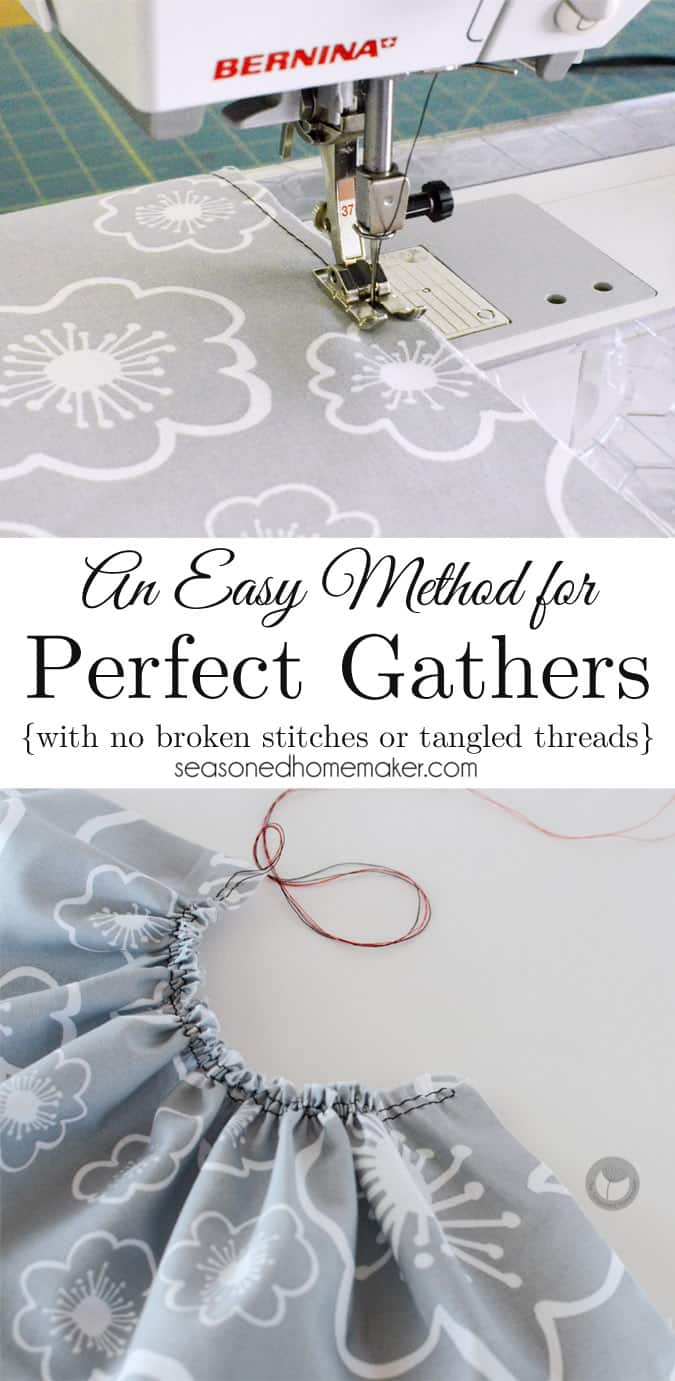
Ever want to know the secret of How to Gather Fabric or need to know How to Make Ruffles.
A few weeks back I did a post on How to Gather Fabric with a Serger. Today, I’m going to show you a fail-proof method on how to gather fabric using any sewing machine.
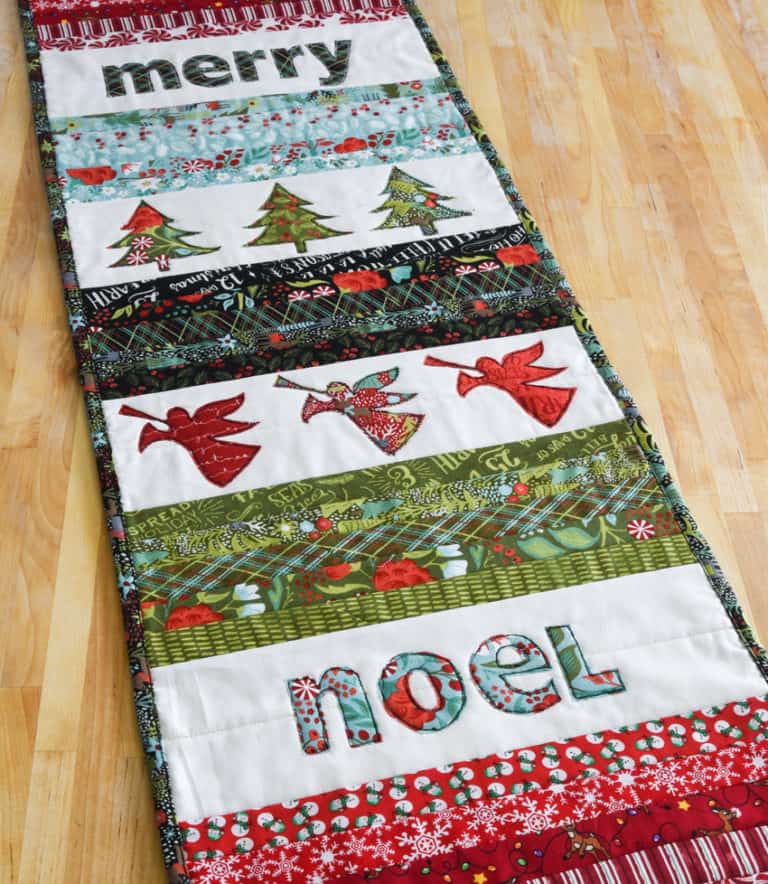
Soon, you will be adding ruffles to everything.
Gathering fabric couldn’t be more basic to sewing. It is essential to know how to gather if you want to sew ruffles. Gathered fabric adds fullness to sleeves, necklines, ruffles, aprons, pillows, and any number of other sewing projects.
Before I learned about gathering on a serger, I hated gathering. I had learned the standard method that has you set the machine on the longest stitch and sew two parallel lines.
This method can be a little problematic. The reason: either the thread breaks or gets knotted when pulling up gathers. I have been known to entirely pull the thread out and have to start over again. This method makes it hard to get nice, even gathers.
I have tried to outsmart the gathering genies by using a gathering foot to make ruffles {too much trouble}. I have tried using a ruffler to make ruffles {too much math}.
Recently, I was chatting with my Bestie and she described a gathering technique she had seen in a recent sewing class. I was instantly reminded of having seen this demonstrated a while back and forgotten all about it. So, no more keeping this tip hidden away.
How to get perfect gathers every time.
Step 1: Change the stitch length on your machine.
Set your machine to the longest stitch length. My machine has a default stitch setting of 2.5 mm and the longest stitch length is 5 mm.
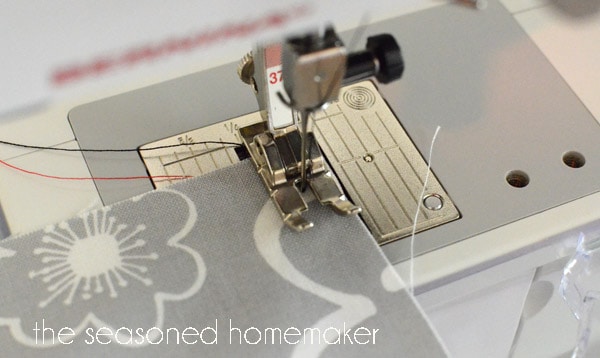
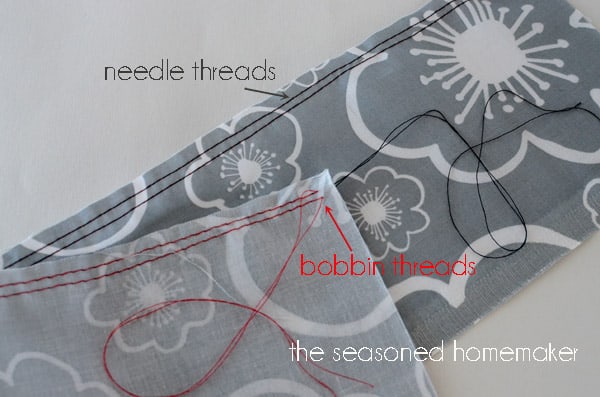
Step 2: Use a different colored thread in the bobbin.
This might seem odd, but it reminds you which thread is your bobbin thread. When you pull up the gathers you will thank me for this one. For this demonstration, the bobbin thread is red and the needle thread is black.
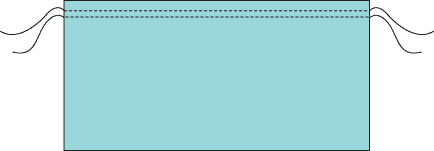
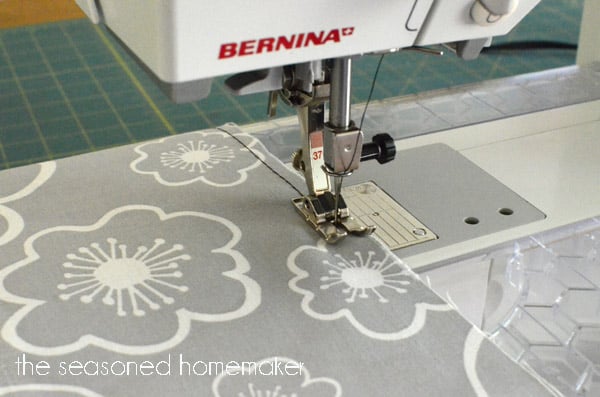
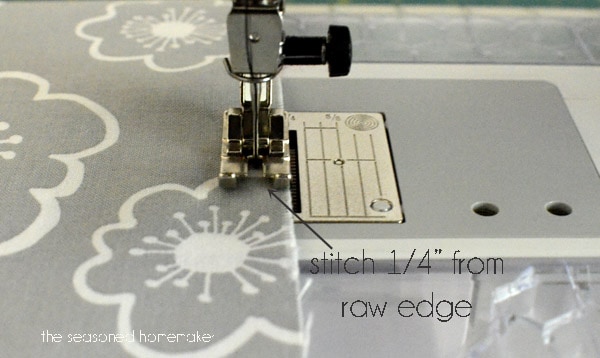
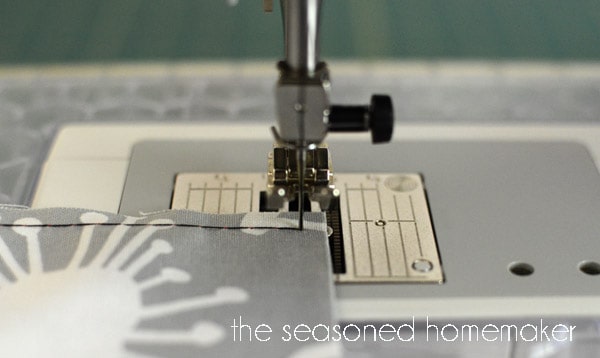
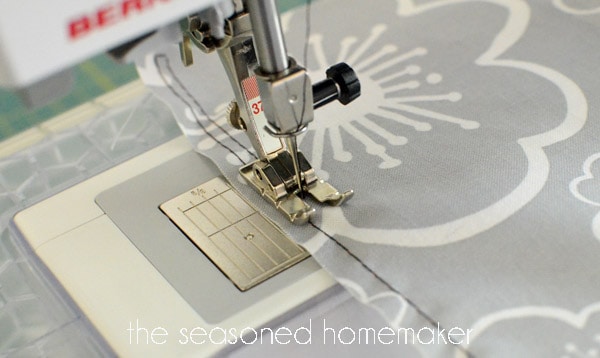
Step 3: Sew a straight stitch 1/4″ from edge of fabric.
Most machines are marked with a 1/4″ seam allowance. Use this as your guide.
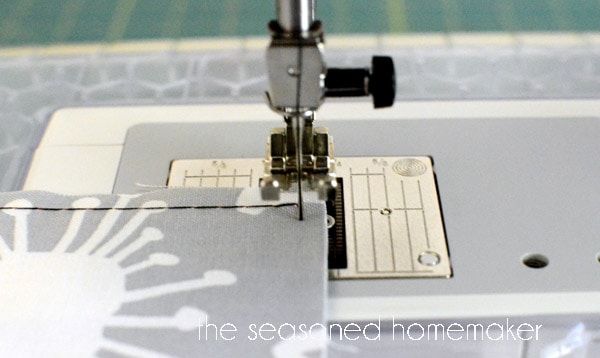
Step 4: About 1/4″ from the end, stop and drop the needle into the fabric.
You will need to guess-timate on where to stop. Try to get as close to the end as possible without getting off the fabric.
Step 5: Raise the presser foot and pivot the fabric to the right.
If you’ve never done this, it is very simple. While your needle is dropped into the fabric and the presser foot is raised, carefully pivot the fabric to the right. The bottom edge of the fabric will now be on the right.
Step 6: Lower the presser foot and take 1 stitch.
That’s right, take ONLY 1 STITCH. One.5mm.stitch.
Step 7: Drop the needle into the fabric again and raise the presser foot.
After taking 1 stitch, drop the needle into the fabric like you did in Step 4. Once the needle is in the down position, raise the presser foot.
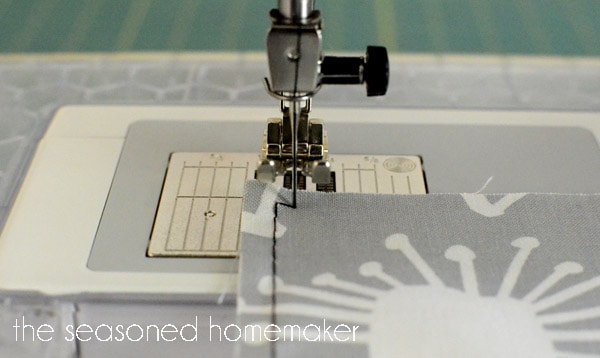
Step 8: Pivot the fabric to the right again.
With the presser foot raised, pivot the fabric to the right again. Just like you did in Step 5. You will now be ready to sew a line parallel to the first one.
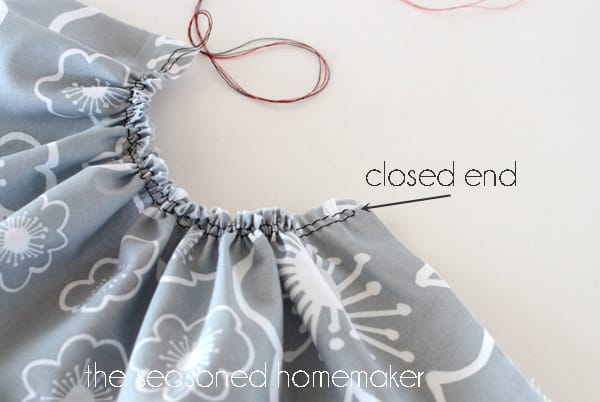
The second gathering line will now be exactly 5mm from the first one and the end will be closed. This makes the stitching line 3/8″ from the raw edge. Since most seam allowances are 5/8″, the gathering threads won’t get into the seam allowance.
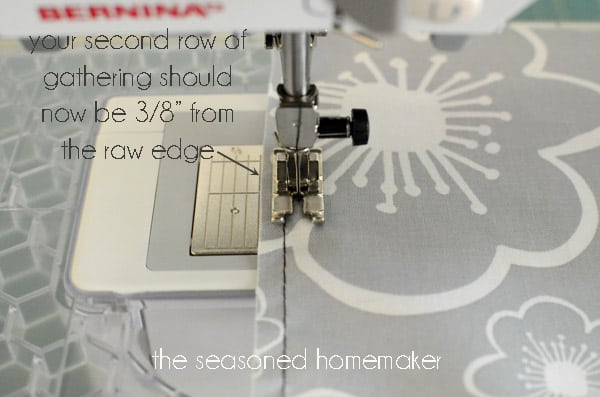
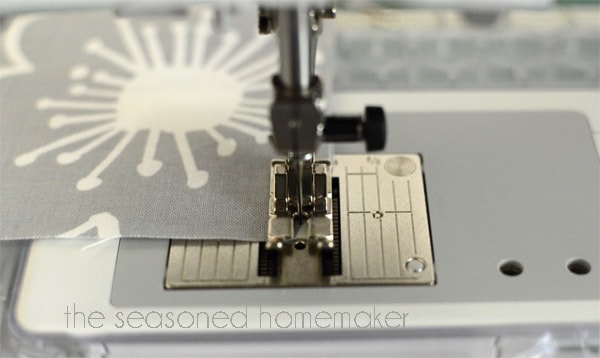
Step 9: Sew a straight stitch parallel to the first one.
It’s very important to keep your stitching lines parallel. If they get too close you will have uneven gathers. If they cross over, you will get knots and have to start over.
Notice the closed end where you pivoted the fabric. This will be important when you pull up the threads and gather.
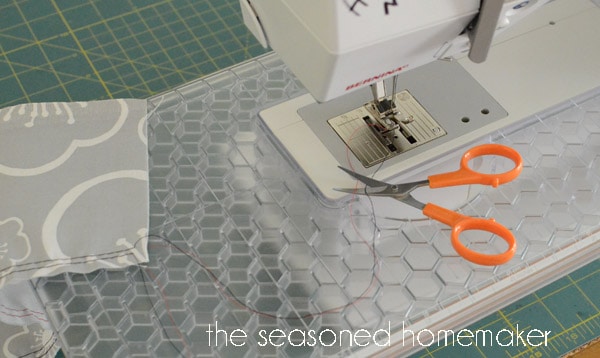
Step 10: When you reach the end, clip the threads leaving a 7″-8″ thread tail.
You will now be back where you started. Lift the needle to the up position, raise the presser foot, and pull the fabric off the machine. Leave a thread tail at least 7″-8″ long.
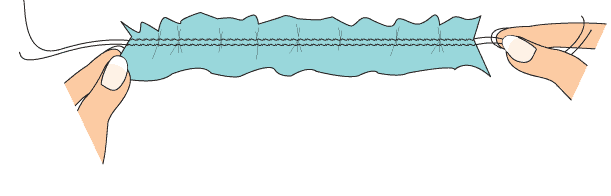
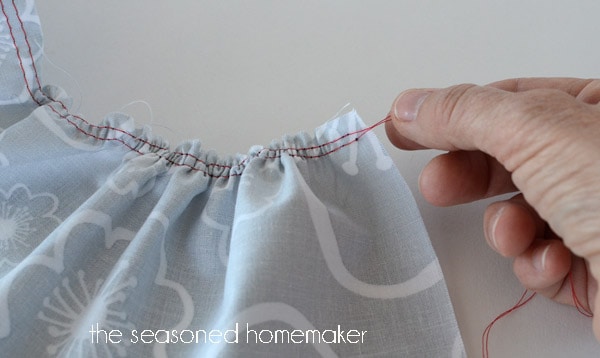
Step 11: Gather the fabric by pulling up the bobbin threads.
One of the secrets to successful gathering is to only pull the bobbin threads. This is why I like to put a different color in the bobbin when gathering. It makes it easier to remember bobbin threads only.
Carefully pull the two bobbin threads {red} and form even gathers. Push the gathers towards the closed end of the stitching. Be sure to pull the threads evenly for clean gathers.
This method will make perfectly even gathers every time. Because you created a closed end, you will never pull the threads through and lose your gathers.
Press the gathers with steam and they will be ready to ruffle.
Perfect every time.
Holy cow Leslie! My mind has just been BLOWN. I prefer to use the serger now for gathering because it also finishes the raw edge but, this technique is pretty awesome. Like I said, mind blown.
(also, your tutes are always so clear! thank you for them! i always learn so much from you!)
Thanks for love:)
Can I use this method to get vertical gathering at intervals on a valance that I am planning to make?
I would give it a try. It should work, but I’ve never tried this.
Beautiful gathers–easy and I like that there is only one set of those pesky tail threads.
I have a question though…what does it look like when the gathered piece is stitched to the flat piece of fabric? If the inside gathering thread is 3/8″ and the seam allowance is 5/8″, doesn’t the stitching flatten out those lovely gathers? I have always assumed that the reason the inside line of gathering stitches was on the seam line was to preserve the rounded look of the gathers.
Great point. Whenever I press my gathers, this doesn’t really effect it.
Two things:
1. If you prefer your stitches closer to the seamline, then take 2 stitches after pivoting.
2. Because the bobbin thread is a different color, it is easier to pull it out after gathering.
I can’t wait to try this. I have a serger that was given to me but I can’t seem to get it right. So this is a blessing thanks
Thank you for this. I was doing it the first way and always running into problems! Wohoo, I can’t wait to try this neat trick out 🙂 Krista @ A Handful of Everything
Leslie, I’m excited to see this post, because I just got a sewing machine and need all the help I can get! Thanks so much for sharing this and am pinning! Have a wonderful week!
A new sewing machine ~ how awesome 🙂 I am working on a new sewing series that will begin very soon.
This may be an odd question , but I’m new into sewing with a sewing machine … in the picture where you were showing the 2 stitched lines and you said to pull the bobbing thread to gather, after this do you just tie it off or just trim the thread and your done ? Did that make since
There really is no need to tie off or trim. Once you’ve pulled up your gathers and then attached that piece to your project they will stay in tact. I usually pull out my gathered stitches after attaching the piece.
Wow! Genius! I’ve never seen this before but it looks like it would work so much easier and less stressful than the ‘tradtional’ method.
Thanks for the lesson.
KC
I was wondering about gathering a very long ruffle to go on a child’s dress. Should I sew the parallel lines in sections—in this case there are four sections of the ruffle fabric and four small parts of the dress—rather than one very long sewing line? Thank you for the lovely tutorial!
I’d do it in for small parts. Otherwise, you could end up with broken or tangled threads.
Great tutorial – great pictures. You do such an excellent job explaining technique and giving instruction. As always, thanks.
Thanks so much for this great tip! I get so frustrated when making gathers and will be sure to try your technique. Pinning it, too!
This is SO COOL! Pinning this! Thank you so much for sharing!
Oooh! LOVE the tutorial! Thanks so much! Pinned. 🙂 Stopping by from Adorned From Above’s Linky Party. 🙂
We’ll I’m coming here a little late but that doesn’t mean that this article isnt incredibly helpful!!! I’ve about to embark on a period chemise, corset and petticoat and I don’t even know how to stitch a gather – LOL! Wish me luck, I’ll need it! Thanks for this tutorial, really appreciate the info!
Great tutorial. I have had the same journey as you with gathering. I can’t wait to give this a try. Thanks so much for sharing with Wednesday’s Adorned From Above Blog Hop.
Have a great week.
Debi and Charly
http://www.adornedfromabove.com
The BEST how to on gathers i’ve ever read! I’ve used every method out there.
I usually zigzag over thin cording and pull away. Easy but i’ve had this method
pull through by snapping the threads where I sewed it down.
Thank you!
Awesome tutorial! Thanks for such detailed directions. Pinned to my Tips Board. I’m a novice with the sewing machine and this will help so much! Thanks!
Why haven’t I ever thought of that? I hate gathering and I don’t like using my ruffler because it always gathers too much. I’m trying this on my next sewing project. Thanks for sharing at Project Inspire{d}!
What a great trick to have the gathering end closed…my grandmother showed me that and it does work!
Love this idea! I will be doing this next time. Thank you for sharing!
We love your blog and this post and all agree to feature it this Sat, May 18th so that more women will learn about some of what you’re doing here.
Come visit again on Sat!
Sue
I love the tutu bags! They are tutu cute!
So glad I found this! I’ve tried so many times to ruffle and not been successful so far! Pinning and trying this soon 🙂
This is a very good tutorial. I always wondering how to do that.
Thank you so much!
Ellya
I have been gathering for years but this so so smart. I am changing my ways starting today!
With Love,
Scary
PS. I am following your site to see what you make next.
Thanks for this very clear tutorial. We use a little attachment called a ruffler but what it does is actually make small pleats. I own a serger but haven’t done anything with it yet. It seems daunting with all those threads… Linda
I have a ruffler – and hope to get around to adding it into the series. Don’t be confused by the serger threads – it’s easier than you think.
This is a great how to! Pinned it! Thanks for sharing at All Our Days.
For the short time I have been subscribed< I have learned so much from you. Like anything< years of experience makes all the difference…thanks!
This is brilliant! How I have never come across this before in 40 years of sewing, I don’t know, but you have just made sewing 4 skirts for my daughters bridesmaids so much easier! Thank you!
Best wishes to the bride ~ and her mother!
What a great post with so many tips! Thanks for sharing!
That tutu tote is adorable – Reagan would love it!
I’m just beginning to sew and this tutorial was great, especially since I really want to make some of those cute ruffle pillows I see all over pinterest. Pinning this tutorial now.
I do not know the first thing about sewing, my mom would not allow me to take Home Ec. in school! Thank you so much for joining us and sharing at Best of the Weekend! Pinning to our party board, and we hope to see you again on Friday.
Leslie what a great tip! Thank you so much for sharing at ITS PARTY TIME. Pinned & shared via G+. xoxo
I am make a flower girl dress using nylon chiffon. On the bottom of the skirt a ruffle is supposed to be attached. However, the ruffle is sewn directly onto the right side of fabric and sewn overtop the gathering stitch (I am a novice “sewist” so I may be getting terms confused here). Do you think I could still use this method for sewing my ruffle onto the skirt? Thanks!!
Thank you for the tutorial, I used this technique today and it worked brilliantly. Making a pelmet for my new grandbaby who is due next week! Nursery curtains and quilt complete!!!
Congrats on the new baby. I had no idea what a pelmet was – had to google it!
I came to check out the tutorial after seeing it mentioned on NoTimeforDIY.com. This is genius and will be tried in my next project. Thank you for sharing!
Your tutu purses are so cute! Thank you for this tutorial. I am novice and I am trying to make a tutu skirt to layer over a dress. I want it to be ruffled, but I also wanted to do strips, so I could a) use different colors amongst one another and b) use the tie-on method versus sewing. I’m guessing after reading this that this would entail A LOT of work, as I’d have to ruffle each strip before tying it onto the crocheted elastic band? Thanks for any tips!
A rainbow tutu sounds fab! Try this. Stitch nearly to the end of one strip all bar a couple of stitches, put your needle down and lift the pressure foot. Place the next strip right up against the needle, next to the strip you have anchored down, then put the foot down again and carry on stitching. You might find it easier to do the last stitches/first stitches by turning the wheel by hand so you’re going really slowly (or use the slow stitch facility if your machine has this). You’ll need to hold the fabric to keep it straight for a few stitches too.
You’ll soon get the hang of it with just a little practice, it’s easier than it sounds!!
Happy sewing 😀 x
Thank you for this method! The (seemingly) miles of fabric on the costume skirt I’m working on zoomed right up to gathered neat and tidy! I was ready for hand sewing or going crazy.
Thanks for this tutorial. I’m going to try it it on my granddaughter’s Easter dress right now.
Just pinned this from pintrest! So much easier than how my MIL showed me I quite sewing because I just got frustrated. Thank goodness for people like you who give us written and visual guides!
Is there a formula for how much fabric is needed to obtain a specific finished length? I want to make tiered skirts, but have no idea how much of each fabric i need.
I was wondering the same thing, hope someone answers!
Say I need 30″ of ruffle- what length of fabric should I start with to account for the gathering? Of course, I realize this will vary based on how tight the gathering is, but even a guess would be helpful 🙂
Yes, it varies. But, the rule of thumb is 1.5 to 2 times the desired length. So 30″ of ruffle would need 45″-60″.
<3 LOVE this – looking forward to more learning on your site – us Leslie's need to stick together
Thank you! I am new to all things sewing. These tricks make sewing much less scary. I almost passed up a project because I didn’t know how to gather.
I learned this in high school back in the 60’s. It really does work. HOWEVER, you need to keep your seam allowance in mind. If you are using a 5/8 in seam allowance, then sew on 4/8 and 6/8. Then when you sew your 5/8 in seam it’s perfectly in between the two gathering stitches. This is a true sewing tip that works and the results are wonderful.
Hi Leslie,
Thank You for sharing this awesome technique!
Just a quick question. Why does it matter that there is only 1 stitch at the closed end?
Thank you
You can go up to two, but it increases the stitch placement.
I Have to try this out Immediately, I have been trying to do ruffles and constantly break the Thread, or when I pull the ruffles down the Thread breaks leaving me frustrated .
I am making a bed skirt for a king bed out of a thicker then cotton silk on one side satin on the other home decor fabric. I tried the technique on a long scrap and broke the thread. Any ideas? All I can think of is using a thicker bobbin thread or doing the stitches for gathering in sections. Appreciate the help!
It’s possible you need a heavy duty needle which can handle heavier thread.
I can’t wait to try this!! So simple. I want to love gathering, but I.always.dread.it.
OMG!!! This was do simple! I struggled for a couple of days trying to get the gathering. Thank you so much!
Hello Leslie,
I found your blog while searching for a tutorial on how to gather to include in a post on my blog, and I am so glad I did. I have always used pins to hold the loose threads from pulling through, but now I have a new way of doing it and am sure my readers will find this so much easier. Thanks so much for this great tutorial.
Have a blessed day!
SallyAnn
HI Leslie!! I also have always used the messy old-fashioned way of winding the threads from the gathering of one end onto a pin! I had to do a lot of gathering of a skirt today so found your suggestion on google – what a revelation!! I can assure anyone who is reading that I immediately tried the method described by Leslie and it is really perfect – saved me a lot of time and frustration!! Thank you very much Leslie…
Hi Leslie,
So, I don’t need elastic to make perfect gathers? My seamstress used elastic and the fabric doesn’t really gather. When should you use elastic? Thank you!
Elastic isn’t for gathering, it’s for waistbands and sleeves.
I have always done gathers with a needle and it has been a lot of work. Thanks for showing me how to do it with the sewing machine.
Thank you so much for this very clear tutorial. I’m a very beginning sewer. Did I read in one of the comments that you pull out the thread after? Do you happen to have a tutorial for the next step…when attaching to something? 🙂
This is amazing!! Thank you for sharing your knowledge.
Fantastic. Thank you for sharing
Thank you so much! This is fantastic! I have never tried anything like this before and I was able to do it first time! You’re the best!
What a great idea!!!!
Great tutorial – I learned something new. I have been sewing for a long time and have never heard of this way to do gathering but am definitely going to try it on my next project for my granddaughter. Love your visuals – makes it so easy to understand.
Fantastic technique – I hope I remember this when I have to gather.
I have been sewing about 35 years. I have always used the traditional two row method to gather. I don’t use my serger, don’t use the dental floss method, haven’t used the highest tension method. This time I am actually blown away. I am TOTALLY going to do this on my next project with gathering. MIND BLOWN.
What a brilliant idea! I shall certainly use this method in future, thanks for sharing :-D. I find it also helps enormously if the tension on the top thread is loosened a little – this helps the fabric slide into the gather more easily (put the tension back to normal as soon as you’ve finished gathering or you’ll forget it’s been changed!)
Thanks too, by the way, for your fab tutorials – your perseverance with them is greatly appreciated!
All best wishes
Joyce
My mother taught me how to do this when I learned to sew in the 60s, except that we left both ends open. I like your way better.
Another easy way to gather, which I learned from a Nancy Zieman book, is to zigzag stitch over a thick string (like crochet thread). Use a fairly wide and long stitch.
It is also much easier to gather if you use a heavy duty (hymark) thread in the bobbin. That way, you have a lot less danger of breakage while you are pulling your gathers, and also the difference in the thread textures makes pulling easier!
Worked like a charm… First time… best . tip . ever! Thank you
After having sewed for over 50 years I thought I knew all the tricks. HOWEVER, why has it never occurred to me to leave a stitch at the end of the row instead of leaving threads and starting a completely new row? So simple and so brilliant. I need to gather something!
This is GENIUS!!! I’m so glad I found this tip, one I’ve never seen r heard of. I’m making an apron that has lots of ruffles, it’s the third one. The first I used the standard 2 parallel lines…hated it, the second one I used zig-zag and dental floss, it was a cinch but my gathers kept slipping! I have a feeling this method will work just dandy, thanks for sharing!!
Thank you for making this awesome tutorial! I’ve been asked to make a pinafore for my niece and I want to make a fancy-ish one, ergo ruffles. I’ve never done them before and I never thought I would want to … but here I am and it looks so easy and it will add so much character to anything! I’m very excited 😀
I haven’t sewed gathers in decades. I needed a refresher. this method worked perfec and was ez!
I just started sewing. Your instructions and illustrations is so clear! Thank you!
I never leave comments – but this ‘how to’ has just saved me. First time making gathers for my son’s nativity costume and first time success! So simple – thank you! 🙂
Thank you! Seriously made my life so much easier as I’m making a ruffled tree skirt and will need to make many layers of ruffles.
Thanks so much!
Thanks, I am inspired, starting to sew after many years, forgotten much
Regards
Cheryl
Thank you so much. It is easily understood how this is done.
God bless u and ur loved ones. Thank u ao much for sharing this amazing tip. A real life-changer. ?
This is a pretty great tutorial. I have been struggling with gathering. So much so that I just received a gathering foot that I purchased online. I am going to give your tutorial a try and share it to FB and Pinterest.
What if you have already sewed the seam of a skirt and you are trying to gather with your Fabric in a circle?
You need to become good friends with your seam ripper.
I am a beginner sewer and I have been dreading to try ruffles. I have read many ways to try this but your method seems to be the best way. Thank you so much for your easy to follow instructions and the pictures to follow along. I can’t wait to try this!
Thanks for this really helpful tutorial. How would you do a long ruffle though which needs to be closed and fit around the edging of a cushion?
Hmmm. You would probably allow the ends to meet up in the same way you would do piping – where it overlaps, crosses, and comes off the edge.
I needed this! I’m 17 and making my Senior Prom dress, which has a LOT of gathering involved. Thank you!
Did you know there is a Facebook group called Simple Sewing with The Seasoned Homemaker. I know everyone would love to see the finished prom dress.
Wow, why didn’t I think of that !!!!
Thank you- this sounds so easy, I’m certainly going to try it.
You did an excellent job of explaining how to gather material Got it done in no time at all. Thank you
this is so awesome, thanks so much!! I’m trying to figure out how to pin this on pinterest lol…
If you hover over the first image you’ll see a Pin button on the top in the middle. Click and Pin!
This is amazing! I hate gathering, because I always break threads. This worked perfectly on the first try!
I have been trying to get a ruffle on some hankies for an apron. Your idea is perfect. Worked like a dream Thank you so much.
Thank you for this tutorial, I used it on a baby dress I was making and it worked perfectly! I am a beginner and this was easy even for me! Thanks again!!
Wow! I’ve never seen anyone gather like this! It looks super easy and I will use on my doll clothes!
Would this method work on tule?
Yes, but you will need a ballpoint needle. Also, you’ll need to sew slowly.
THANK YOU! I have to do a gather (three actually) for a jacket i’m making in my sewing class and this looks WAY easier than what my teacher told me!
Thank you so much! I am making an Easter basket and have been so intimidated by the ruffles that it has been sitting for five years! Your directions are so easy to follow. I’m really excited to finish this cute project for my granddaughter!
Super. Desperately inept at sewing BUT need to make a costume with a gathered skirt! Wish me luck. And thank you. Regards.
Good luck! You can do this. It’s just sewing.
I’ve been looking for an easy to follow and understand tutorial for this stitch – thank you for this!!! I am an absolute beginner and I want to make some dresses for my girls, yet the patterns I have found all say to make a gathering stitch… and I didn’t get it. =)
WOW, I never gathered in my life, and this tutorial made it feel like it was so easy! my (not finished) skirt already looks amazing thanks to this ! thank you so much for not making me go through all the troubles you went through when you gathered previously! 🙂
Thank you so much for this incredible tutorial Leslie. I have always struggled with gathering and have lost count of the many rages and frustrations the procedure has engendered. This morning, following your instructions to the letter, I have managed to achieve perfect gathers and a wonderful sense of achievement. For some simple gathering, for me, life-changing! Thank you for making an elderly lady very, very HAPPY!!!! YIPEE and very best wishes – Marion.
Years later, and this tutorial is still saving lives. I make petticoats. Loads of petticoats. Long ones and short ones and anything from chiffon (so cool in summer, but you need layers for good volume) to muslin to crinoline to flannel (so warm in winter, just less gathering or you get way too much volume). And the thicker the fabric, the less I wanted to play gather….. This (and since you say only pull the bobbin thread, some upholstery thread for that to prevent breakage, since I couldn’t break that by hand if I tried) saves me a lifetime’s worth of headaches. This might even get me doing gathered skirts again instead of pleated ones. Maybe. Those pleats are just too cute.
amazing!!! thank you!
Thank you so much for this. I usually do my gathers by hand but after snapping the thread five times (!!), I felt like throwing my project in the bin. Thanks to your tutorial, I will be gathering a lot more. Thank you so much. (I particularly like to see ruffles on an outfit for an older woman – it looks cute and feminine, without being too much).
I also learnt something about sewing gathers by hand. If your material is cotton, so should your thread be. After snapping it so often, you get to ask yourself a few questions (:o).
Thanks so much for the tip. I hadn’t done gathering since high school “housecraft” lessons in the 80’s so my knowledge (along with my memory!) was at best rusty. This method has worked beautifully for me today, sewing a full length throwover beach dress. which needed a gather around the neckline.
Thank you so much for this, Leslie. Only one end to fight with. 😉
I love this illustration…wow I have lean something new here