Serger owners: Did you know you can use your serger to gather fabric? Imagine the possibilities ~ no more knotted or broken threads when you gather fabric. It will be like you’ve died and gone to gathering Heaven. Now that I know how to gather on the serger, I will never go back.
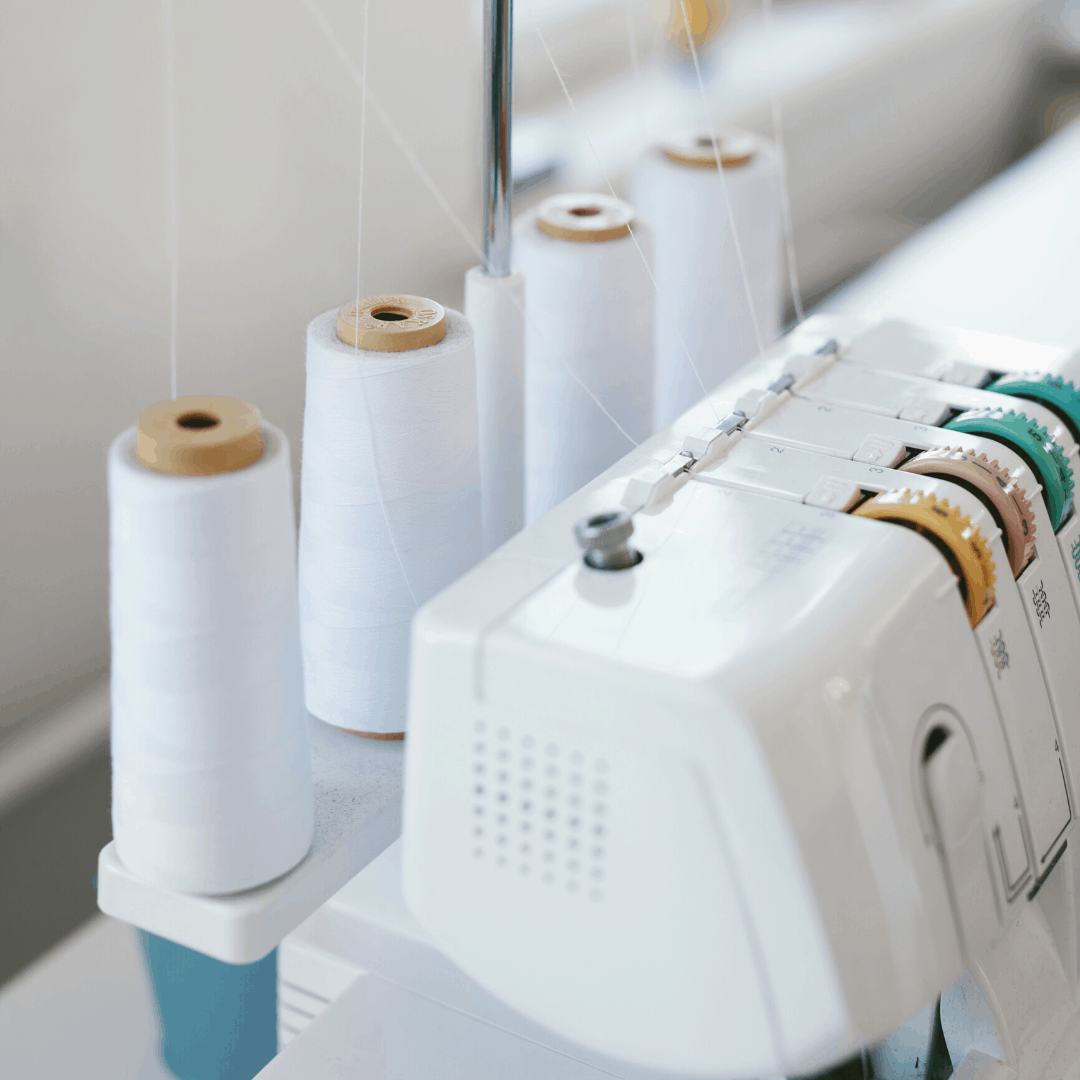
Here’s a quick recap in case you don’t really know what a serger is or what it does. A serger is a unique sewing machine that cuts fabric and finishes seams at the same time. Most sergers will do additional edge finishes such as a rolled hem. Some fancy-schmancy sergers will do things like a chain stitch, wave edge, or cover stitch.
Today, I want to show you how to use your serger to gather fabric. It is so unbelievably easy; you will never go back to sewing a double row of gathering threads. And, there are no special feet required ~ just your standard serger foot.
If you have a serger hidden away in the closet, now is the time to dust it off and put it back to work.
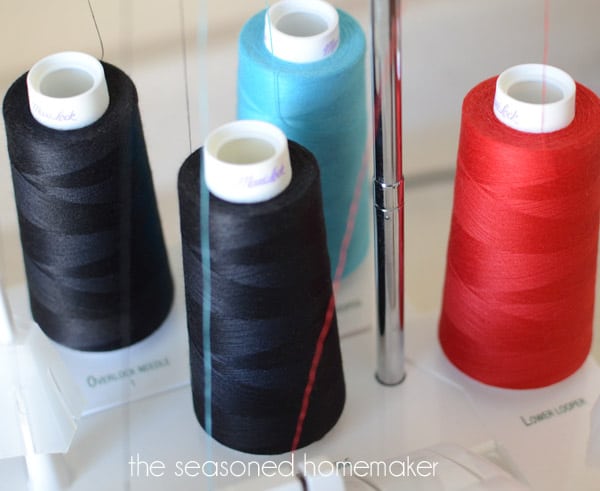
Step 1:
Set your serger for 4-thread serging.
Step 2:
Increase your Differential Feed to the highest number ~ mine is a 2.
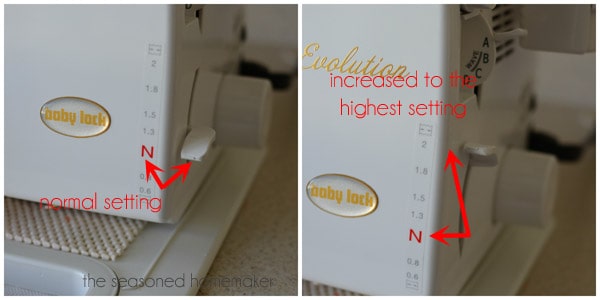
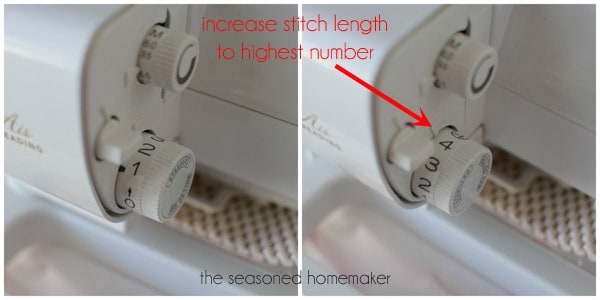
Step 3:
Increase your Stitch Length to the highest number ~ mine is a 4, but some sergers go up to 5.
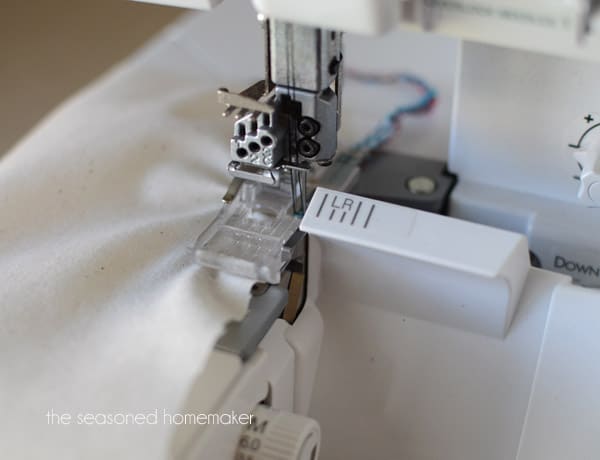
Step 4:
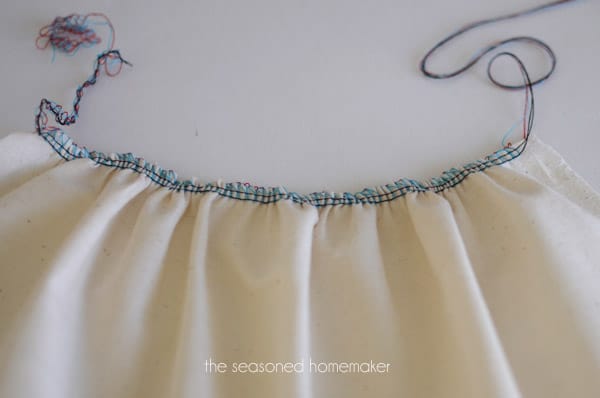
Serge along the raw edge. You will notice that it does a little gathering. This is normal.
Step 5:
Notice the two needle threads (the black threads). Near the fabric edge, put a needle underneath the two parallel threads. Be sure not to catch either of the looper threads ~ it will knot if you do. Just the needle threads.
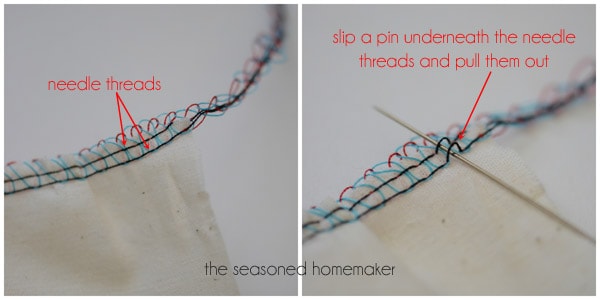
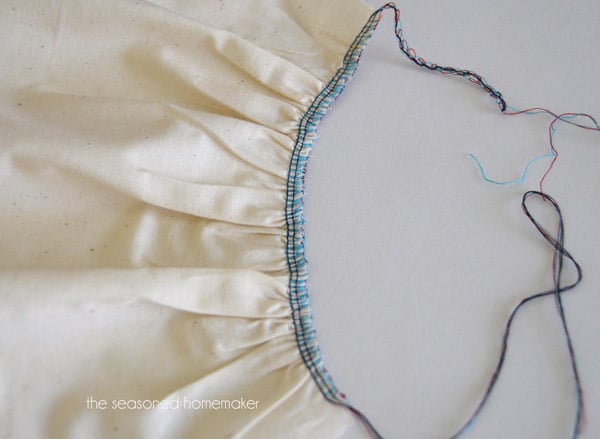
Step 6:
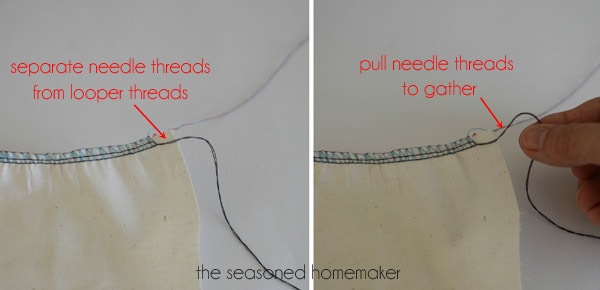
Pull the two needle threads out of the chain of threads. Do not let these get tangled. If you do this correctly, they will slip out easily.
Pull the two needle threads to gather your fabric.
Step 7:
Voila! You have nice, even gathers that can easily be adjusted and then attached. No stray threads that end up on the outside of your project. What’s not to love about this!
Sew, sew easy!


If you are new to The Seasoned Homemaker, I would love for you to subscribe to my email updates or connect through
Welcome, I'm Leslie. The Seasoned Homemaker is where I comment on all things delightfully domestic. To read more, click 


Nice tip! A real time saver…

I’ve pinned it because my serger’s teacher showed it to me, but this is a photo lesson!!! Really better
tx for sharing
MammaNene from
SergerPepper.blogspot.it
Thanks! It’s so simple, it’s crazy.
Thank you Leslie!!!
My pleasure!
I think you just changed my life.
Glad I could make a difference.
Thanks for this tip.
Glad to help.
First visit, thanks for post on ‘gathering with a serger’ haven’t ever done that
Sew, so easy ~ you’ll never go back.
Thank you Leslie!! This is great. I’ve heard of doing this before but have never tried it!
It is beyond easy.
I have a mini surge machine, do you think this would work with 3 strands? or only with 4?
I think it would work with three threads ~ be sure to separate the needle thread and pull slowly. I am going to go try this now.
I just got a Serger, my granny’s actually after she passed away, and am such a novice at using it, but I am eager to learn!! Thanks for the tutorial. Now if I could just master threading it! Also, seems my seams aren’t real ‘tight’ when I sew them, as in, when you turn it over and press the seam open, it kind of shows the stitching. Not good. Any idea what might need adjusting? Visiting from Skip to My Lou and I will be back for more advice I am sure!
Thanks!
Congrats on getting your first serger. I also own a serger I bought in the mid-80′s. I totally understand fear of threading. Consult an online guide for your machine’s threading instructions ~
Try decreasing your stitch length to see if you get tighter seams. The machine may also need servicing. Good luck.
I’ve had a serger forever and I’ve never used it for gathering … thanks so much for sharing this great tutorial. I pinned it! Thanks for joining us at Project Inspire{d}!
Thanks for pinning the post ~ I’ll be back at Project Inspire{d}.
I love this! Seriously? How did I not know this? THANKS!
You’re welcome.
Sergers can be very temperamental (at least mine can
. Thanks for this great picture tutorial. I know our readers will love it, too! We have a weekly Thursday (today:) link up party at allthingswithpurpose.com. We would love to see this post!! We are also your newest FB like
wow this seems like it would be a great one to know…but there wasn’t any pics? just writing..I have a serger but have yet to use it been reading/watching stuff on puter to know how to start to use it gotta get my confidence going
Hmmm. Not sure why the pictures aren’t coming through. Did you receive it through an RSS feed?
You are my new BFF. For real.
Awww. I can always use another friend.
Great idea! I remember being taught this in a serger class but had completely forgotten it. I enjoy making doll clothes and this will be a real time saver, especially for the dresses on the 8″ Ginny doll.
Thank you.
You’re very welcome. I never thought about doll clothes, but this would definitely be a time saver.
Do you have a tutorial on how to thread servers too? LOL I received a Janome Juno for Christmas and am still stuck. I love following your blog. Thanks for the tips. I do plan on using them soon!
I’m sorry to say I haven’t done a tutorial on threading a serger. Since each brand is a little different, I would look at the manufacturer’s website to see if they have tutorials for their different models. Also, if you bring your serger to a local dealer, someone should be able to help you with threading.
Hi Leslie
When I do gathering on my over locker (this is what a serger is called here in Australia) I do it slightly differently. The differential feed is still set to 2, you leave your looper thread tension as normal but you turn the tension on the needles UP (I set mine to about 8) and then you overlock as normal. With this method the fabric is actually gathered as you overlock. The amount of the gather is determined by the stitch length; the longer your stitch length the tighter the gathers. What I tend to do is to simply set the stitch length to it’s longest stitch and adjust the fullness of the gathers as necessary.
How to adjust the fullness of the gather – easy. I make sure I sew a long chain before I start overlocking and also sew a long chain at the end of the fabric. To easy the fullness you simply sort of ease the fabric back along the chain. Now that sounds complex but I am sure it will make sense once you actually do it.
I am not saying that this method is any better or worse than the method you currently using, simply that it is another option.
Kim
I makes sense to me. I’ve seen something like this demonstrated, too. Both methods are true time savers.
I have a very old serger that sews beautifully once I get it threaded!! It does not have the differential feed, do you think it would still work?
I’m not sure ~ why don’t you try setting the stitch length to the longest setting and serge on a scrap of fabric.
Thank you so much! I’ve been tying to gather a ruffle and threads kept breaking-I got so frustrated that I just put it away. Now, I’ve got to try this! lloks really easy.
You will never go back to the old way….I’ve never had a broken thread using this method!
Now I just need a serger!!
Wow! I did not know this, how awesome!! I will never gather on the sewing machine again! Thank you!!
I knew there were lots and lots of you out there who didn’t know this. And, it is the easiest thing ever!
Wow, I wish I’d known this years ago. Thanks for sharing. Pinning!
Thanks for pinning!!!!
Will this work with heavier fabrics like cotton duck? I make slipcovers, and making a gathered skirt is a huge pain. I’ve never used a serger but have considered getting one.
I’m sure it would. You will have to adjust the presser foot for heavier fabrics.
Oh wow, thank you….I will have to pin this so I’ll have it on reference.
Wow….this is a GREAT tip! I am going to give it a try next time I need to gather something! Thanks for sharing!