

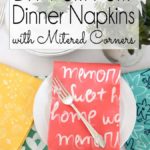
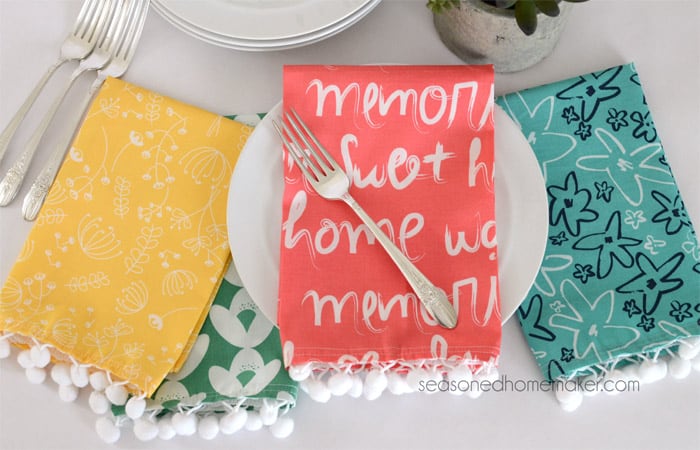
DIY Pom Pom Napkins with Mitered Corners
This post may contain affiliate links which won’t change your price but will share a commission.
I have a confession. I really love cloth napkins; and, when company comes, I like to pull them out {if I can remember}. They are practical, eco-friendly, and can be totally beautiful. I also think they make a great hostess gift for dinner parties.
DIY Pom Pom Napkins with Mitered Corners
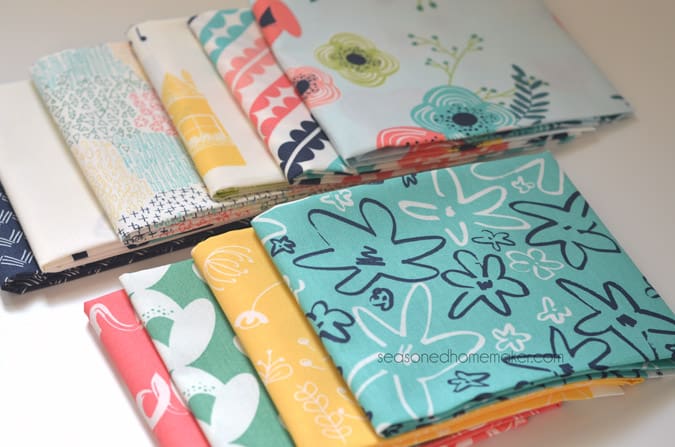
When Fat Quarter Shop sent me this gorgeous fat quarter bundle called Fun Happy Home by Sew Caroline I knew it would be perfect for a set of DIY Dinner Napkins with Pom Pom Trim.
Along with having some super cute dinner napkins, I’m also going to show you how to sew perfectly mitered corners. You can use this method to sew tea towels and table cloths as well as dinner napkins.
Also, I’m making 4 dinner napkins and saving the other fat quarters for future projects.
Materials:
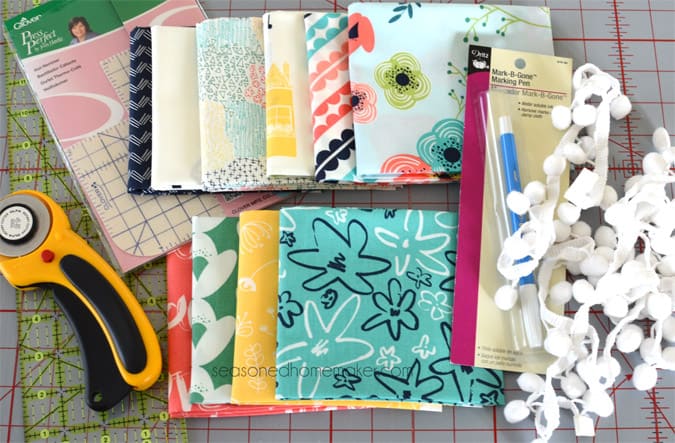
- 1 Fat Quarter Bundle
- 2 yards of 3/8″ Pom Pom Trim (Check Joann’s or Hobby Lobby)
- Clover Hot Hemmer
- Marked Quilting Ruler like this one
- Rotary Cutter
- Cutting Mat
- Water Soluble Fabric Marker
- Fray Check
- Matching Thread
- Usual Sewing Supplies (sewing machine, iron/ironing board, scissors, pins, etc.)
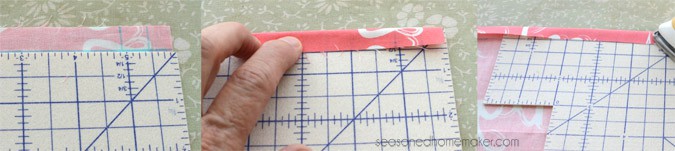
Step 1: Press & Trim
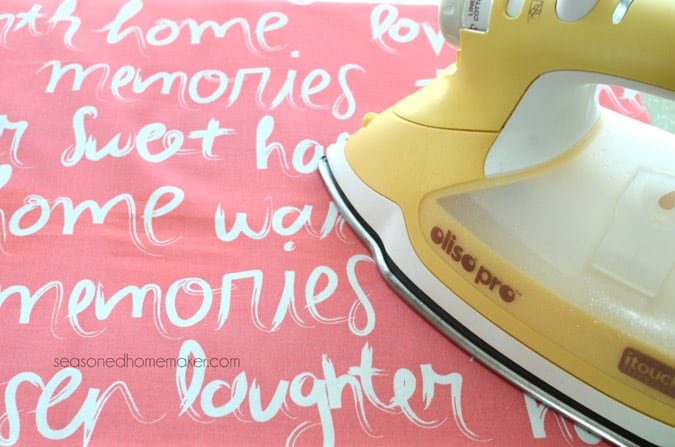
Most fat quarters come folded so press each fat quarter until there are no creases.
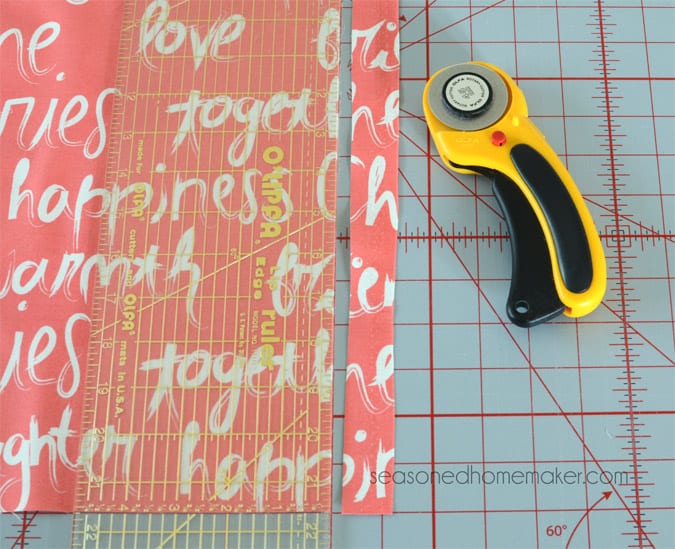
Since we are using fat quarters it is a good idea to trim them down a bit. Fat quarters are 18″ x 22″ so you will want to trim them into 18″ x 18″ squares. Be sure to trim from the selvage edge. Also, if you are using a directional print like I am then be sure that you trim accordingly. Later on we will be putting pom pom trim on the bottom edge. If you’ve not taken notice you may end up with your trim in an off position.
Step 2: Marking the Fabric
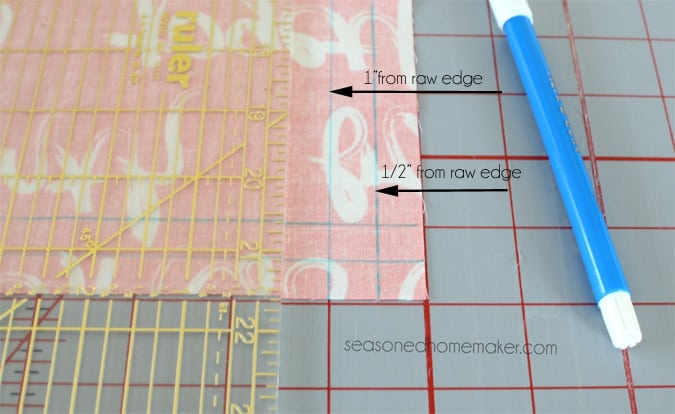
Using a water soluble fabric marker, draw a line 1″ from the raw edge. Then, draw a second line 1/2″ from the raw edge. Repeat this on all four corners of your napkin.
Using the Hot Hemmer, press under 1″ around all four sides.
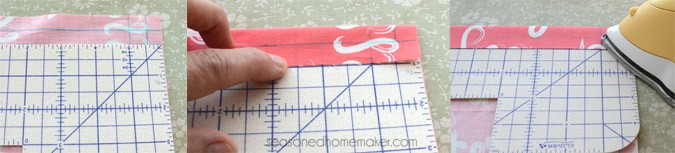
Then go back and fold under the raw edge 1/2″. {Note: The raw edge will line up with the 1″ fold.} Press under the raw edges 1/2″.
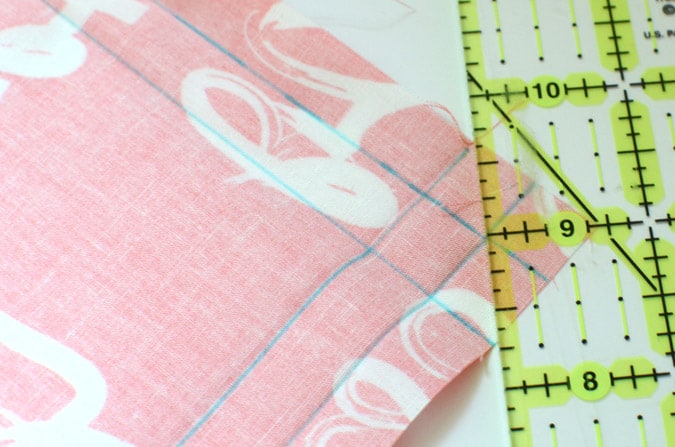
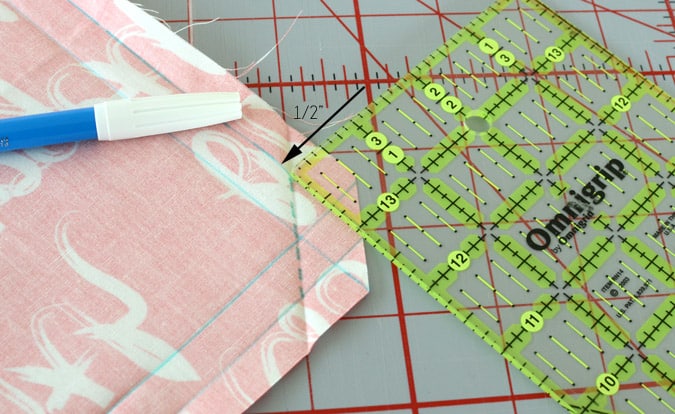
Step 3: Trim Away Corner
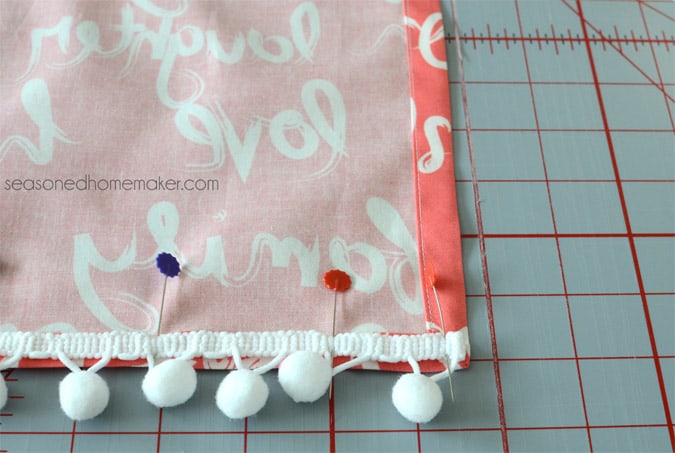
Trim away the corner. Using a marked ruler (like for quilting) precisely measure in 5/8″. Make sure the corner point is directly on the 5/8″ mark. Once this is carefully lined up, make a mark and cut away the corner. See the up close photos for accuracy.
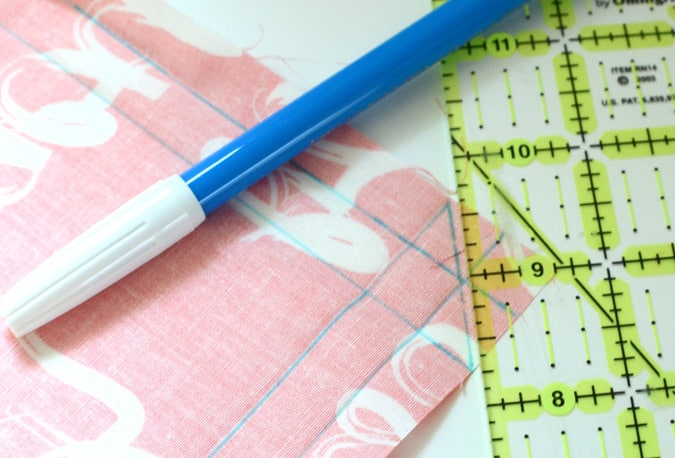
Step 4:
Fold in from the just-trimmed corner until the the the raw edge points meet with the 1″ fabric mark. This should fit perfectly and will be a 5/8″ fold. Notice how the two points from the corner trimmed in Step 3 meet the 1″ fold line perfectly! Press.

Step 5: Fold in Corner
Open the folded edge and mark a stitching line 1/2″ from each of the sides. The stitching line will NOT be all the way across.
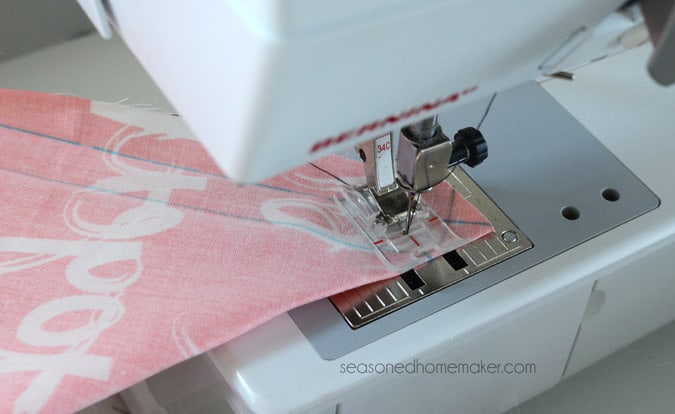
Step 6: Pin and Stitch
With right sides together, carefully pin the stitching line. Notice how my pin lines up perfectly on both sides. This will insure that you get a perfect corner.

Sew along the stitching line you drew in Step 5. {Note: I’ve used a dark thread for better visibility. I recommend using a matching thread.}
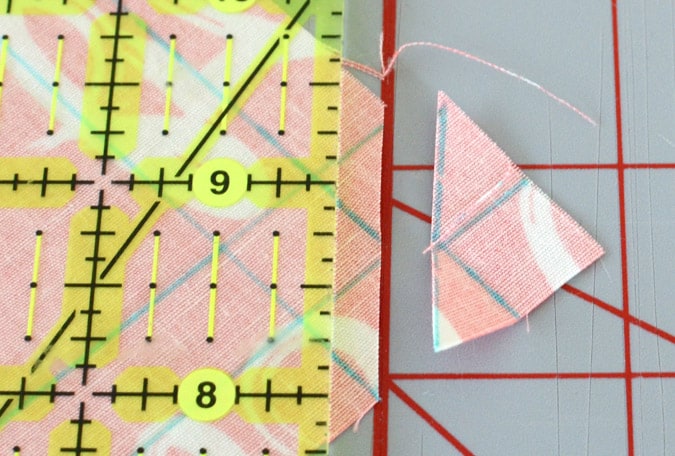
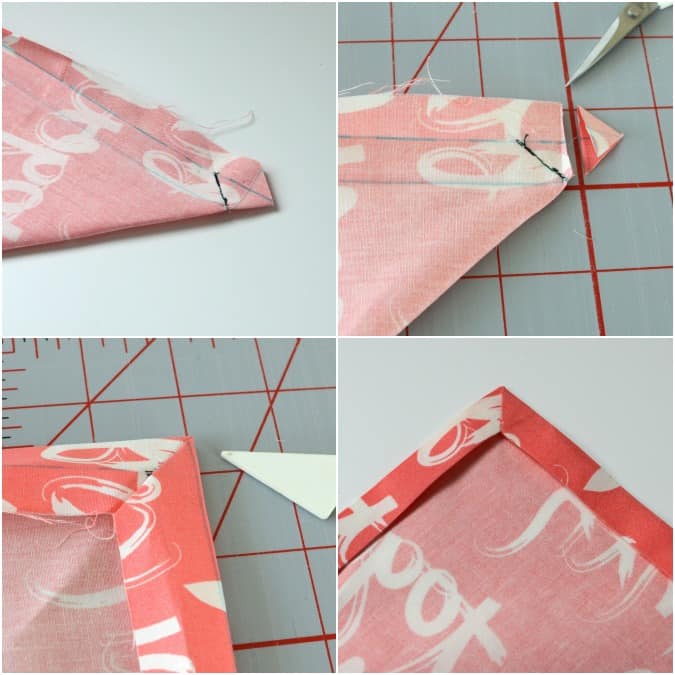
Step 7: Trim and Fold Under
Cut away the corner triangle and turn the corner right side out. Use a point pushing tool (or chopstick, knitting needle, etc.) to create a sharp point.
Fold under the folded corners and press flat. There should not be any bulk and it should fit perfectly.
Step 8: Repeat Steps
Repeat Steps 1 -7 on the other 3 corners. Realistically speaking, after one or two more corners you will be able to breeze through these steps ~ even to point of just relying on the ironed-in folds.
If you’ve used a water soluble fabric pen, take a spray bottle of water and spritz the markings. They will immediately disappear.
Step 9: Hemming the Napkins
Now that you have four beautiful mitered corners you will need to stitch them down. I prefer to use an Edge Stitch Foot to create perfect top stitching. Using a 3mm stitch length, top stitch approximately 1/8″ from the folded edge.


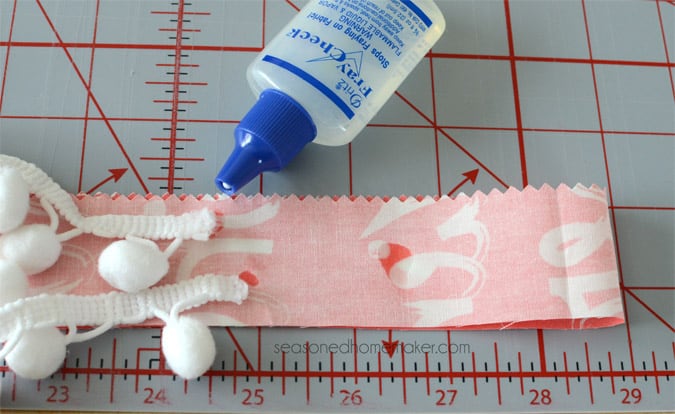
Step 10: Adding the Pom Pom Fringe
Cut a piece of pom pom trim approximately 19″ long. This will vary based on where the pom poms are place. You may need to snip off a pom pom or two in order to get the sizing right. This trim tends to unravel so secure the ends and places you’ve trimmed away a pom pom with Fray Check to prevent unravelling. Let the Fray Check dry before sewing.
Pin the pom pom trim to the bottom edge of the napkin. Be sure to pay attention if your fabric is directional (as mine is). Fold under the raw ends of the pom pom trim. Carefully stitch down the pom pom trim. Note: The pom pom trim tends to stretch when you sew it. Be sure to allow for this when stitching or it will pucker badly on the front.
Give you napkins a quick press with the iron and you’re done. Aren’t these adorable. I think they would make great gifts.
Also, a huge Thank You to Fat Quarter Shop for providing the Fun Happy Home Fat Quarters.
Great tutorial , Leslie !!!
You have broken down the entire process into such simple steps ; steps that will not require constant referencing – they are so easy to remember.
Thank you so much 🙂
Thanks Lesley. Great tutorial. Love the fabric.
Val
This totally simplifies mitered corners. I’ve been struggling with this problem for years! Now it’s cured! This works on ANY corner that needs to be squared & perfect. Thanx so much!!!
Cute, cute, cute! Great tutorial! I love cloth napkins and I make many of my napkins with mitered corners. Your tutorial is spot on, worth re-blogging. The stores just don’t have what I want and not to say if I want a little accent trim on the napkins. I share your interest. Thanks for sharing.
Leslie these are so super cute! I’m definitely going to give the mitered corner technique a try. The pom pom trim makes for such a whimsical touch. Will the trim hold up well in the wash?
Thanks for this these look really good and I like the detailed insturctions
Too cute!! I love these patterns, and the use of them as Cloth Napkins (I have the same funny adoration of them, so chic and green!) is perfect! As for the sewing tip, Oh My Goodness you are awesome!!
Thanks for sharing this! Loved it!
Found you at: A little Bird Told Me
Beautiful work. I’m into ball fringe now also. Loving it. Pinned also. Linda @Crafts a la mode
I love these! They are so bright & fun. Adding the pom-poms was the perfect touch. These would be great for a summer brunch.
That’s the most times I’ve ever seen “fat quarters” in a blog post. Haha. Never heard of that before but I love cloth napkins and would love to make some for myself. Thanks for the helpful tutorial.
The napkins are so cute! Love the pom pom trim 🙂
These make unbelievably cute napkins! I have become a huge fan of cloth napkins, but ours are rather boring. These would be really fun to put out when we have company over. Stopping by from SITS, thanks for sharing the tutorial!
I love learning how these things are done! Do you have a tutorial on how to miter corners to make a 1″ frame around a pillow?
(side note: I will be in Austin the second week in November–99% chance!!)
I love these! Those fabrics are stunning, and the pom pom edge is such a fun touch! I’m featuring these at our weekly link party! http://www.thelifeofjenniferdawn.com/2015/07/a-little-bird-told-me-link-party-148.html
Is there a print friendly feature on your projects? Love this tutorial!
What a great idea! I will have to do something about that!
These are just so cute! Thanks for linking up to the Handmade Hangout! I’ll be featuring these today on my blog when the new linky goes live at 6pm ET. Hope to see you there!
Thank you for the wonderful tutorial! I love how you made the finished mitered corners!!!
Love this tutorial ! Thanks so much.
excellent tutorial; can’t wait to try this.
These look easy and so cute
Leslie,
This is the first tutorial for mitered corner table napkins I have tried that actually worked! Your descriptions, photos and precise measurements are so helpful. Thank you for an excellent tutorial!!
Where can I find the name of the coral colored “memories” song font?
This fabric was designed by Caroline Hulse. (sewcaroline.com). You can send her an email and ask if she remembers the font, but I think she created it.
LOVE your DETAILED instructions-sadly missing in most tutorials today! I’ll be making these for sure!