Strip Piecing Basics
This post may contain affiliate links which won’t change your price but will share a commission.
Inside: Strip Piecing Basics
Have you heard of strip piecing? It’s a technique that can save you time and fabric. Learn how to cut and piece fabric strips to quickly make simple quilt blocks.
One of my favorite quilting techniques is Strip Piecing. This simple and efficient technique uses fabric strips that are sewn together to form strip sets. These strip sets are then cut into smaller units and can be used to create a variety of quilt blocks.
Because this method is so productive it saves time, money, and fabric. If you have a roll of 2.5″ strips, it’s even better.
>>> Want an ad-free, printable version of this post? Look for the Printable Post option below?
Materials & Supplies:
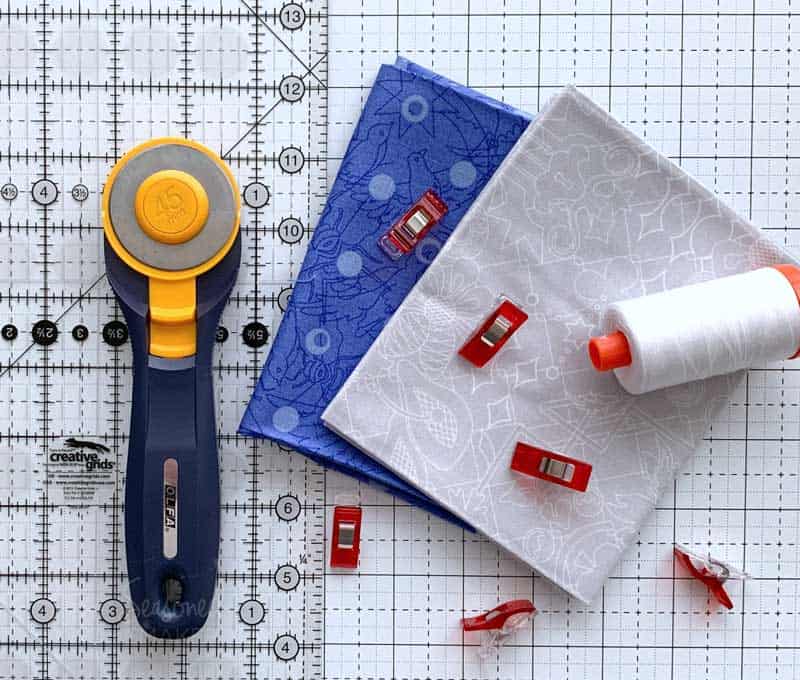
- (1) Fat Quarter in dark color
- (1) Fat Quarter in light color
- Sewing Machine
- Quarter Inch foot for your sewing machine
- Aurifil 50 wt. Cotton Thread
- Wonder Clips
- Rotary Cutter with sharp blade
- Acrylic Ruler
- Self-Healing Rotary Cutting Mat
- Iron & Ironing Board
- Stripology Ruler (optional)
Cutting the Strips
When cutting your fabric strips, accuracy is essential. This can be achieved my making sure your fabric is square because cutting even slightly off grain strips can make strip sets bow and they will not be uniform in size.
It is also recommended that you cut along the lengthwise grain (parallel to the selvage). These are the strongest threads in the fabric and will keep your strips from stretching when you sew. Learn more about finding fabric grain and squaring here.
One sure-fire way to get completely accurate fabric strips is to use a Stripology Ruler . Once your fabric is squared you place it on top and start cutting your strips across the fabric. Nothing could be easier.
Pro Tip: While it’s time-saving to cut strips that are the width of the fabric (WOF), it’s recommended that you cut them down into 21″ lengths before sewing together. Longer strips tend to bow and will eventually lead to uneven quilt blocks.
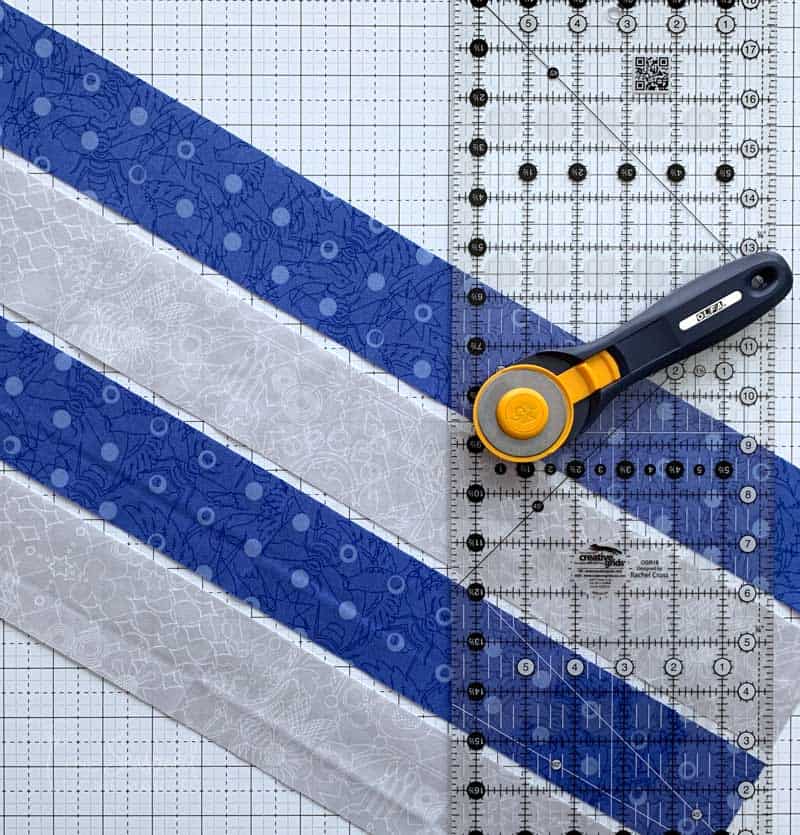
Cut the Following:
(2) Strips of 2.5″ x 21″ fabric in light color
(2) Strips of 2.5″ x 21″ fabric in dark color
Optional: If you have a set of pre-cut strips (don’t we all!), these work well, too. One thing to remember is that pre-cut strip rolls generally have fewer low volume (light color value) fabrics and more medium value fabrics. If you go this route, you may want to have a roll of lighter value strips. Also, when sewing pre-cut strips with a pinked edge, your sewing foot should align with the sawtooth edge.
Sewing the Strips Together
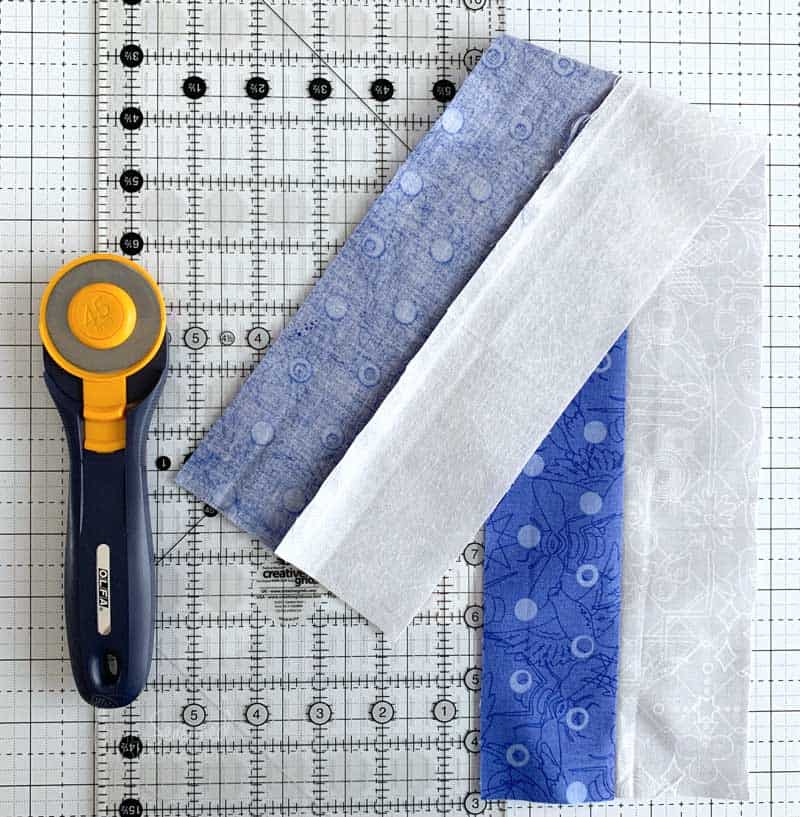
It is essential that you use a scant 1/4″ seam allowance when sewing your fabric strips together. This will ensure that the smaller units you cut from your strip sets are uniform in size. This will be important when you start connecting them to make a quilt.
Pressing is equally important. Once you’ve sewn together a pair of fabric strips, set the seam with an iron then then press the seam allowance towards the darker fabric. Make sure there are no creases in the seam line.
Once the strips are connected and pressed, it’s a good idea to make sure all of the connected strips are the same size. Do this by laying an acrylic ruler along a seam and verifying the strips are all the same size.
If using pre-cut strips, I recommend using a Walking Foot to sew the strips together since these are usually cut on the crosswise grain. They will have a little stretch which can lead to bowing.
Pro Tip: It’s recommended that you sew your strips together in pairs rather than four across at once. The reason for this is to avoid your seams bowing. It’s also a good idea to reverse your sewing direction when connecting these pairs. For instance, if you start sewing all of your strip sets at the top, longer strip sets will eventually start to bow. Instead, sew strip set pairs; and on every other pair, flip the top and bottom and sew together from the opposite direction. Voila! No bowing in your strip sets.
Step 1: Sew Strip Set Pairs
- Set your stitch length to 1.5mm. This is important because when you sub-cut your strip sets you’ll be cutting across this seam.
- With right sides together, sew a light and dark set of fabric strips using a scant 1/4″ seam allowance.
- Press seam towards the darker fabric. Set aside.
- Sew a second set of light and dark fabric strips together using a scant 1/4″ seam allowance.
- Press seam towards the darker fabric. Set aside.
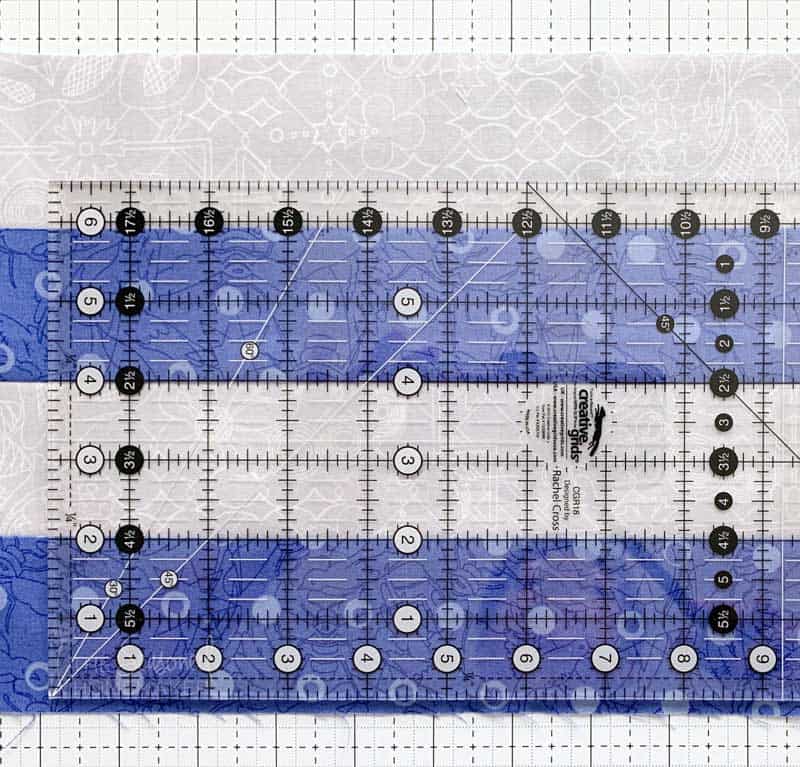
Step 2: Connect Strip Set Pairs

Pro Tip: When you place your two strip set pairs together, be sure that the seams are opposing. This means that one seam allowance points left and the other points right. Make sure your seams are nested as you connect the two strip sets because this will set up your seams when you start turning the strip sets into blocks. Doing this also helps keep your pairs nicely aligned.
- Place the two strip sets from Step 1 right sides together, matching up the light fabric to the dark fabric.
- Stitch together using a scant 1/4″ seam allowance.
- Press seam towards the darker fabric.
You should now have four strips across in a light + dark + light + dark pattern. Be sure to measure for accuracy.
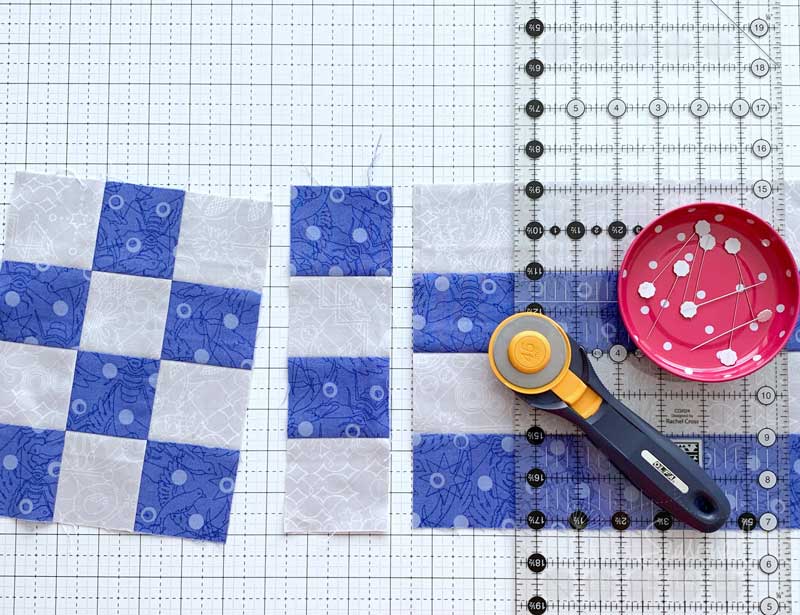
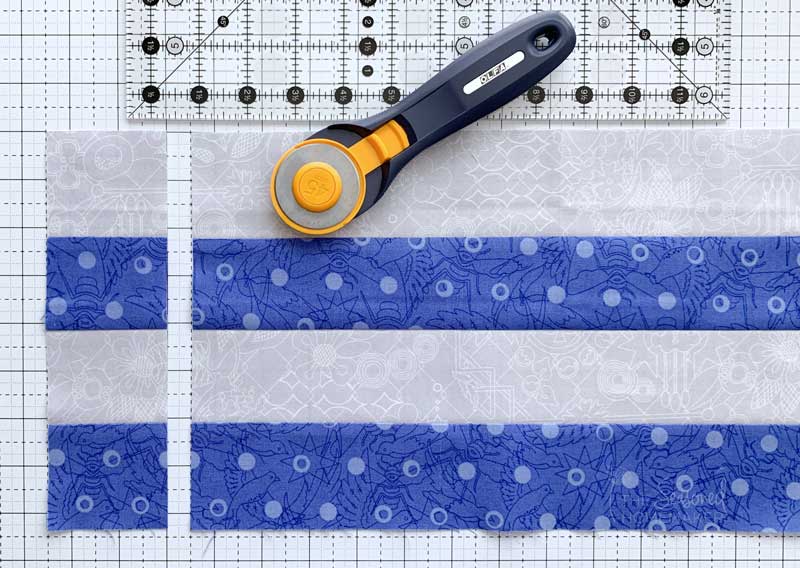
Step 3: Sub-cutting the Strip Sets
This is where the magic happens! Now you’ll begin sub-cutting the strip set. For the sake of this tutorial, I’ve chosen to sub-cut 2.5″ strips that will be flipped and then reattached.
- Sub-cut four 2.5″ units.
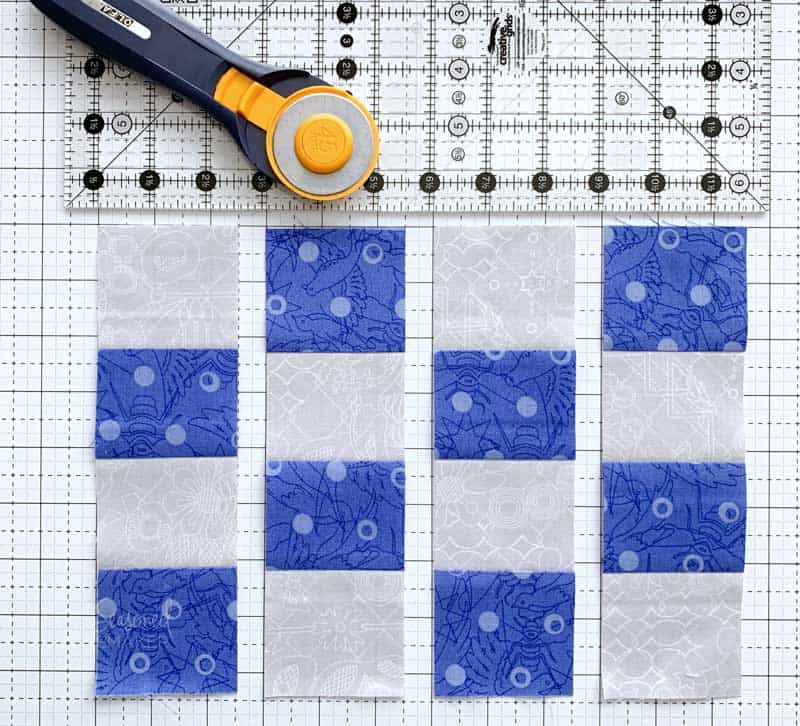
Step 4: Rearrange
Rearrange the strips to create a design.
For this example I’ve flipped every other sub-cut unit. This creates a nice patchwork design. If I had four different 4-strip sets to work from, I would be able to create a nice, scrappy quilt.
Another option would be to make my sub-cut units wider. For instance, if I sub-cut each unit to be 3.5″ (instead of 2.5″), I’d end up with a 12.5″ quilt block. Put five of those quilt blocks across and five down and you’d have a 60″ square quilt.
That’s the beauty of strip piecing.
Step 5: Sew Together
For the purposes of this tutorial, I’ve sub-cut four 2.5″ units from a four-strip set. Once assembled, I will have an 8.5″ x 8.5″ block that can be used in a quilt.
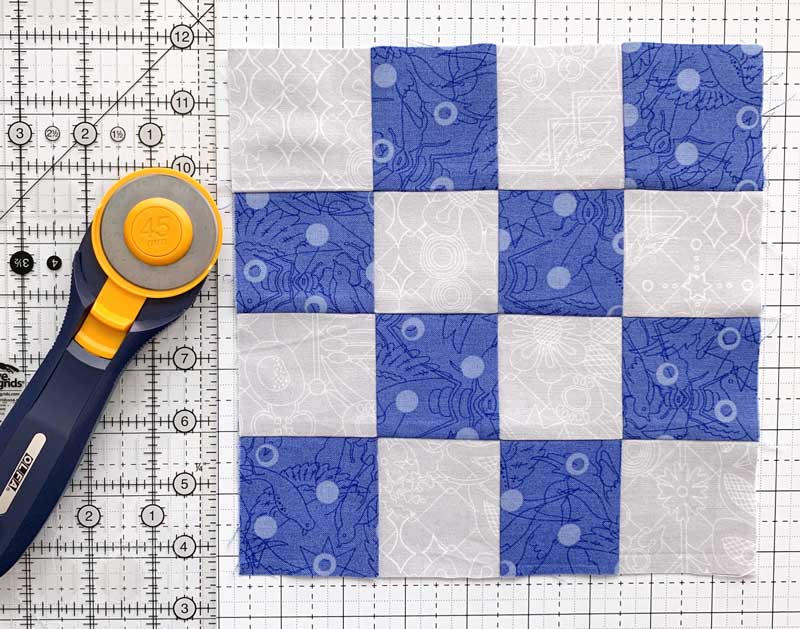
- With right sides together, nest seams and clip or pin sub-sets together
- Using a 1.5mm stitch and a 1/4″ seam allowance, sew sub-cut sets together.
- Press seams in one direction.
Note: If you’ve pressed your seams correctly throughout the process, they will all nest perfectly!

Step 6: Make a Pillow
Now that you know strip piecing basics you can create tons of designs. There are so many projects available that use this method.
Try out your strip piecing skills with this fun pillow tutorial!
Once you’ve mastered a few of these simple strip quilt projects, you should be confident enough to move on to something more challenging…like a quilt!
Strip piecing is so fast and efficient. And if you pay attention to the small details, your quilts will turn out perfectly every time.
Get the Printable Post
Want an ad-free, printable version of this post? Click the button below and download the Printable PDF tutorial.