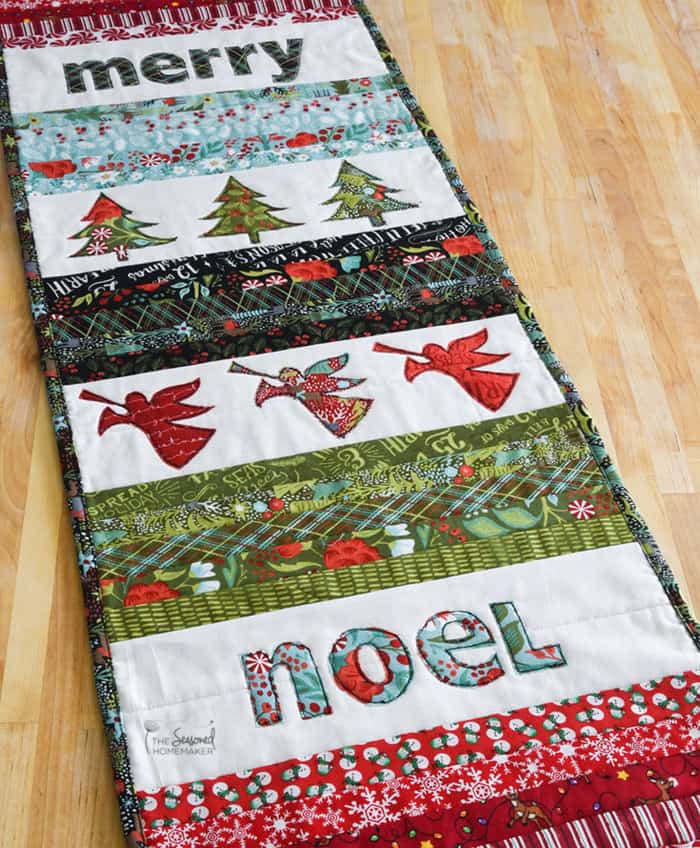
Quilted Christmas Table Runner
This post may contain affiliate links which won’t change your price but will share a commission.
Back in early October, I introduced a simple Christmas Appliqué Set that makes sewing up Christmas projects fast and easy. I’m sharing one of those Fast and Easy Christmas projects that you can whip up in an afternoon. I know, because that’s exactly what I did. And, I used a little technique that’s a cinch.

In this post, you’ll learn how I made this table runner using my Christmas Appliqué Set. I have links and video to show you more about the Quilt As You Go Method and I’ve included a video at the bottom that explains how to appliqué.
My table runner is approximately 14″ x 48″ but you are not limited to that size. Once you understand my method you can make your table runner a lot longer or even turn it into a wall hanging. The method is still the same, no matter the size.
Here’s what you need to make the Quilted Christmas Table Runner
- Christmas Applique Set
- 10 Strips of white quilting cotton that are 2 1/2″ x 14 1/2″* (affiliate)
- Collection of Christmas fabrics (1/4 yard in each fabric is more than enough, but I used scraps)
- 1/2 yard of Christmas fabric for Table Runner backing.
- 1/2 yard of Christmas fabric for binding when finished.
- 15″ x 50″ piece of quilt batting such as Warm & White* (affiliate)
- Heat’n Bond Fusible Adhesive Product* (affiliate)
- Sewing/Quilting supplies such as rotary cutter, mat, thread, scissors, needles, etc.
Cut Out Fabric Strips
- Out of the white quilting cotton, cut 10 strips of fabric 2-1/2″ x 14-1/2″
- Out of each color collection cut out 5 strips of fabric that are 1-1/2″ x 14-1/2″. If you plan to use a color collection more than once, be sure to cut out a second grouping.
Get Your Quilt Backing and Batting Together
- Cut out or assemble your quilt back into one piece that is 15″ x 50″ (or however wide and long you want your table runner to be) This is more of a guideline than a particular pattern. My table runner is 14″ wide, but you can make yours a little wider.
- Cut out a piece of batting 15″ x 50″.
- Place the batting on the wrong side of the quilt backing fabric. (see this tutorial if you don’t understand) I use an Elmer’s School Glue stick to hold the backing to the batting. I dab a bit of glue stick about every 4″ and then set it with an iron. It will hold it perfectly when you start to Quilt As You Go.
Use the Quilt As You Go Method to Assemble and Quilt at the Same Time
Here’s where it all goes together quickly. If you don’t know how to Quilt As You Go, watch the video below or check out my blog post. Once you understand, come back here and assemble your table runner.
- Lay your first 2-1/2″ strip of white fabric against the top edge.
- Take your first 1-1/2″ strip of fabric and place the fabrics right sides together. Stitch, Flip, and Press. Continue adding 1-1/2″ strips until you’ve added all 5 in one color collection. (these would be the red ones at the top)
- Lay another 2-1/2″ strip of fabric on top of the last 1-1/2″ strip. Stitch, Flip, and Press. Repeat with a second 2-1/2″ strip.
- Take your second color collection of 1-1/2″ strips and repeat Step #2. (these would be blue on my table runner)
- Repeat Step #3
- Keep repeating these steps with the white fabric and the black, green, and red fabric.
- Once you’ve added your last set of 1-1/2″ strips (mine are red), add one more 2-1/2″ white strip to finish off the table runner.
Now for the Appliqué
All of the appliqué designs for this table runner are included in my Christmas Appliqué Set. The letters even print out in reverse.
I made a couple of changes to the designs. When I printed out my letters I enlarged them to print at 125%. When I printed out the Christmas Trees and Angel I reduced them to print at 50 %. That makes them approximately 3″ tall and they will fit into the space.
Trace designs onto a fusible web product and fuse to the back of your fabric. Next, cut out the designs and fuse them to the table runner. Straight-stitched around each of the letters and designs.
Note: The design set includes SVG files for cutting machines like Silhouette* or Cricut*. (*affiliate) You can easily break apart the designs in the free software and print. If you own one of these cutting machines, you can set the size and print paper templates or cut the fabric with your cutting machine.
If you don’t know how to appliqué, it’s super easy. Below is a video and you can learn more in my eBook Appliqué Made Easy: A Beginner’s Guide to Appliqué.
Finishing Your Table Runner
All that’s left to do is square up your table runner and add the binding. Like I said, a very easy project.
Enjoy.