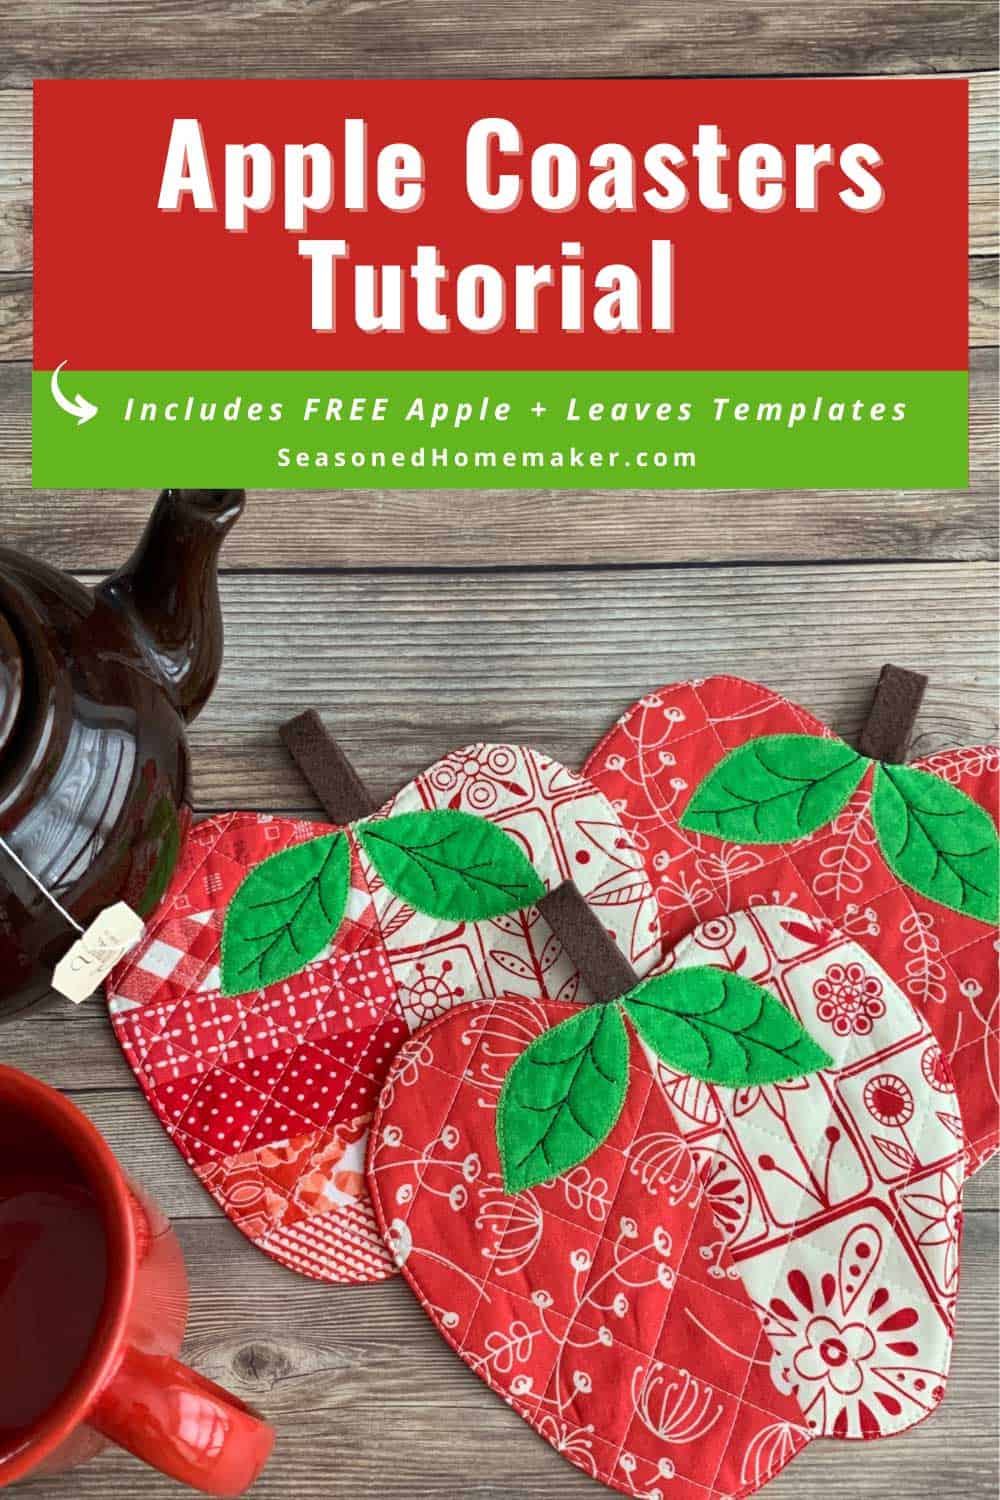
How to Sew Quilted Apple Coasters
This post may contain affiliate links which won’t change your price but will share a commission.
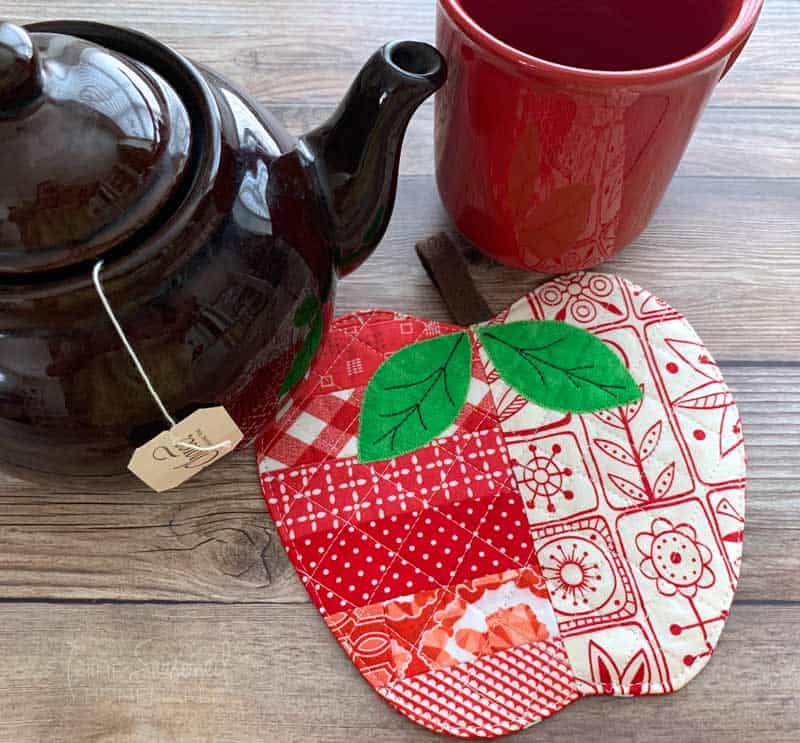
Inside: How to Sew Quilted Apple Coasters
Are you looking for a Fall scrap busting project? You’re going to love these easy Quilted Apple Coasters. They’re a fun way to say “Fall has arrived!”
It’s that time of year again when the wind shifts out of the north and there is a sudden chill in the air. And that means settling in and cozying up with a warm drink. And what does every hot beverage need…a cozy coaster! So, pull out those red scraps and let’s make this scrappy, handmade apple coaster. It’s destined to be a Fall favorite by all apple-lovers!

How to Sew Quilted Apple Coasters
Materials

- Apple + Leaves Template (FREE! See box below or find them in my Shop > Freebies section)
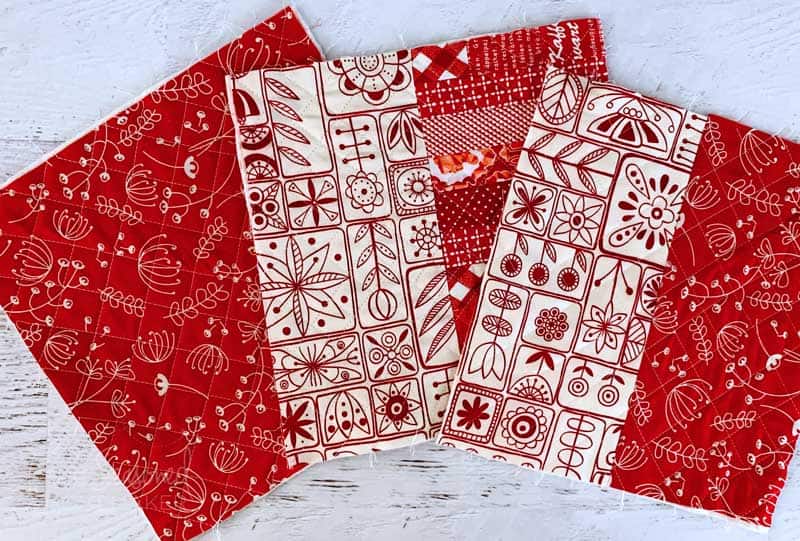
- Assorted Red Fabric scraps
- (1) 10” x 10” piece of Low Volume Fabric
- (1) 4” x 5” Piece Green Fabric for Leaves
- (1) 10” x 10” Piece Backing Fabric
- Small piece of Brown Wool Felt
- (1) 10” x 10” piece of Quilt Batting
Supplies
- Sewing Machine
- Quarter Inch foot for your sewing machine
- Aurifil 50 wt. Cotton Thread
- Water-Erasable Pen
- Wonder Clips
- Sewing Pins
- Rotary Cutter with sharp blade
- Acrylic Ruler
- Self-Healing Rotary Cutting Mat
- Stripology Ruler (optional)
- Iron & Ironing Board
- Wool Pressing Mat
- Serrated Scissors
- Wonder Fuse Fusible Web
Step 1: Get the FREE Apple Template
I’ve created a simple Apple Template that you can download for free. To download the FREE Apple Template, click the button below. You’ll be taken to the Freebies section of my Shop.
Want an ad-free, printable copy of this tutorial? Scroll to the bottom of this post for more details!
Step 2: Fabric Choices
Below are several options for making the top of your apple coasters.
- You can use a single piece of 10″ x 10″ fabric.
- Piece a 5″ x 10″ red piece of fabric with a 5″ x 10″ piece of low volume fabric.
- Piece together red fabrics to create a patchwork design. Anything goes!
- Piece fabrics together using the Quilt As You Go method. Anything goes!
Choose one of these ideas above and have it prepared before moving to the next step.
Step 3: Quilting the Coaster Top
In this step you will be quilting the apple coaster top to the batting. I recommend something simple like a diagonal or straight stitch quilting design.
- Place the apple top fabric onto the piece of quilt batting. Pin to hold in place.
- Quilt in any manner you desire.
- Once quilting is finished, trim away excess batting.
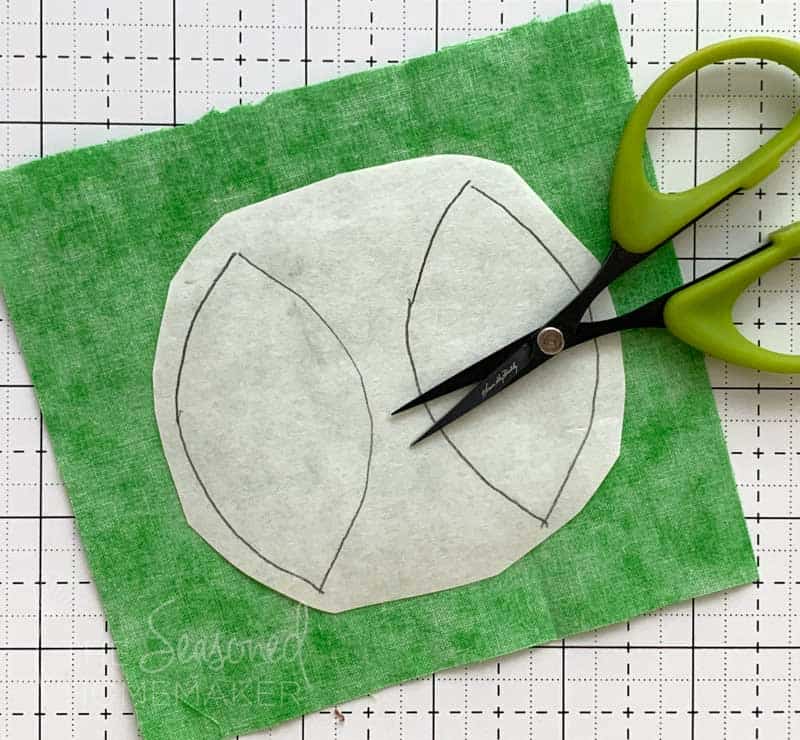
Step 4: Cutting Out
Time to cut out your templates and apples. Note: You don’t need to cut out the leaves yet. That will be in the next step.
- Print and cut out Apple + Leaf from template download. Set aside.
- Place the apple template on the right side of your quilted coaster fabric. Note: If you have a center seam, be sure to line it up with the dotted line on the apple template.
- Using a water-erasable pen, trace around the template and cut out the design. Pro Tip: Serrated scissors are great for this because they keep things from unraveling.
- Place the apple template on the right side of your coaster backing fabric, trace, and cut out in the same manner.
- Cut a strip of brown wool felt 1/2″ x 4″.

Step 5: Applique the Leaves
You will be adding leaf appliqués to your apple. If you’re new to applique I have several tutorials that demonstrate this. You can find them in the Applique section of the website. I also have an eBook with more details on applique.
- Cut out the leaf template.
- On the back of the Wonder Fuse, trace two leaves.
- Rough-cut around the leaves, leaving at least a ¼” margin.
- Fuse to the back of the green fabric. Let cool.
- Cut out leaves on the traced line and remove the paper backing.
- Fuse the leaves to the Apple.
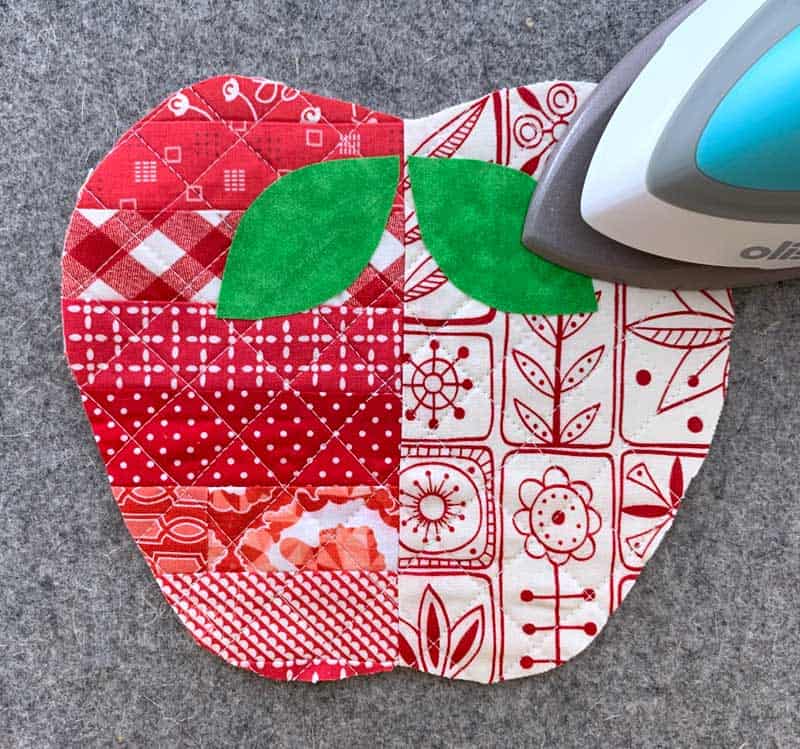
- Using a water-erasable pen, draw leaf veins inside the leaves and stitch in a contrasting color.
- Using a straight stitch or tiny zigzag, stitch around the perimeter of the leaves.
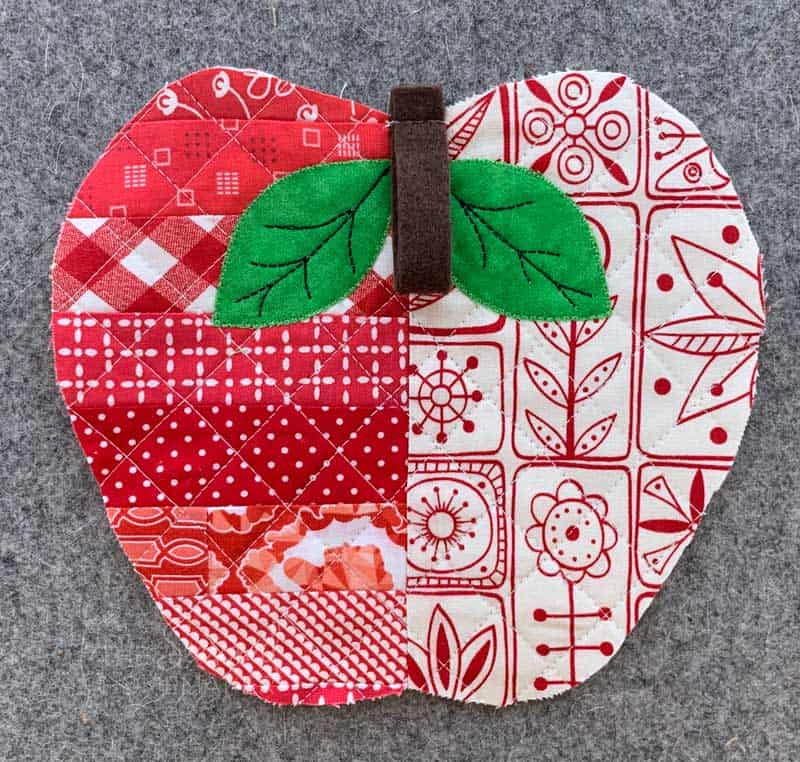
Step 6: Making & Attaching the Stem
For the stem I recommend a piece of wool felt which will give it a nice Fall feeling. Feel free to make a stem using a piece of brown fabric.
- Take the stem piece and make into a loop by matching raw edges together.
- Pin the stem loop to the right side of the apple coaster top with raw edges matching. Be sure the stem raw edges extend about 1/4″ beyond the raw edges of the apple. Baste to hold.
Step 7: Stitching the Layers Together
- Place the apple coaster backing fabric right sides together on the quilted apple coaster top. Pin or clip to hold.
- Leave a 1-1/2″ opening on the side for turning.
- Using a 1/4″ seam allowance stitch around the apple. Be sure to backstitch at the start and stop.
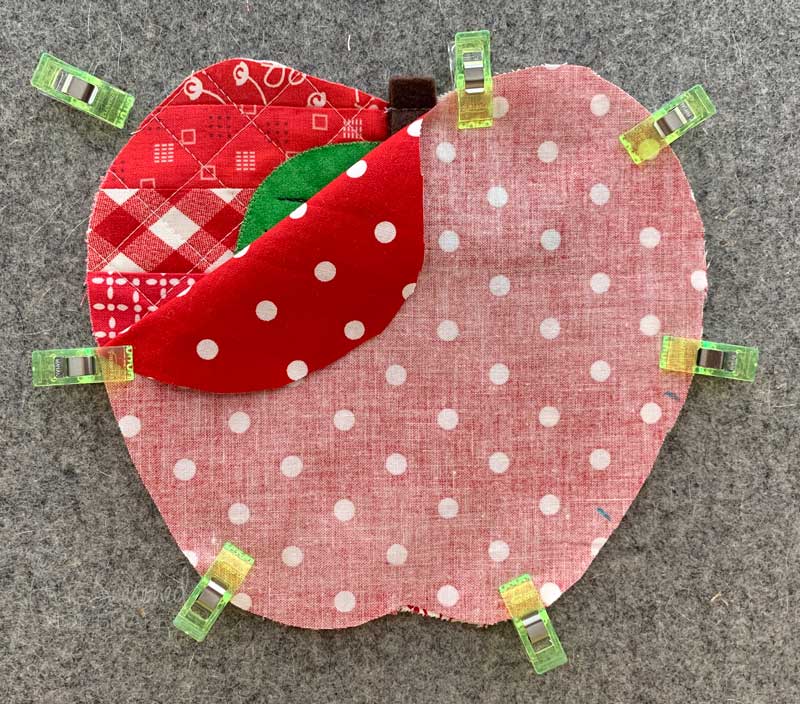
- Clip curves and turn right side out. Press.
- Blind stitch the opening closed.
- Top stitch around the apple coaster.
Wasn’t that easy! Now try making a few more in other apple colors such as yellow and green! And be sure to share with your friends!
>>> Want a printable version of the post? Click the pink button, and download the Printable PDF instructions.

Pin for later.