

How to Sew the Perfect Quilting Seam Allowance
This post may contain affiliate links which won’t change your price but will share a commission.
INSIDE: How to Sew the Perfect Quilting Seam Allowance.
When piecing a quilt it is a truth universally acknowledged that all seam allowances must be exactly, precisely, and perfectly one-quarter inch.
Has This Happened to You?
- Your 12″ x 12″ quilt block measures 11.5″ x 11.5″
- Seamlines don’t match up on your quilt top.
- You can never get triangles to sew together correctly.
Want an ad-free, printable copy of this tutorial? Scroll to the bottom of this post for more details!
How to Sew the Perfect Quilting Seam Allowance
Step 1: The Seam Allowance Problem
Let’s say you follow all of the directions in the quilt pattern to achieve a 12″ x 12″ block. You’ve used a 1/4″ piecing foot and measured the seam allowance to find that it is a perfect 1/4″ from the seam to the raw edge. Once the block is complete it measures 11″ x 11.”
If you’re having trouble with your quilt blocks not turning out in the right size it may have something to do with your seam allowance. Instead of a perfect 1/4″ seam allowance, what you really need is a scant 1/4″ seam allowance.
The first time I heard the term scant 1/4″ I thought, “What! I have a 1/4” foot, what the heck is a scant 1/4″ seam?” Then, I promptly ignored this information and started making quilts using things like an accurate 1/4″ foot and following the seam guide on my machine. Sounds reasonable.
Well, it turns out that I experienced trouble with consistent block sizes because I have a problem on one of my machines. The needle drops slightly further to the left and creates a greater distance between my needle and the edge of my 1/4″ foot. In order to get an accurate scant 1/4″ seam allowance, I would need to know the exact location of a quarter-inch from my needle.
Step 2: What is a Scant 1/4″ Seam Allowance and Why is it so Important?
It turns out that pressing your seam allowance to one side shrinks the seam the width of the top and bottom thread. The more seams in a block, the more shrinkage. The problem continues to develop as you start assembling blocks across a quilt top. Before you know it, the individual quilt blocks have shrunk, affecting the entire quilt top size.
What you need is a seam allowance that allows for this tiny amount of shrinkage. While a thread’s width doesn’t sound like much, it adds up quickly and that is why you need to use a scant 1/4″ seam allowance to create consistent seams so your blocks will line up.
Step 3: It Starts With the Thread
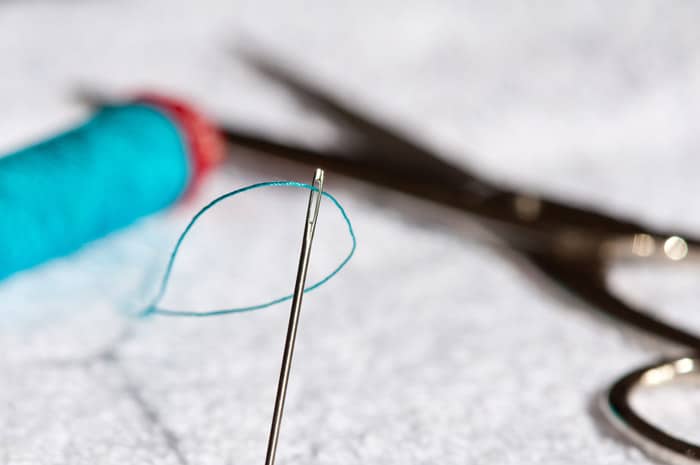
First of all, before we can begin to chat about using a quarter-inch foot (sometimes called a patchwork foot) or achieving a scant 1/4″ seam allowance we first need to discuss thread and why it matters.
If you pop into your local big box sewing and craft store you will have a couple of thread options: Coats & Clark or Gutermann. Both of these brands make great threads for general sewing; however, they are slightly thicker when compared to a finely spun 100% cotton quilting thread such as Aurifil 50 wt.
With quilting, the weight and consistency of thread creates a very slight issue because the thread is taking up a bit of fabric space in the seam. Using a finely spun brand such as Aurifil helps reduce some of the bulk that naturally occurs when piecing.
Combining a finely spun thread with a scant 1/4″ seam ensures that you get perfect 1/4″ seams and no loss of fabric space every time.
Step 4: Creating an Accurate Scant Quarter Inch Seam Allowance
Finding a scant 1/4″ seam allowance is easy. Once you’ve located a scant 1/4″ seam on your machine, scroll down to find a way to mark this seam allowance using one of the methods below.
- Place a quilter’s ruler under the presser foot and slowly lower the sewing machine needle until it is a thread’s width to the right of the 1/4″ mark on the ruler. In front of the feed dogs, mark the bed of your machine with one of the methods in Step 5.


- Or try this method. Using the far-right edge of a piece of 1/4″ graph paper, place the graph paper under the presser foot and slowly lower the needle until it is to the right of the 1/4″ line. In front of the feed dogs, mark the bed of your machine with one of the methods in Step 5.
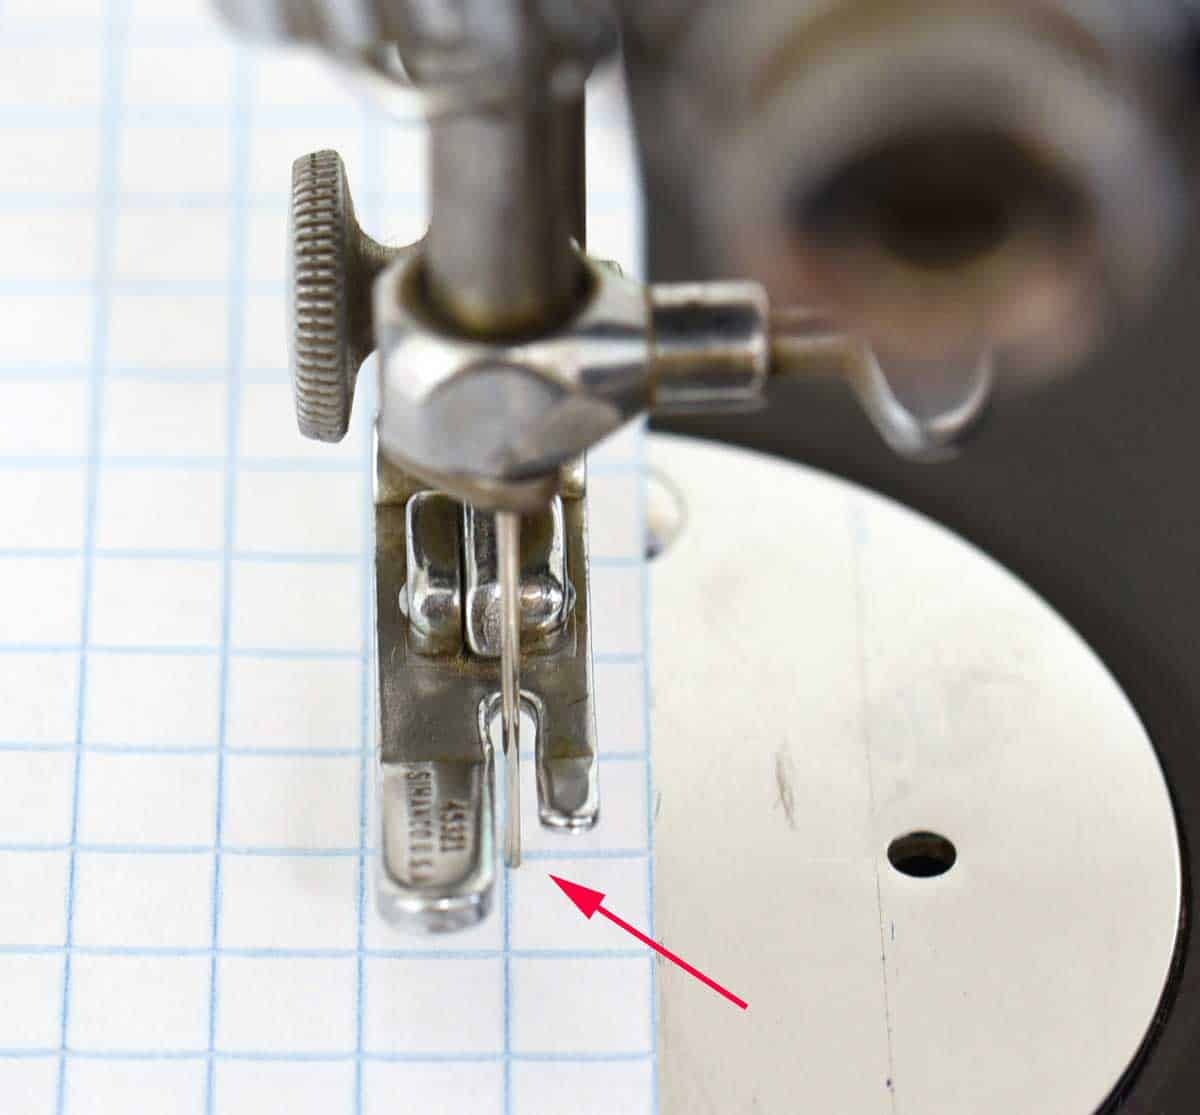
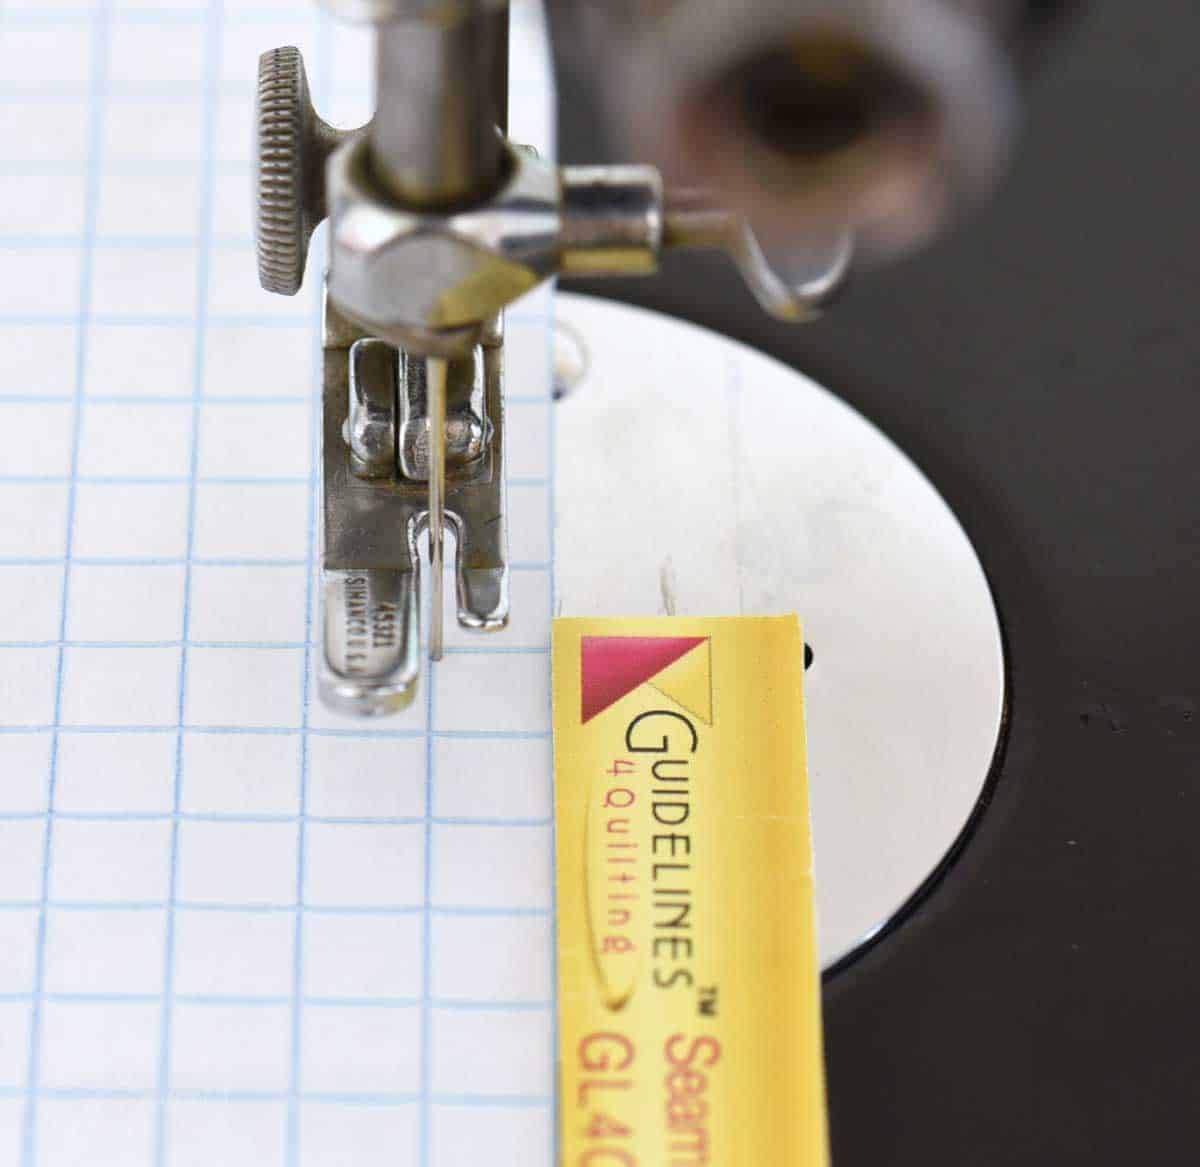
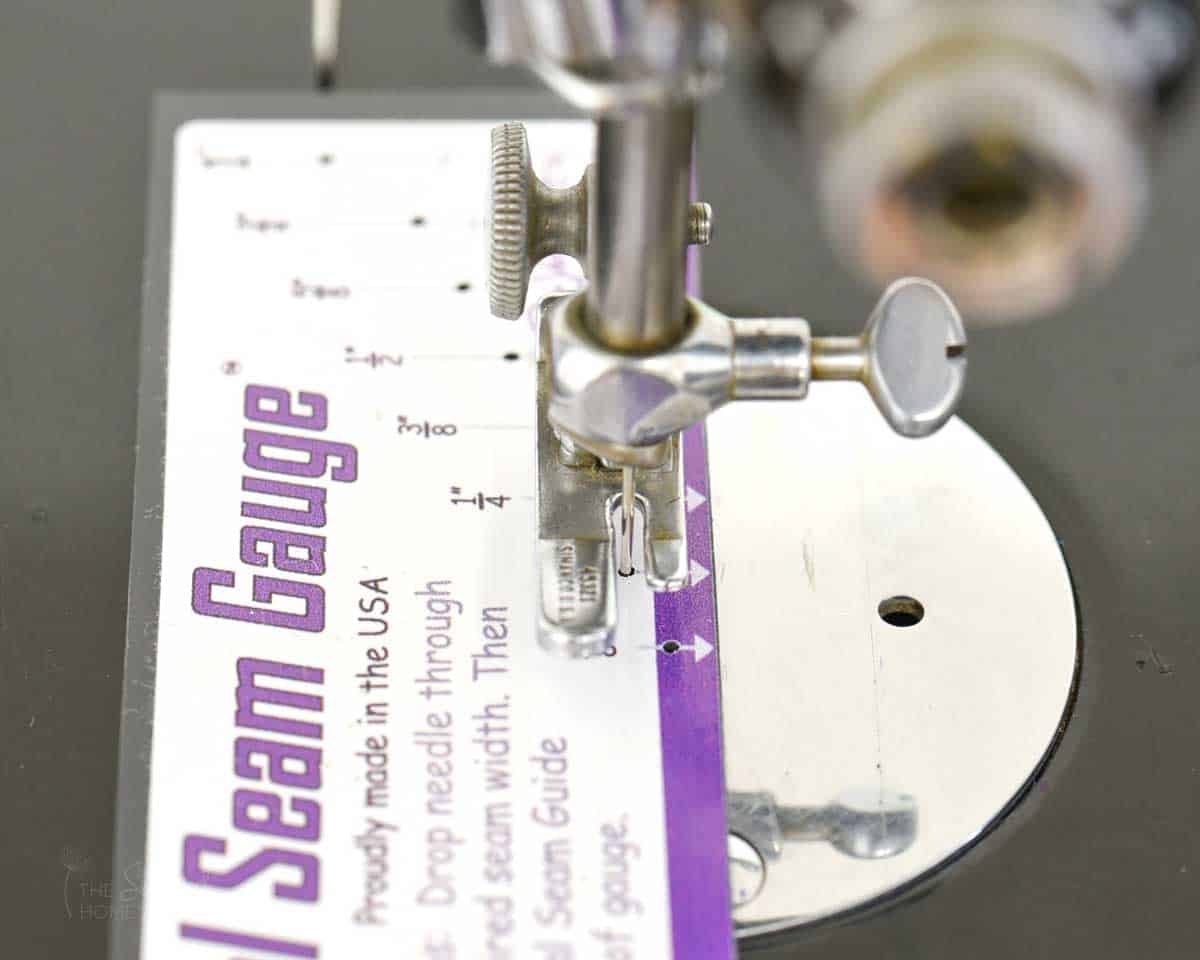
- My preferred method is to use a seam gauge (see below) to perfectly line up a scant 1/4″ seam allowance. Place the template under the needle and drop the needle through the tiny hole giving the exact location of a scant 1/4″ seam allowance. Once the location is determined, use one of the methods in Step 5 to create a seam guide. This will assure you get the perfect scant stitch width.
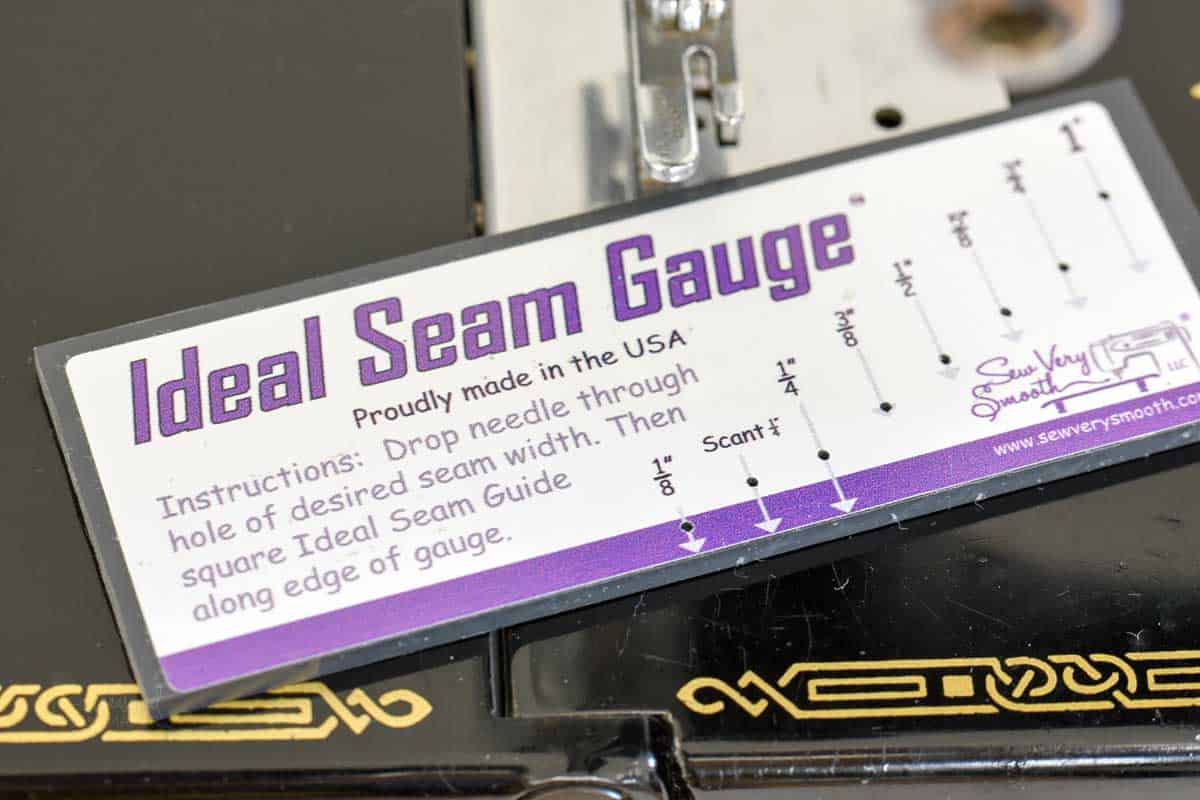
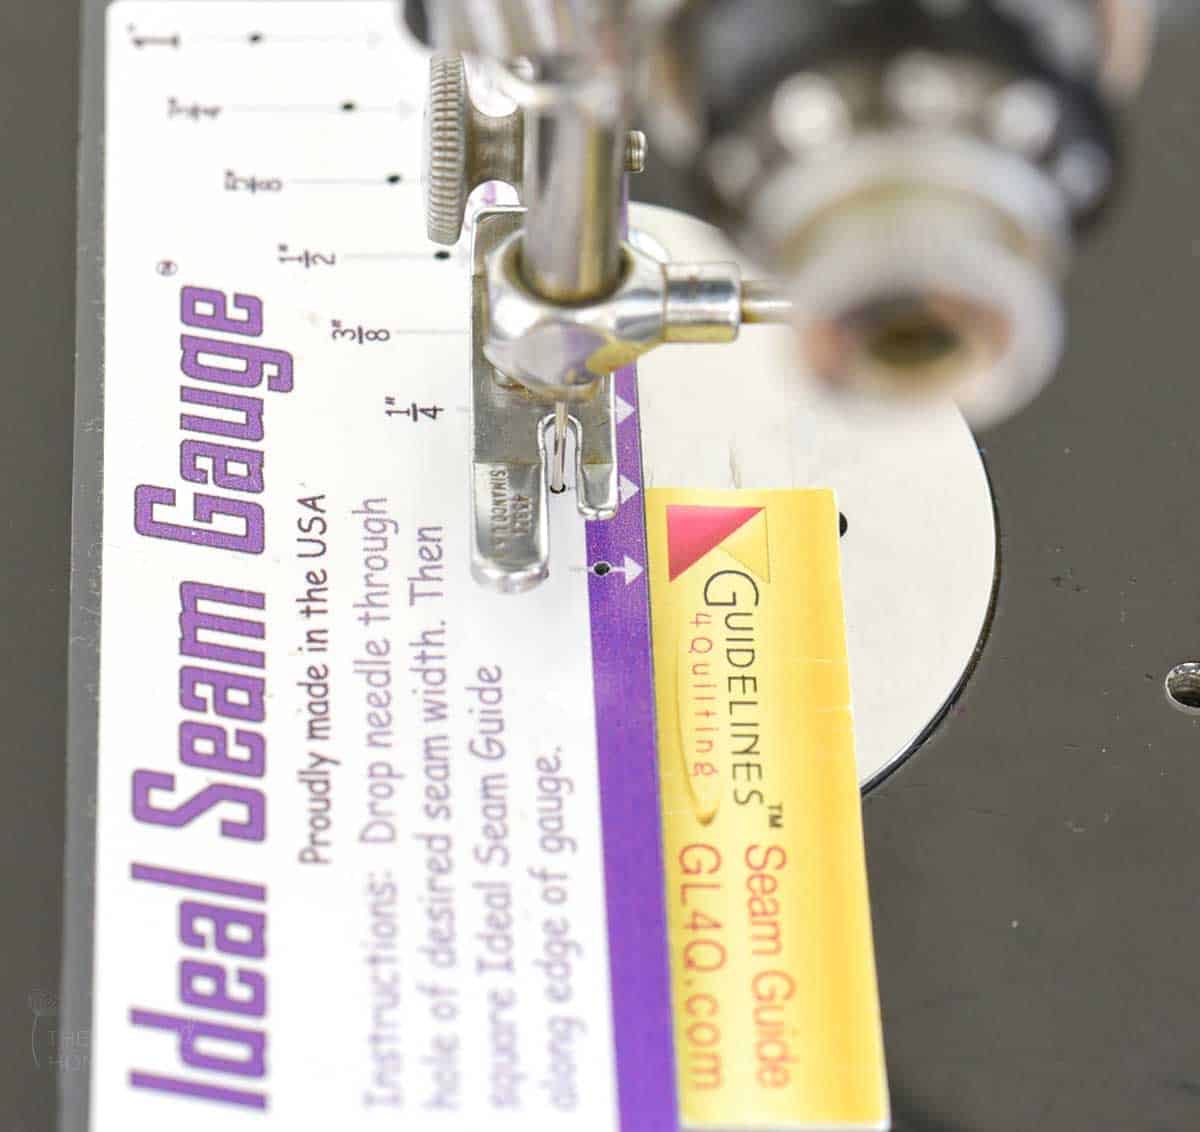
Below are links to my favorite seam gauges. I use the Ideal Seam Gauge, but the other is equally accurate.
>>>Ideal Seam Gauge
>>>Guidelines 4 Quilting
Step 5: Making a Mark
Now that you know where your scant 1/4″ seam allowance is located, you will need to somehow create a guide.
Below are a few ideas that I have tried with some success.
Make your own seam guide using one of these methods:
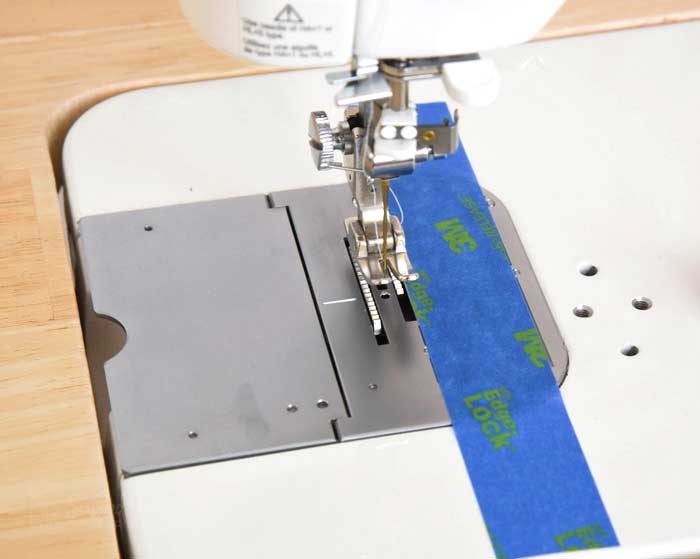
- Use blue painter’s tape and make a stack with 2-3 layers. This will create a guide for the fabric.
- Use washi tape to create a guide.
- Mark a line on your sewing machine bed with a fine point Sharpie.
- Use these Seam Guides because they easily remove and can be used over and over.
Whichever method you choose will work as long as you place the guide in front of the feed dogs. This prevents the seam guide from interfering with the feed dogs when you’re sewing.
Step 6: Testing the Seam Allowance
Now that you’ve created a scant 1/4″ seam allowance on your machine you will need a way to test it.
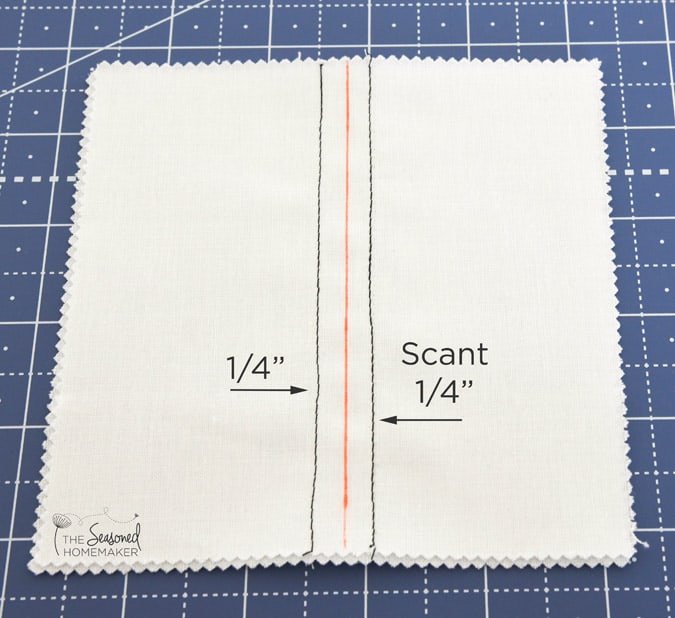
Use a 5″ square of white fabric and mark a red line down the center. Stitch a 1/4″ seam on one side and a scant 1/4″ on the other to demonstrate the difference. It’s very subtle, but there is definitely a difference.
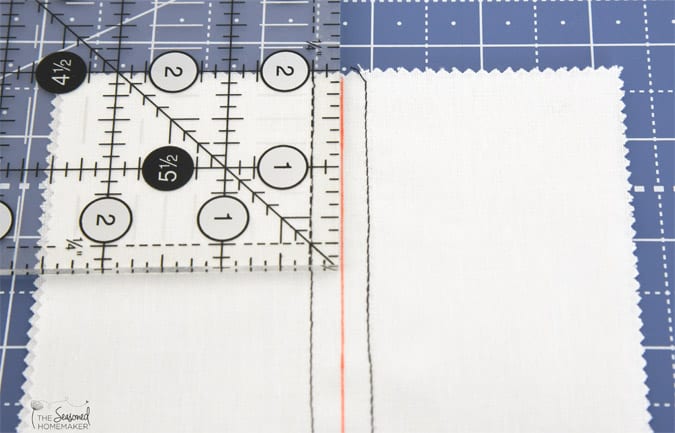
The image below shows an accurate 1/4″ seam allowance. Notice that it is right on the mark. As a result of piecing with this full 1/4″ seam allowance, you could lose a little fabric in the overall block size. For example, on a 12″ block you could lose 1/2″ by not using a scant 1/4″ seam allowance.
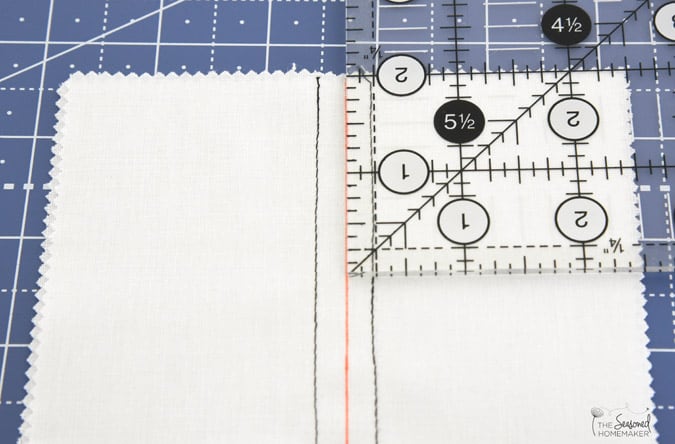
Notice the subtle difference in the scant 1/4″ seam allowance below. As a result, this tiny fragment of space allows for the shrinkage that occurs because of thread width and pressing.
If you have a sewing machine with an adjustable needle position, this can be a great way to get a consistent scant 1/4″ seam allowance. Test out several methods to determine what works best for you.
Final Thoughts on How to Sew the Perfect Quilting Seam Allowance
Take the time and determine your best method for achieving the perfect 1/4″ quilting seam allowance. Suddenly you’ll feel confident enough to tackle difficult blocks. And that makes the possibilities endless!
>>> Want an ad-free, printable version of this post? Click the pink button below and download the Printable PDF instructions.


This is the first time I have ever understood the scant 1/4″ and how to achieve it!! Thank you so much!
I always use a Singer seam guide to get accurate seams – after all it screws in to holes on you machine bed (if you have a machine with bed screw holes that is) and is just what it is/was made for.
Thanks for mentioning this. I thought about mentioning this type of “fence” but they are so machine-specific.
But not the Singer seam guides which appear on ebay often for very few pennies. As long as you have a screw hole on the bed of your machine, and use a screw that came with your machine (or order a second screw the same as the one you use for the ankle – the screw hole in the bed is the same size) to screw it in (though many of the screw holes take exactly the same size screw, but you have to be sure) then it will fit on any machine. I even use it on my Janome 15000!
Thank you for that Anne. I have a 15000 too, and I’ve wondered about those seam guides. Are you saying that the cheap eBay ones are no good?
No Mary – I’m saying that the original Singer Seam guides are an inexpensive way of obtaining a metal seam guide that will fit on any machine with a screw hole in the bed. Since the screw holes on modern machines are a different size thread to the ones on the Vintage Singer machines I would advise only using a screw that is provided for your machine, like the one for the foot holder, or one that came with an accessory you may have bought for your machine – such as the circular attachment for the 15000 which I have.
One thing I would mention is that of course the adjustment is only as far as the length of the slot, so if your bed screw hole is too far way from your foot you won’t be able to get it close enough to the needle and foot to give you a quarter inch guide if that is what you want. There are other slightly more modern Singer guides, and those from other machines which are longer. Definitely worth having a look around.
You can also buy generic modern screws too, but you do have to be sure these screw in properly or you will ruin the screw hole thread.
If you find the screw is too long for the hole you can put a washer between the screw and the seam guide so it tightens down on the bed of your machine. Here I am using it on my Singer 12 which has a very short screw hole so I had to avoid interfering with the mechanism below the bed – https://sewingtales.wordpress.com/2014/07/06/needles-and-my-singer-12/
Don’t forget your 15000 came with the cloth guide that slots into the embroidery mechanism too. I don’t like it at all and never use it as it doesn’t guide right next to the foot which is where I like a guide.
Great post, Leslie! I use Aurofil thread when I am piecing and my blocks are so much more accurate!
WOW! Thanks, Leslie. I have struggled with this issue for years. I have debated about switching to Aurofil thread; now there is not question. This has been so helpful to me! Have a great day.
WOW! Thanks, Leslie. I have struggled with this for years. Your explanation and directions are so clear. I have wondered about switching to Aurifil thread because of the cost and because I wondered if it really made a difference. Thanks to this post, I will definitely switch. Thanks so much, Leslie.
Hi Leslie – This is the most precise and easy to follow explanation. And your tips are awesome.
I have a question. I generally don’t use Aurifil thread. I use Prescencia, which is fabulous and distributed by Colonial Needle. It is a finely spun thread, however, I don’t know if it is a scant 1/4″. This is a stupid question, but did you know that Aurifil was a scant 1/4″? Did you actually measure the Aurifil thread? (I really feel embarrassed asking this). Was it printed on a container of a box of the threads? I prefer the Prescensia because it doesn’t leave much thread dust behind on my needle shaft or in my bobbin case.
Thank you for your thoughts and help.
I have never used Prescencia, but I believe it is also finely spun. I’m sure their 60 wt. would work as well as Aurifil.
Thanks, Leslie!! Ralph Lauren uses Prescensia thread for all the logos they have on shirts and other clothing.
The color doesn’t fade after many, many washings.
Prescenia 50 wt. is thicker than Aurifil 50 wt. “Wt” is not standard from brand to brand, which is maddening, Leslie’s tips, but because of different thicknesses of thread, different fabric thicknesses of fabric (cotton with gold on it is “painted” gold, and therefore thicker), I take a different approach to scant quarter-inch seams.
What matters is that the block measures what it should measure, not some magical one-thread smaller seam measurement. This is where you start but you may need additional adjustments to get it right.. I cut – VERY carefully and accurately – 1-1/2″ x 3-1/2″ strips and TEST. Sew three strips together starting with a basic scant quarter and press AWAY from the center. Take a one-inch ruler and measure that center strip. It should measure 1-inch EXACTLY. Adjust your guide or needle position as necessary. I usually test for a new project. I also take into account if I’m using fabrics with metallics, or how many pieces go into a block. I prefer the modern machines with adjustable needle positions. I toggle between a few positions depending on the project. I like to line up with the edge of my presser foot so that the fabric is grabbed by all the feed dogs – you don’t have to struggle to keep your seam straight.
I’ve been teaching beginner quilters for 20 years with great success. The scant quarter is the most important thing to get right. There’s some trial and error, but it’s worth it to save frustration in the long run.
BTW, I hate that modern machines don’t have screw-in attachments anymore. I have a beloved seam guide that screws in and I adore it. Luckily, I have a husband who can put threads into the machine bed, but there aren’t many people who have that advantage! I also hate drop in bobbins, but the machine I wanted had a drop in bobbin. Marking my scant quarter in drives me crazy now.
Thank you! I had no idea.
Wow. Thanks Leslie. I too have found that my finished block is not the correct size when finished. I will definitely switch. Thank you so much for the post.
Thank you so much Leslie. I have struggled with this for awhile now. I have been quilting for about 2 years, being my own teacher, this has really made sense to me. Keep up with the great teaching & God Bless 🙂
Another kind of tape that works very well is electrical tape. This vinyl tape is much thicker than painter’s tape, and never leaves a residue, no matter how long I leave it on my machine.
Thank you for your explanation of the scant 1/4″ seam. I really didn’t understand how it worked before.
Marvellous post yet again Leslie! Your simple explanations and tips are so welcome to newbies like me who sometimes feel a bit nervous asking very experienced quilters. I know they’ll say “oh we all started out just like you”, but I really feel comfortable being part of your community.
Thank you!
This is an awesome post! Thank you so much. It explains why I have had a problem with my sizing after I finished the blocks. I’m going to buy new thread this week!
Recently a reader asked this Question: I have 6 inch squares for a quilting project. If I do a 1/4 inch seam allowance will the finished square be 5 1/2 inch or 5 inches?
Answer: Your block would be 5 1/4″ finished. Remember, you can lose some size if your seam allowance isn’t accurate.
Outstanding post. Lots of really valuable information. I can’t wait to put all this new knowledge into practice.
I have been quilting for only a year, and I love it. I have a problem, though. I am a perfectionist. So, I worked up my way to get my blocks to turn out perfectlly.. I have Bernina machines and use the 1/4″ foot. But, I move my needle one click to the left or right, depending on which side the foot lays on the seam. I do use a straight stitch plate. I ALWAYS press my seams open. I guarantee my seams are a scant 1/4″ and my blocks turn out the same size. Before I came up with my solution and used the true 1/4″ seam and pressed my seams to one side, my blocks were always a little smaller than they were supposed to be. I was a seamstress before I was a quilter. We seamstresses ALWAYS press our seams open.
Karen Christensen in Colorado
Oh my goodness! Thank you so much. I have been trying so hard to make a 12.5 ” block that keeps coming out 12ish. I was so frustrated. I am earning and I really miss my instructor. But this makes so much sense now!
Thank you so much! I think my quilts are beautiful but many times my blocks do not add up as you explained. I jury rig them to work but always blame myself ….thinking I’m just not that good! I love the concept of the scant 1/4”. I am very happy I found your website and I enjoy your news! ?
Susan
I didn’t know what a 1/4” scant was and it didn’t make any sense to me. I marked it up to me being new to quilting, plus teaching myself. (with the help of ladies like you & YouTube) I just finished my first quilt, that’s how new I am to it all. It actually turned out pretty good considering I used Minky as my backing. Talk about starting out a bit on the difficult side!
I do have a question…..My triangles Always end up with one being larger than the other. No matter how much I measure or what kind of I ruler I use. Do you have any idea why this would happen? I’ve tried many different things but to no avail.
Thank you for this great information.
Stay Safe
AM Smith
Thank you so much for sharing this information! I’ve sewn for years and have struggled with the seam allowances never being quite accurate. I’ve marked my machine with guidelines but there is always a variance. Your explanation of the scant 1/4″ seam is so enlightening. I purchased the seam gauge and seam guides and my first block made with these tools turned out perfect. It was so much more satisfying and fun! Please continue to share these helpful bits of knowledge!!
you could also move your needle one notch to the right
Yes, but many people don’t have machines with that feature so I always want to include them in any detailed post.
I use the elongated felt pads (about 1/2″ x2 5/8″) used to protect your floors and furniture from scratches. They can usually be found in most Dollar Stores; they have an adhesive back, and stay put – but do not hurt your machine when you want to remove them and are thick enough to stop the fabric from moving.
I have a piecing foot for my machine, but the seam allowance is too big. Now, I adjust my needle position for a scant 1/4″ and get very consistent and accurate results. It took some trial and error, but in the end, my projects and triangle points look great without any fussing! I think pressing is important, too. Sometimes I press seams open to reduce bulk, too. That can help in a block with many seams. Thanks for the tips you send. I enjoy reading your blog.
Great suggestions. Had not seen the Ideal scant 1/4 seam gauge. Keep the suggestions coming.
Thanks for the detailed explanation with pictorial! . I am a “newbie/wannabe” and have already had some trouble . Good to know I expect this is going to make a huge difference to me 👍🏼
love your article about this in the fact of our sewing and blocks not matching up …i always just thought it was me …thank you …i quit sewing for i was so mad that i couldn’t make a quilt that would match up…thank you …on to try this and having some fun sewing again…thank you so much…