

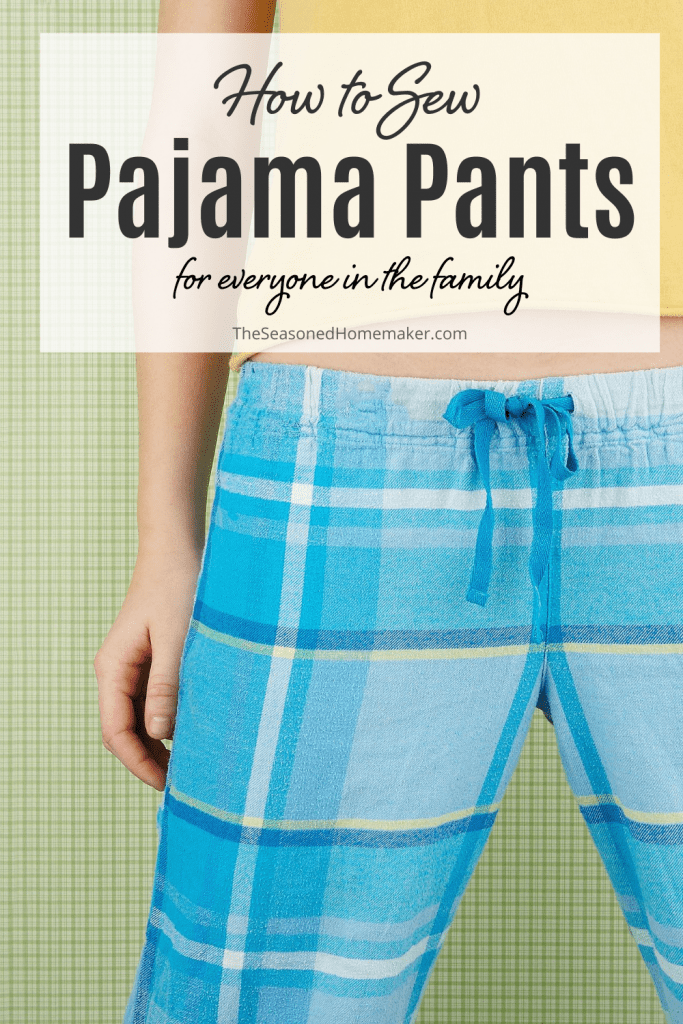
How to Sew Pajama Pants
This post may contain affiliate links which won’t change your price but will share a commission.
Sewing a pair of Pajama Pants is one of the easiest projects out there ~ especially for new sewists. For this tutorial I’ve taken an inexpensive Simplicity pattern (Note: Current pattern # S9127) that I picked up at Joann’s for $.99 and translated some of the sewing jargon in order to show you how to whip up a pair or two of Pajama Pants.
This is a simple pattern that is sized for kids and adults. And, it is perfect if you want to learn How to Sew Pajama Pants for everyone in your family.
How to Sew Pajama Pants
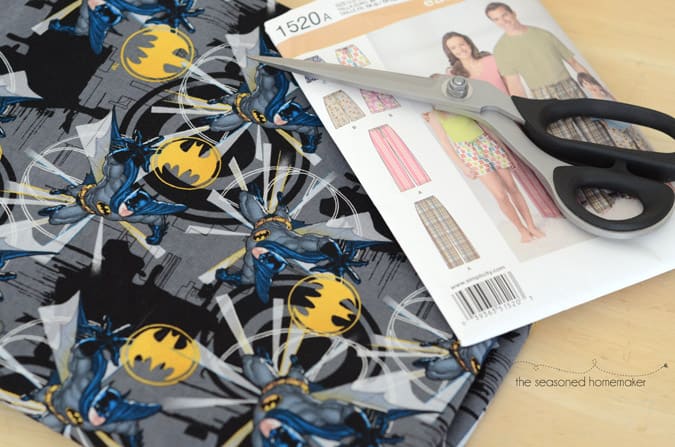
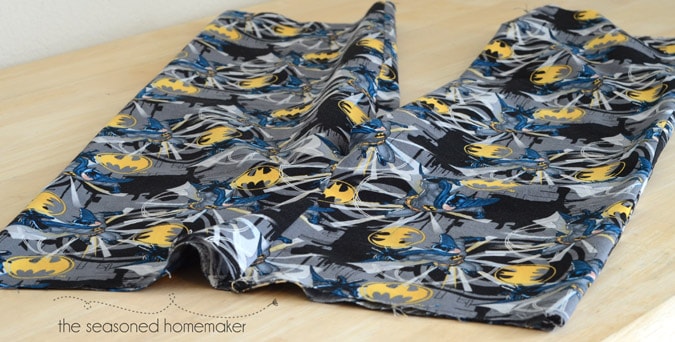
So, first things first. If you are new to sewing then you may not be aware that you can occasionally purchase patterns at Joann’s for $.99. A couple of months back I saw this Batman fabric that I thought would make really cute pajama pants for my two Batman-obsessed grandsons. After a quick online search, I found a Simplicity pattern (S9127) that is sized for both kids and adults.
–>NOTE: The most recent pattern number is now Simplicity S9127<–
I patiently waited until Joann’s had their next $.99 Simplicity pattern sale and picked up the pattern. And, I might add, this is a great staple pattern to have on hand if you do a lot of birthday or holiday gifts.
Something you need to know…
Here’s the thing with pajama pants. You can take the cheesiest, most gaudy, theme-centered fabric and turn it into a pair of one-of-a-kind pajama pants. It would be impossible not to find something for everyone on your gift list. Literally.
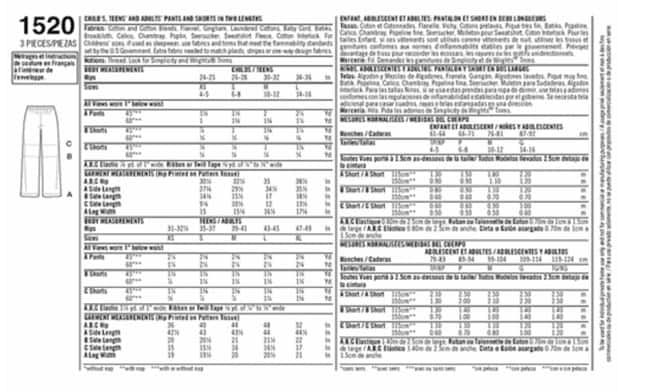
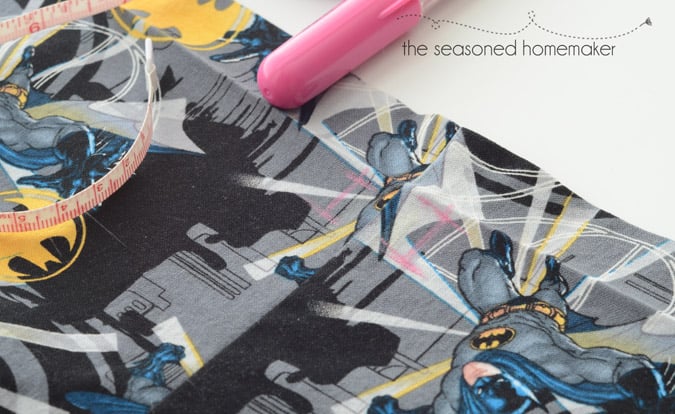
For something simple like pajama pants, I think it is easier to start with a basic pattern. There are only two pattern pieces you have to work with. Notice the back of the pattern. It comes in four sizes for children, five sizes for teens/adults AND the pattern is marked for shorts, capris, and pants. All for $.99 ~ quite a bargain if you think about it.
Step 1:
The secret here is to NOT cut out a particular size; instead, just trace off the size you need. I’ve used inexpensive taped-together white tracing paper from Hobby Lobby and traced the sizes I needed. That leaves me with all of my pattern sizes and styles still intact.
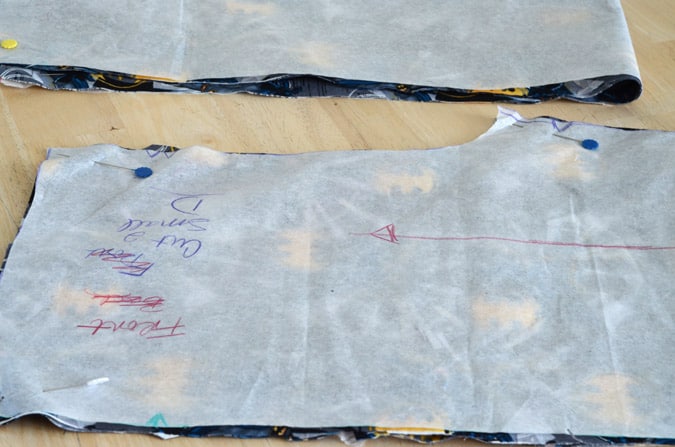
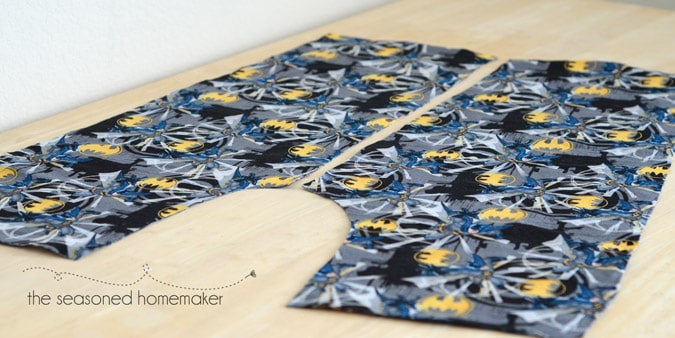
There’s really not much to cutting out the PJ Pants. You are cutting out two Front and two Backs.
Once the pattern is cut out I strongly suggest that you label the Front and Back pieces with some sort of removable sewing marker.
Step 2:
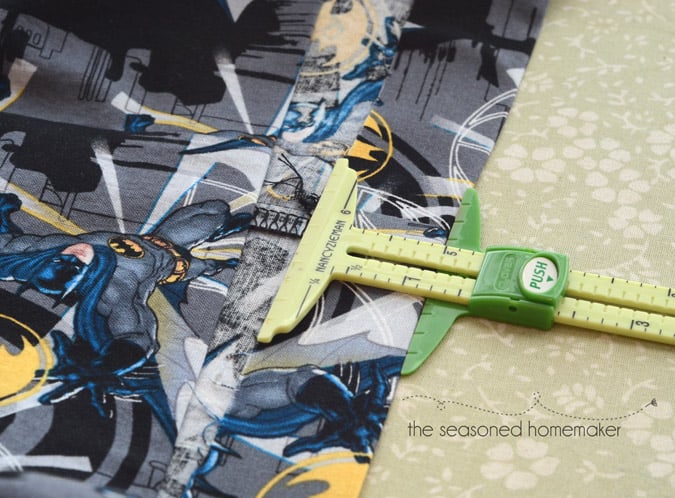
The next step is to sew the inner leg seam(s). Translated, that means pin a Front and Back right sides together at the inner leg seam, then stitch. Repeat with the other Front and Back.
Notice how the Front and Back are a little different. The back is cut a little deeper in the crotch to allow for sitting. It also has a little more rise in the back.

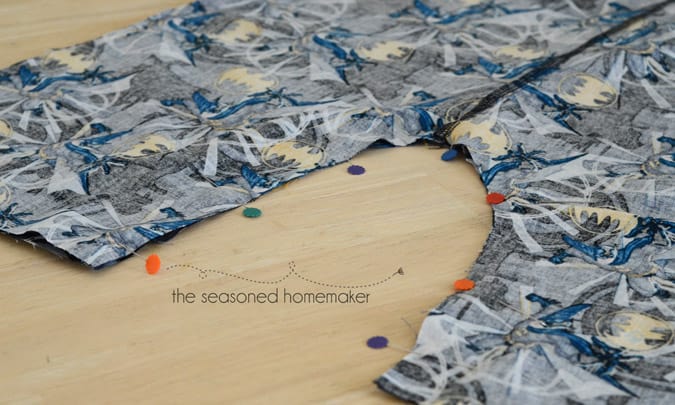
Step 3:
The next step in the instructions is the one that I think causes people to curse like a sailor and abandon sewing. Here’s what the instructions say:
With RIGHT sides together, pin center seam, matching inner leg seams and notches. Stitch.
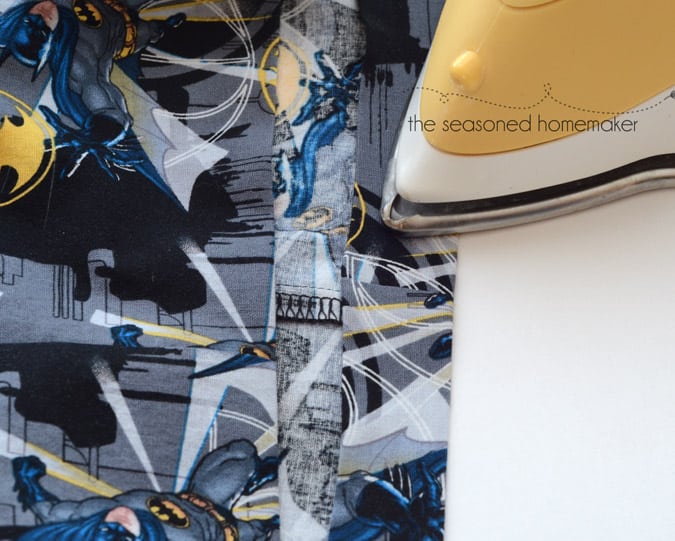
What they really want you to do is open up the pieces that you just stitched together on the Inner Leg Seams. Then, press them well so the seam is nice and flat.
Next, with your fabric right sides together match up those Inner Leg seams. This will be shaped like a the letter U. Pin this together then stitch.
How easy is that. No colorful language and sewing desire still intact.
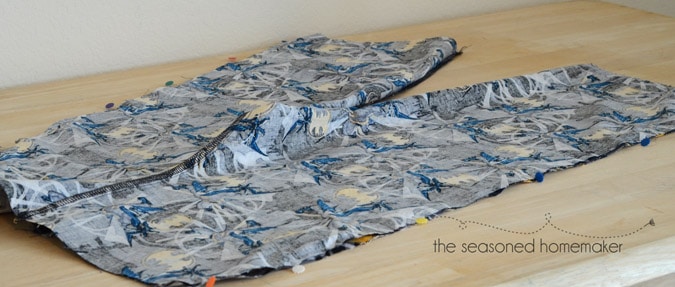
Step 4:
This step is pretty straight forward. With right sides together match up the two side seams and pin. It should now look like a pair of pants.
Stitch the front to the back at the side seams. Press open the seams and then turn the pajama pants inside out.
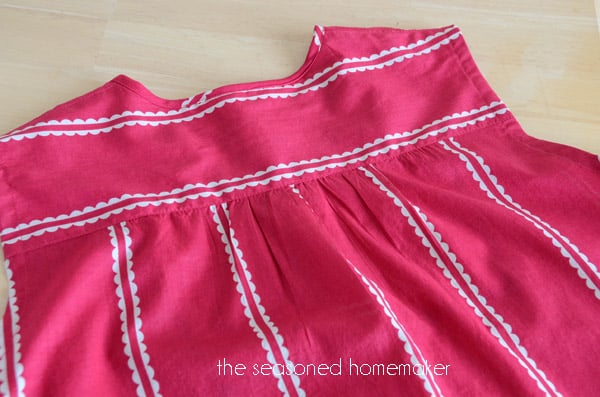
Here, I’d like to mention seam finishes. Notice how I have used a serger to finish my seams. I know many people don’t own sergers; however, I have a tutorial on How to Finish Seams without a Serger.
Step 5:
You will need to form a casing for the elastic at the waist. To do this fold the upper edge 1 1/2″ towards the inside. Press under the raw edge 1/4″
(Optional) Step 6:
This is an additional step that is not a part of the pattern directions and is completely optional. When I sew pajama pants I like my elastic to be pretty loose for comfort. In order to tighten the waist a bit I add in a tie. This way I can be comfortable and keep my PJ pants from falling off.
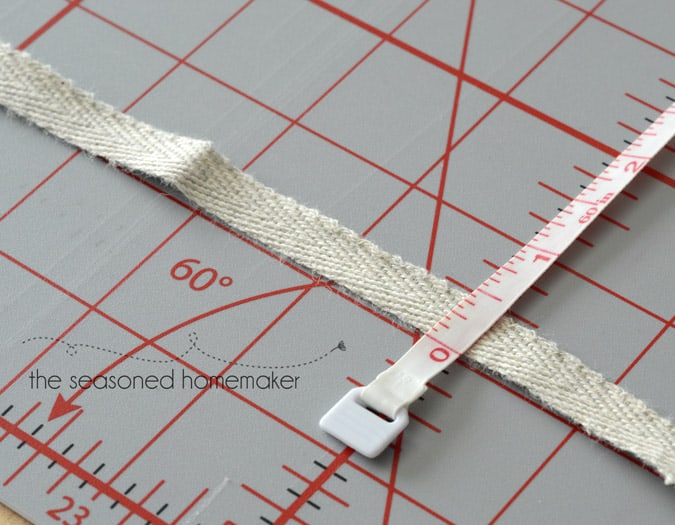
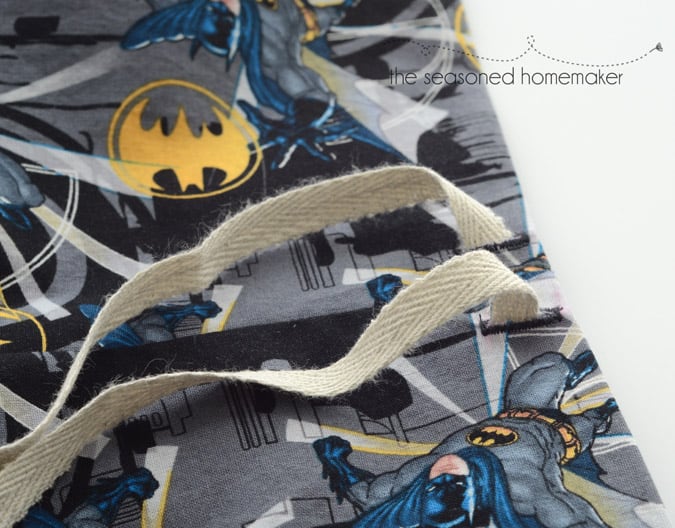
I like to use twill tape for my ties. (affiliate) To determine the size of the buttonholes, measure the twill tape that you plan to use and size your buttonholes accordingly.
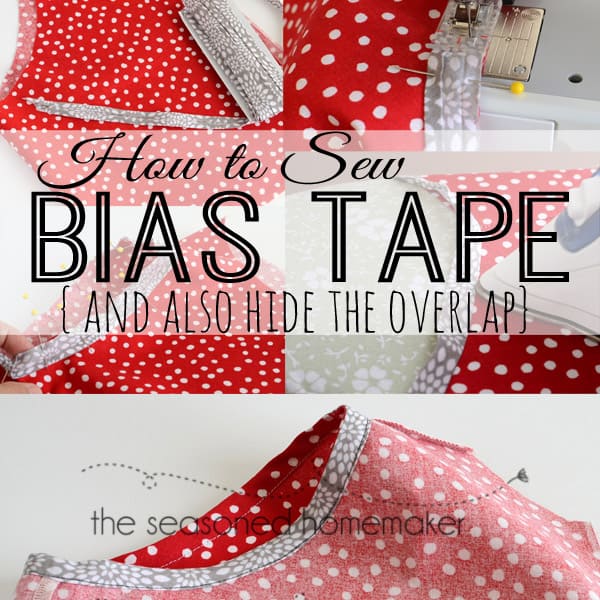
You can always make your own tie using the leftover fabric. Here are the directions on How to Make Bias Tape if you want to make matching ties.
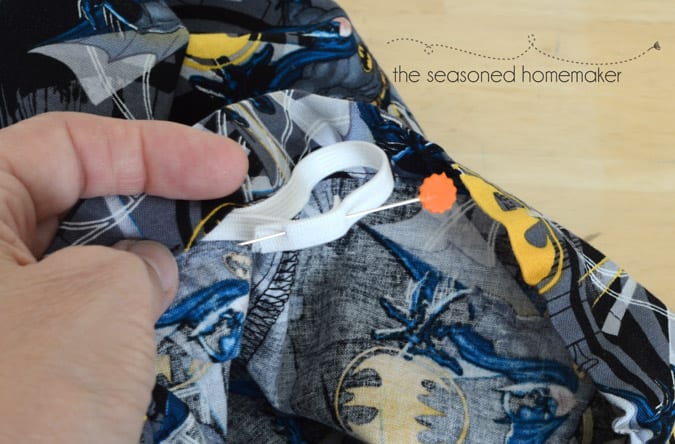
In order to add a tie you will need to add two buttonholes on either side of the pajama pants front seam. Notice how I’ve unfolded my casing. I will be making the buttonholes only on the front of the pants BEFORE I sew down my elastic casing.
For more information, I have a tutorial on making the perfect buttonhole.
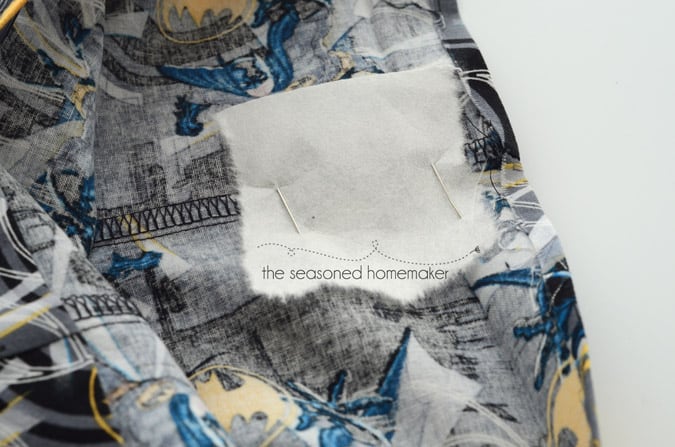
Before you sew the buttonholes I strongly encourage you to stabilize the back of your buttonholes with a small piece of tear away stabilizer. This will keep your buttonholes from bunching up and tunneling.
Step 7:
AFTER you’ve completed your (optional) buttonholes then you will want to stitch down your elastic casing. Be sure to leave an opening to insert the elastic and twill tape.

Step 8:
The instructions say to cut a piece of elastic the length of the Elastic Guide. Exactly, how does the Elastic Guide know the correct waist measurement? There is a better way to get this measurement. Measure 1″ below the waist of the wearer of the pajama pants and cut a piece of elastic 1″ larger than that measurement.
Using a large safety pin, insert the elastic into the casing and thread the elastic all the way around the casing until it comes out the other side. Adjust the elastic gathers evenly around the waist.
Note: I recommend getting Pajama Elastic which is softer and less constricting than regular elastic.
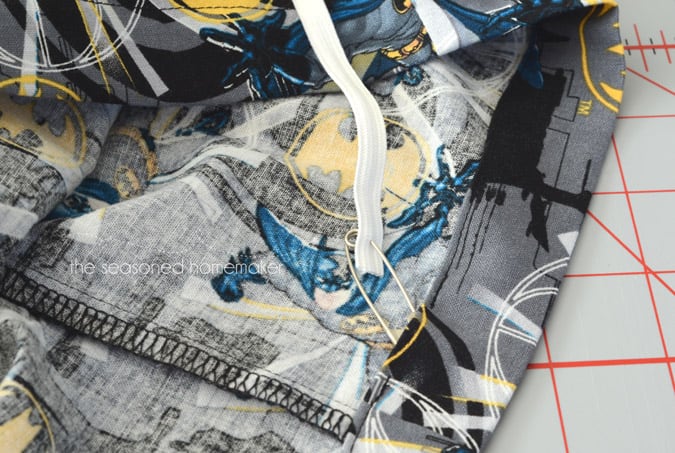
Overlap the elastic about 1″ and pin. Then carefully stitch it down using a zigzag stitch.
Once the elastic is evenly distributed you can sew the opening closed.
Now you can thread your twill tape through the two buttonholes in the front of the pajama pants.
Step 9:
The final step is to hem the pajama pants. You will need the waist-to-floor measurement of the person who will be wearing the pajama pants. Mark the length and turn under just like you did for the elastic casing. Trim away any excess until the hem allowance is 1 1/2″.
Fold under the raw edge 1/4″ and press. Stitch close to the pressed under edge.
And you are done! Now for the best part. After you’ve made a pair or two you can whip these up in about 30 minutes ~ and that includes adding two buttonholes!
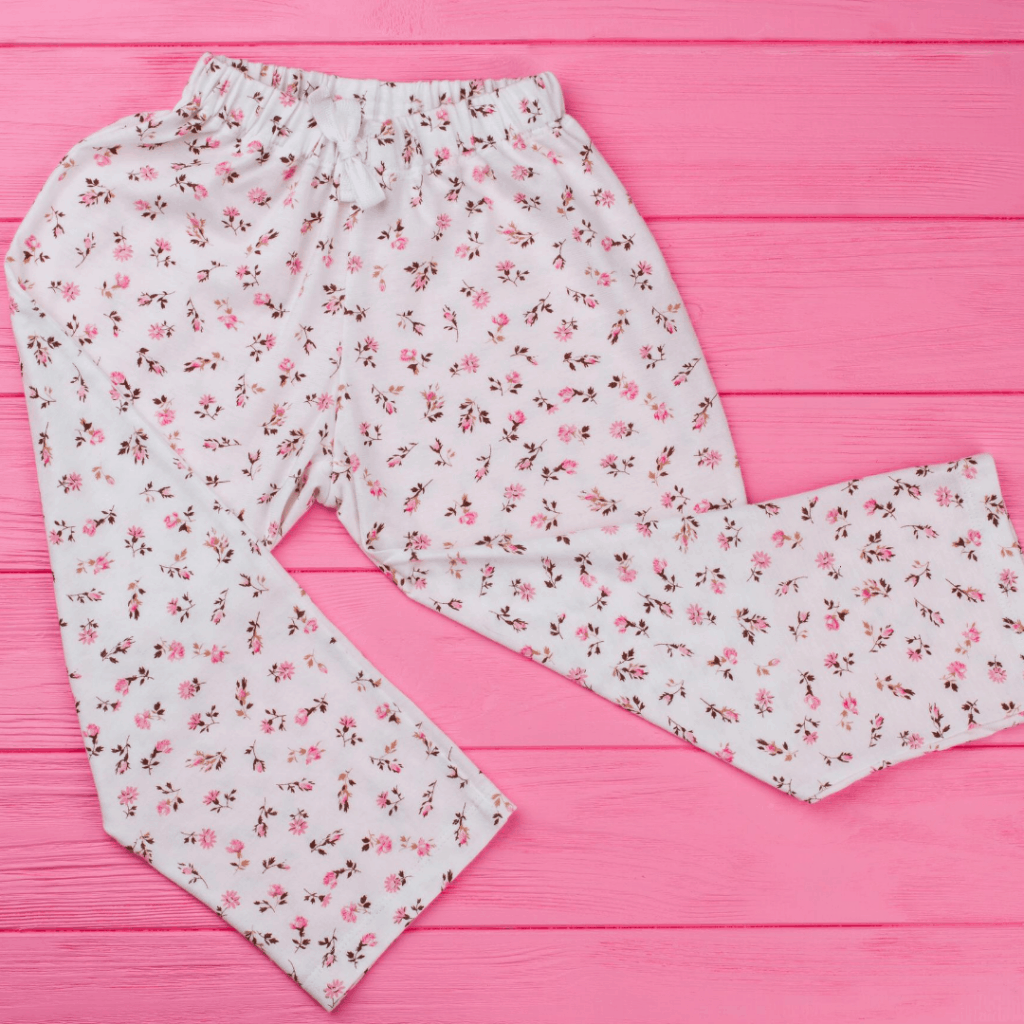
On this pair of Pajama Pants I eliminated the tie because they are for a child who is under age 2. I wouldn’t add a tie to pants for any child who is under age 4.
Now, I’m off to sew several more pairs.
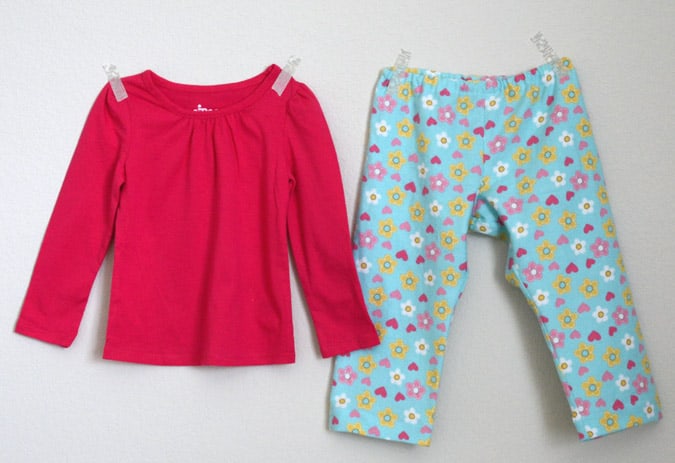
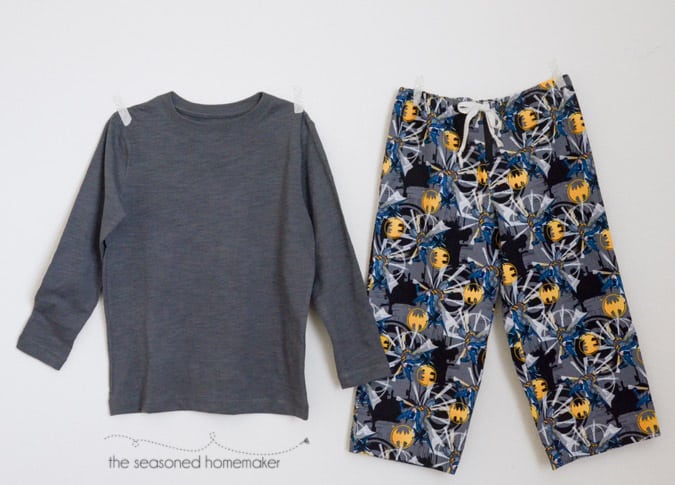
Pair these pajama pants with an inexpensive t-shirt from Target or Walmart and you’ve got a nice personalized gift.
Pin this image for later:
Great instructions – instead of marking the pattern pieces just remember the back side is bigger than the front side on everybody – so the bigger curved seam is the back.
Good way to remember. Years and years ago I made palazzo pant. First effort, I learned this lesson. I sewed the inside front to the outside back leg. What a mess. Lol.
Thank you Jesus! I found help!!
This is a great idea for gifts, everyone wears them these days. Question, is the twill tape threaded around the waist band or is it sewn to the elastic?
The twill tape is threaded through the pants after the elastic.
Thanks for this added info. I have to make some for my son-in-law and was wondering how I was going to do elastic and tie.
Why not attach the twill tape to the elastic?
I prefer them to be separate because the elastic holds the pants up but the twill tape allows you to cinch them for comfort.
Thanks for posting this. I am new to sewing and bought this exact pattern at Hancock’s during the black friday sale for $0.99!!
Excellent. I always think it is ideal to start with a pattern when you are learning to sew. This one is great. Be sure to trace off the designs and you will be able to make this pattern over and over again.
I’m 6 years late to this party – but I wanted to share what I use to make additional patterns – leftover / sale-priced rolled wrapping paper. Old Christmas stuff works quite well – the cheaper the better (for thin-ness).
I love this tutorial! How far apart do you space the buttonholes, or did I miss that? It’s also a great use for miscellaneous fabric everyone “gifts”me.
Thank you so much, I have been looking for inexpensive pant patterns for my grandsons who just turned three. Anything I found was like 4 or 5 dollars and not their size. I want to make some sweat pants for them and PJ’s.
I will check out Joanne’s craft store.
I will also Pin it to my pinterest.
Dot
Wow, this couldn’t be more timely, Leslie. One of my grandsons said he wants me to make him Batman and Spider-Man pajama bottoms ! I’ve already got the fabric ready to go ! Thanks for these terrific instructions.
What a great idea – I never thought of adding the twill tape to allow the elastic to be a bit looser. That would be much more comfortable!
I use a different pattern but it is just as easy. How many Christmas PJ’s have you made this year. I will have made 16 pairs of PJ’s by Christmas. My sewing room is full of scraps and thread. It is crazy this time a year. Merry Christmas
Well, you’ve got me beat. I’ve only made 6 pair.
Can you show how to place the pattern on the material
I LOVE your tutorial! We have the tradition of giving PJ’s on Christmas Eve and your tutorial is perfect! I pinned for myself and featured you on my fb and SO glad you linked up through my blog – pretty please come back next week so I can see your next amazing project! Carrie, A Mother’s Shadow
Thank you for explaining sewing terms so they are much easier to understand. Patterns make me crazy some times! You should have seen me trying to flip a purse the right way once. Insane!
I love this pattern! I picked up 2 copies when JoAnn had them 5/$5 because I knew I would be using it a LOT. A few notes on the pattern itself.
– The line from waist to crotch seam on these pants is extremely long. As I do a lot of sewing for young girls, I’ve had to lower the waist on several pair because the girls like them better that way. Usually this is an easy fix of just turning the hem allowance down one more time.
– Marking the front and back of cut pieces is a breeze with the use of scrapbooking paper tape. It’s easy to write on with a pencil or regular pen, sticks great to the fabric, comes in tons of cute colors and patterns, and is about half the cost of Washi tape.
– After the twill tape has been fed through the channel, it’s a good idea to stitch it at the center back seam to keep it from being pulled out through the buttonholes in the wash.
– After you’ve made a few pair of these by the pattern, you can pretty much construct them from memory, but don’t stop there! Stretch your own limits by trying it out on different types of fabrics; add a contrasting cuff at the bottom hem, or a ruffled edge for little girls, etc. I made a Daddy/son set for my brother and nephew and learned how to draft and add pockets on my brother’s.
These are excellent suggestions. Thanks for sharing.
Yea! Can’t wait to make some. So, you could do these in cotton or knit? It seldom gets cold enough for flannel where I live. Any suggestions for working with knit? Is that material harder to work with?
I almost exclusively make these in cotton. Knit would be great, but they could stretch when sewing. You may want to find a pattern for knits – but then assemble them using my instructions.
I’m wondering if you would consider doing another post on this topic and do a pocket add-on? My favorite flannel pair that I have had for 15 years (I bet) have a pocket on the right pant leg like at the upper thigh and it’s perfect for my cell phone! And, some day I’ll need to replace them and I’ve been thinking I should just make my own!!!
Your style is so unique in comparison to other folks I’ve read stuff from.
Many thanks for posting when you have the opportunity, Guess I will just book mark this site.
Do yourself a favor, and check out all of Leslie’s sewing tutorials. I’ve been sewing for 50 years, but I always learn something new in each of her tutorials. Also I have purchased two of her apron patterns – and they are fabulous! Clear, concise instructions – they go together like a dream, and are so flattering. I’m getting ready to purchase another one for my daughter.
{blush}
I love to make PJs but I got a question. Someone told me it was easy and simple to add a ruffle, flounce, cuff to the bottom of the pjs but I have had the hardest time getting this to work out. It is either to long or to short.
Any suggestions?
Thanks
This is really hard to answer in a short reply. I suggest you look for a Simplicity or McCalls pattern that has these additions. They will give you the proper measurements and ways to easily add or deduct.
One thing to remember, you don’t have to add at the hem, use the lengthen/shorten line on your pattern to make these adjustments.
I’m old. I just slap on a piece of freezer tape with an F or a B on the inside of the fabric. Marked. Comes off great!
Excellent tip! Thanks for sharing.
Next time you go to the doctor ask to buy a roll of paper they use for the exam tables. My dr actually gave me a roll. Works great when making your own patterns.
I sewn a pair of pjs years ago, but the elastic kept twisting and was very uncomfortable. Probably had the wrong type of elastic! But I have seen pants with the elastic sewn along the top seam and then turned under and hemmed. Now, my question is, how difficult is this to do or if I purchas pajama elastic, as you suggest, will that eliminate the twisting or at least the uncomfortableness that I had experienced.
Just wanted to mention… I made Kitty Hammocks out of used pillowcases and stuffed with batting. I put loops on all 4 corners and purchased metal hooks ( a.k.a. “stage rings” “key chain hooks”). They were made to clip on the cages of shelter cats. And most of the cats and kittens loved them. Making these was a very good learning experience! And I think it would be a good project for a group of young girls (or boys) to do, and donate to their local shelter.
The solution for you elastic twisting is simple. Once you have the elastic into the waistband, adjust the gathers then everywhere there is a seam, stitch down ‘in the ditch’. No more twisted elastic! And, a few happy kitties.
Remember the pantskirts of the late 60’s & early 70’s? My two girls, 15mths. apart really wanted these. I adjusted a pajama pants pattern, flaring the legs & adding a matching ruffle to the bottom. All that was needed was to make one longer than the other while cutting the flare. I folded the ruffle strip in half , pressed, gathered & adjusted it to fit the hem of each leg, which gave the pantsskirts a nice swishey bottom. They looked really cute with coordinating crop-tops & dressy with a blouse. Love your Nancy Zieman Adjustable ruler.
Just wondering if……Is it cheaper to buy another 99 cents pattern to make second pair of different size PJ or cheaper to get tracing paper and reuse same pattern for other sizes?
I’m so cheap, I trace. But truly buying a second pattern would be easier.
I tried making these and they still had the “U” shape between the legs and the line from the waist to crotch came out to small. Any ideas what I did wrong?
I’d really have to see it. Send me a photo via email and maybe I can see what happened. It sounds like you may have messed up on the front/back seams.
Thanks I’ll send a photo any help is greatly appreciated. I stitched the each front to a back like in the instructions. One more question I have is after I did that and then opened up them up and put them together as in Step 3, the front of the shorts had one front piece and one back piece and the back of the shirts were the same. Is it supposed to be like that?
I have been a seamstress for 45 years and love the tutorial. I am teaching adults sewing techniques this next weekend. I enjoyed your tutorial and would like to use it for the class. I did notice something that made me scratch my head. You mentioned to measure the elastic 1″ larger than the measurement 1″ below the waist measurement. I think that might make for a pretty loose fitting. I have always taken the waist measurement then deducted one inch then when I sewed the elastic, the lap over used about 1/2 inch. This gives some snugness to the pants but not so snug it is uncomfortable. The tie assures the pants will not slip down. What do you think? I know this is especially true for young children without any hips to hold the pants up if the elastic becomes looser from frequent washings. Looking forward to your comments.
Excellent question. I do it this way in order for the pj bottoms to be loose fitting. Because there is an actual drawstring, the waist is able to be adjusted. I know they could be more snug, but we love them where they barely hang on!
How do you add a button up crotch to this pattern? Great instructions, thanks for your excellent post.
Well, that’s a great question. I’ll have to think on it and get back to you.
Hi I am a new sewer and I am trying to make the pajama same pattern for my 20 yrs daughter but the problem is even the S size is very large for her how can I reduce the widht of pajama overall.i have cut the pieces already it seem very broad . Will be very grateful if you tell me how to reduce the width.Thank you for excellent post.
I feel your pain. This is why I always recommend making a muslin, first.
If I had to guess, you’ve cut out the men’s pj pants. I suggest you look for a pattern designed specifically for a woman. Also, don’t toss that fabric, just lay the new pattern pieces on top of the already-cut pieces. The smaller size should fit on top of the first pair of pants and then you can cut down to the correct size.
Great tutorial! Thank you!
Thank you so much for this. It has saved Christmas, just when I’d almost given up hope (so many videos/tutorials, so little help.) This is great!
My pleasure!
Thanks for this tutorial, I struggled with my first pair until I found your directions, then I made 4 more pairs for my sons and their friends!! And make them super fast now!! My sons friend came over and decided to spend the night, and had nothing comfortable to wear, I said, I can take care of that, whipped up some pajama pants in no time!! Thanks !!!
What Debbie said! I’m using the same pattern and I triple checked all my pieces, etc. and was just so confused! Will rush home and finish them tonight!
Wonderful tutorial! Do you have any for a batgirl cape? 😉
I’ll have to look into the cape thing.
Thank you! Your directions are very clear but I have one question. I want to put on the tie and followed you up to making the buttonholes and adding the elastic. The step I am confused on is do you sew the ties down or just thread them through the two button holes? Will they actually allow the person to draw the pants up?
Again, thank you for doing this. I am going to check out your directions on making a button hole since it has been a few years and a new machine!
I keep the elastic loose and thread the ties through the buttonholes.
After unpacking items from a recent move, i noticed the packing paper was still in fairly decent shape. I ironed the paper and used it to trace the pj pattern; strong enough to with stand many uses ; if i can just manage to quit shaving off the edges with each use.
COuld you please help me? Step 2—back and front together, right sides facing. You mention they patterns don’t match because it allows for the seat area. So HOW DO YOU SEW THEM TOGETHER WHEN THEY DON’T MATCH??
Help please
You’re pinning/sewing the front to the back and matching at the inner seam ~ that seam will match. The waist and crotch won’t match because it’s the front and the back – which are different.
I don’t understand how to attach the twill tape to the elastic….could you explain? By the way, I love your site!
The twill tape is not attached. Is is a drawstring that is threaded in one end and out the other.
thank you for your instructions!! I always find it difficult to understand the pattern instruction. Therefore has hindered me in my sewing and i end up frustrated. regards Rotha
Why do you need elastic if you have the twill tie threaded around the entire waist?
The tie allows you to make the elastic loose. Having the tie allows you to cinch it to your level of comfort.
Thank you for the great read. Do you know if this Simplicity pattern can be used to make pajama shorts ?
I have made many shorts, pants, and pajamas, I am glad you simplified the language of the pattern. I wish you could help me get a perfect fit pair of shorts for my 3yr old grand daughter who really is a 2t. Very. Few patterns offer. Sizes so small
Hi Leslie, love your blog, and your pictures are really well made, keep it up 🙂
As a beginner I have a question for you:
1- how much fabric did you buy to make the Batman pajama pants?
2-In general, how do you calculate in advance how much fabric you will need for a garment? (lets say a PJ top and pants)
3- I am currently looking at digital printing websites where you can design your own pattern. The problem I have is that they charge per the meter/yard – so I am not sure how much I need? Do you have any experience with textile digital printing?
Many thanks for sharing your wisdom with a beginner 🙂
C.
1. I used the recommended fabric on the pattern.
2. I have a simple formula – If I don’t know: 1 yard; If I sort of know: 2 yards; Everything else: 3 yard.
3. Nope – but spoonflower.com should have more information.
Your’re welcome!
What is the best fabric to use.
This really depends. Flannel is great for cold climates, but quilting weight cotton works, too. If you live in a warm climate, voile would be great.
Great tutorial! I have been looking for one that allows for an “opening” in the front for mens pants, but I cannot find a tutorial on how to do this! Will this pattern allow for it? If so how can I make sure I do this part right?
Please help! 🙂
Great tutorial! I’ll have to pick up that pattern. Just two comments: first, I like to mark the back of my pants permanently either with a small piece of cloth sewn into the seam or permanent marker “B”. Easy for the wearer to find the back. second, if I apply elastic in a casing I stretch the elastic/garment and pin it at the seams, then take a few stitches to anchor it in 4 places so it doesn’t roll after washing. I usually don’t make casings, though, instead i cut down the size of the allowance at the top of the pants to whatever width elastic I’m using. I stitch the elastic closed and make 4 equal marks and pin to the inside of the pants top. Then beginning at the back I zig zag the elastic along the edge, stretching it to fit the gap until the next pin, continuing from pin to pin to the beginning. Then I fold pants top and elastic down tightly and zigzag over the previous zigzags enclosing the elastic. Repin at each seam and remember to stretch as you go with a hand behind and in front of the presser foot.
Hi Leslie, so I made pajama pants for my toddler. However after the first night of wearing them the fabric started to fall apart beside the seams. Do you know what I did wrong? All the seams were overlocked nicely. Thanks
I have no idea why this would happen. You may want to rethread your serger. Possibly the threads never knitted together.
thanks.
What a great tutorial, thank you! I’ve read through the comments but I don’t think I’ve found my specific question: the last time I made my kiddos a pair of pj pants (from the same pattern! I think there is a single pj pattern floating around out there)- they both got persistent wedgies. I tried to add an extra “band” at the top of the pants so the crotch would be lower but still- wedgies! These are fairly normal sized kids and I selected the size that seemed to fit with their measurements. Is there a trick I’m missing? is there a different measurement I should be making and adding length to a different part of the pattern accordingly? I really appreciate all the responses you send to folks. If you have any ideas, I’d be most appreciative.
I’m not sure I know what the problem is. For me, I did once use the wrong pattern pieces and came up with gi-normous pants.
Just got a serger and was looking for pj instructions when I found these. I have made dozens of pairs of pj pants and taught many friends, children, exchange students, etc., how to make them, and this tutorial is perfect! What a great job you did–and pj pants do make a great, fun, easy personalized gift! Thanks!
In step 3, do you sew all along the U shape? I’m still confused :-/
Yes.
Love your tutorial! I do have a question about the tie. On simplicity pattern 1520 pj bottoms. How long do you make this tie?
It depends on who will be wearing the pajama bottoms. I like to double the size of the wearer’s waist, then trim down to a comfortable length. It’s easier to cut away.
Is there an updated pattern number that you find to be easy?
The most recent pattern number is Simplicity S9127
Thanks so much for including instructions for the ties. I have been making this way too difficult in my mind. . ….so never even tried. Don’t know how I missed this post the first time around, Ivery been a subscriber for a long time. Maybe the simple title threw me off. Anyway your talent and willingness to share is appreciated.
Thanks for this tutorial. I did find it a little confusing when you were talking about adding the twill tape – did not know it was threaded all the way through after the elastic until I read the comments and replies.
Thanks so much. Was just thinking today I really needed new pj bottoms!
Hello can you please explain how you lay your fabric out when you place your pattern on it. Does the fabric need to be pattern side up or down? For the life of me I cannot remember. I haven’t made pajama pants in a very long time. Thank you!!
It can be either pattern side up or down…you just need to be consistent with what you choose.
Very late to the PJ party. I have spent 4 hours looking for instructions for adding twill to pj’s. Thank you so much for your tutorial. I can now order my fabric and more importantly Twill. My personal opinion is the twill adds a professional touch.
Thank you . Caroline UK
Hello!
Will it say in the pattern how much material to purchase?
My 11 year old son really wants pug pajama pants so I told him we could try this together.
-Julie
I’m trying to determine how long to make the drawstring. I do not have the opportunity to try them on my model – they are across the country. I just need a good estimate, please.
Thanks.
Hello:
I’m new to sewing – just bought a sewing machine at an online auction. I have REALLY long legs (37″ inseam) and my Tall shop is no longer in business. I have a pair of worn out pj pants in cotton flannelette (or flannel) and I want to take them apart and make a pattern. I want to wash the 100% cotton first so it pre-shrinks and I want the pants to be really long. I’m going to use the old pajamas as a ‘guide’ for the pattern and your instructions to sew them.
My question is: how much of the pre-shrunk material will I need to buy to make these pants?
Thank you.