Easy Doll Sleeping Bag + a Tiny Kitten Tutorial
This post may contain affiliate links which won’t change your price but will share a commission.

Inside: Easy Doll Sleeping Bag + A Tiny Kitten Tutorial
If you follow me on Facebook you may have seen my post with the cutest little Pocket Kitty made by my friend Stephanie from swoodsonsays.com.
It’s made from felted wool and is the perfect size for a small child to hold. If you look closely at Stephanie’s website, you’ll also notice she has an entire menagerie of little pocket animals.
I decided that I’d make the Pocket Kitty because it’s so adorable and I know a little granddaughter who will agree. I also wanted to make a small doll sleeping bag to go along with the kitties. I used Stephanie’s pattern and made a few adjustments which you’ll see below.

Pocket Kitty:
The key to making these cute kitties is using felted wool. I don’t recommend using the cheaper felt from craft stores because it won’t hold up. Instead, see if you can find some felted wool. I picked up the black and white wool from my local Joann’s. Also, your local quilt shop may carry squares.
Materials:
- 8″ x 10″ Felted Wool Squares (affiliate)
- FabriSolvy (affiliate)
- Embroidery Needle
- Embroidery Floss
- Chopstick or hemostats for stuffing (affiliate)
- FREE Kitty Pattern and Instructions
I didn’t vary much from Stephanie’s tutorial with the exception of using embroidery floss. The instructions are simple and straight forward.
It’s also an ideal project for teaching a young child how to hand sew.
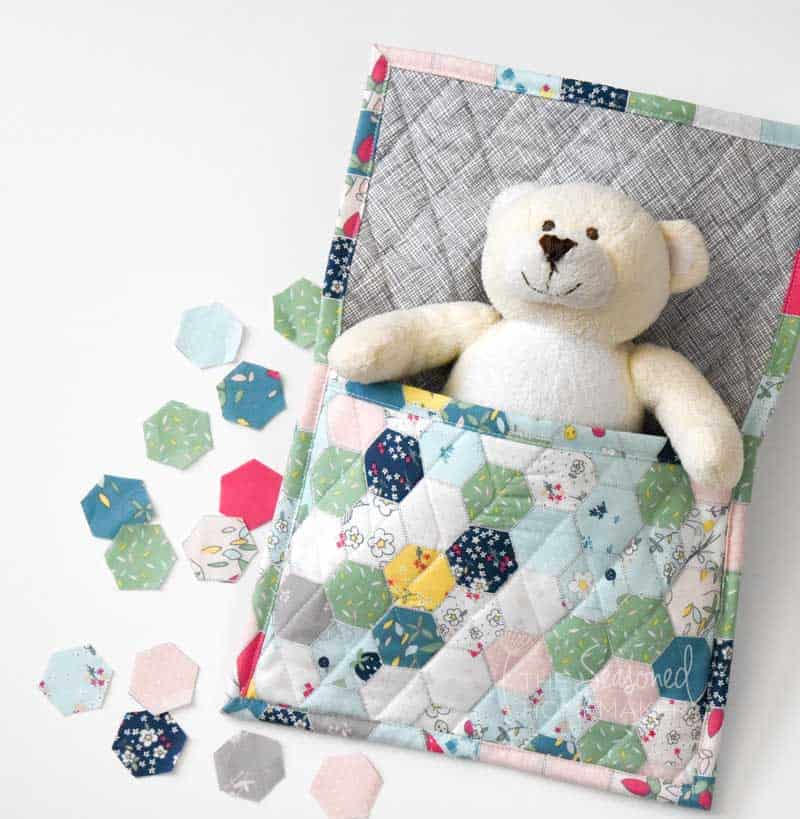
Easy Doll Sleeping Bag:
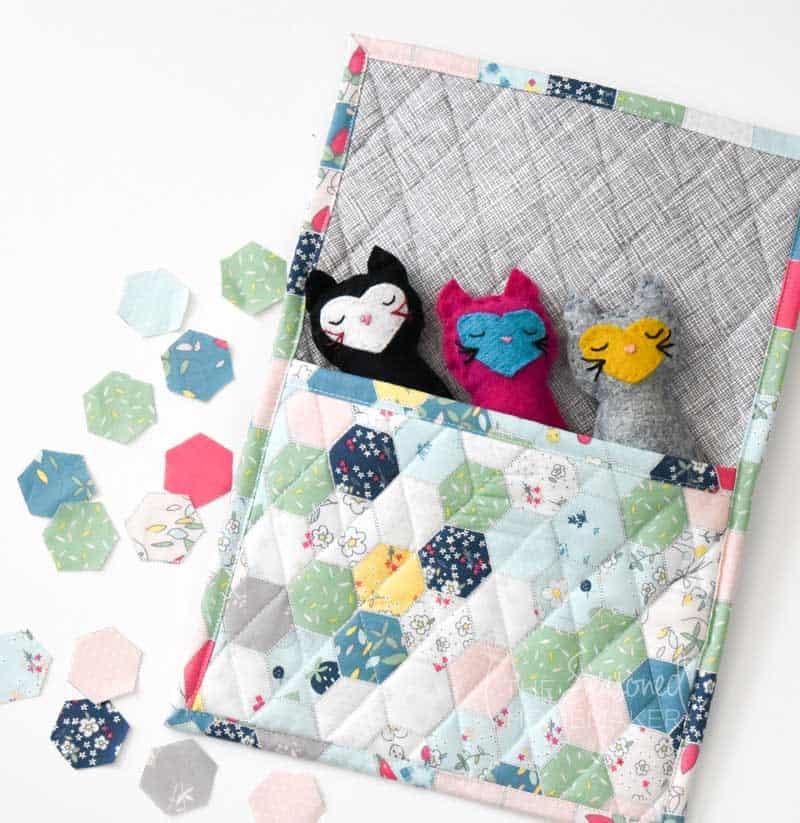
While perusing Stephanie’s website I also came across a doll sleeping bag and thought it might add to this project. The pattern is so cute and I thought I might make this to go along with my little kittens.
It’s made with hexies and has some hand quilting which meant it might be more time consuming than I anticipated. But, I loved the idea so I found some hexie-shaped fabric (see below) and used that to get the same affect. I also skipped the hand sewing part, although it really sounded like a great way to put my hand sewing skills into practice.
Instead, I used Stephanie’s pattern as a template for my own version of a Doll Sleeping Bag. It’s so straight forward I didn’t take any process photos. If you think of it like making a mug rug with a pocket, then you’ll be fine.
Materials:
- Qty (2) 8″ x 10″ Pocket Fabric – I used Riley Blake’s Serendipity by Minki Kim because it has hexies.
- Qty (2) 10″ x 14″ Back Fabric – I used Robert Kaufman’s Architextures by Carolyn Friendlander (affiliate)
- Qty (1) 8″ x 10″ Quilt Batting Scraps
- Qty (1) 10″ x 14″ Quilt Batting Scraps
- Enough scraps to make a binding approximately 2.5″ x 70″ – I used leftover Serendipity scraps to make my binding.
- Aurifil 50 wt. Cotton Thread
- Rotary Cutter with sharp blade
- Acrylic Ruler
- Self Healing Rotary Cutting Mat
- Iron & Ironing Board
Instructions:
- From the Pocket Fabric, create a quilt sandwich and machine quilt a simple grid design. I did this with a walking foot and followed the hexie lines on the fabric. Once you’ve quilted the fabric, trim it down to 6.75″ x 9″.
- Take about 10″ of binding and attach to back of Pocket using a 1/4″ seam allowance. Fold over front edge and machine stitch. Set aside.
- From the Back Fabric, create a quilt sandwich and machine quilt a simple grid design. I did this and marked my lines 1″ apart. Once you’ve quilted the fabric, trim it down to 9″ x 13″. Set aside.
- Make a 2.5″ x 70″ binding from the leftover scraps.
- Place the Pocket at the bottom of the quilt Back and pin in place. Stitch using a 1/8″ seam allowance to hold.
- Attach the binding to the back and stitch down using a 1/4″ seam allowance.
- Fold the binding to the front and machine stitch.
Isn’t that easy. And so cute.
And, the sleeping bag is for more than just kitties!