

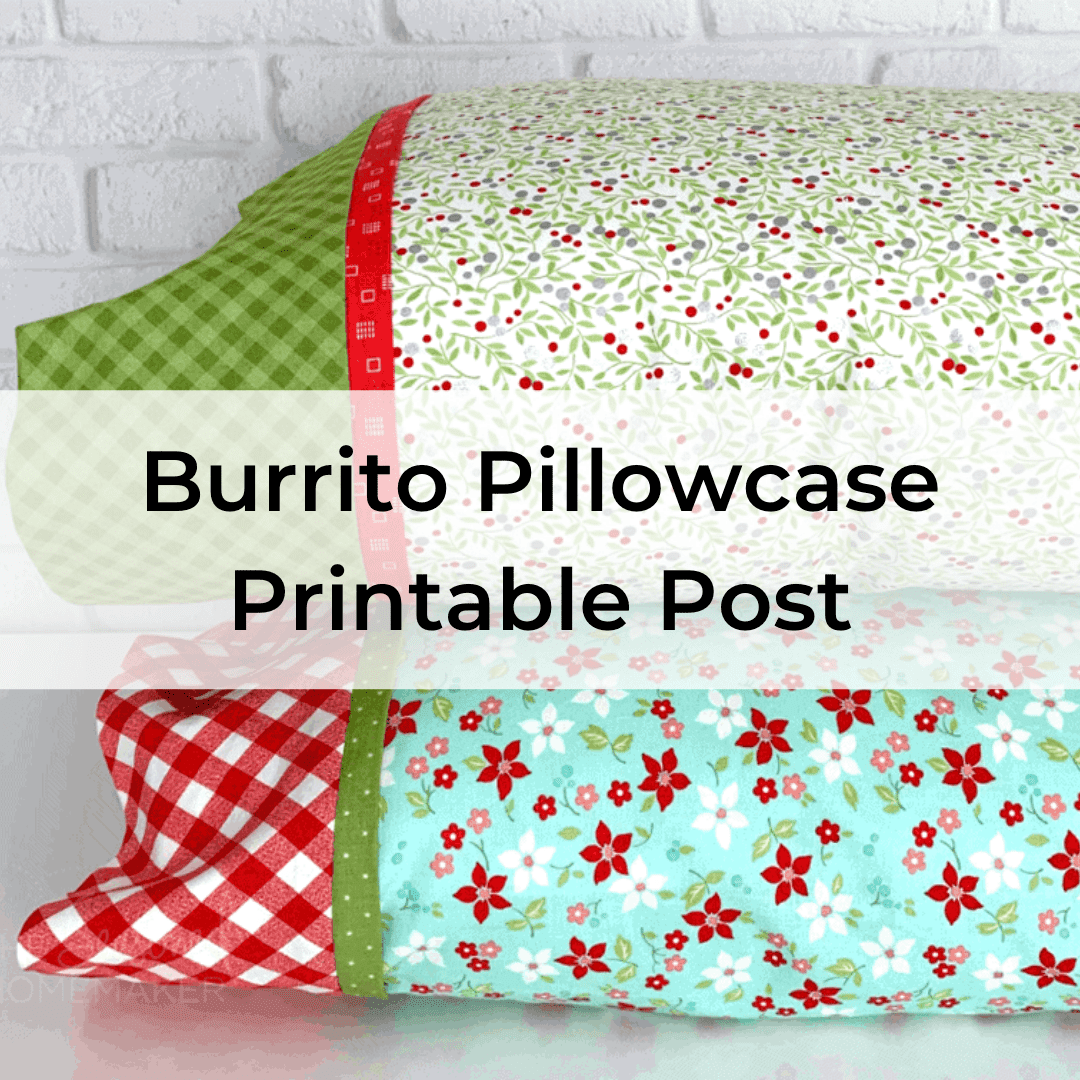
How to Make a Pillowcase Using the Burrito Method
This post may contain affiliate links which won’t change your price but will share a commission.
INSIDE: How to Make a Pillowcase Using the Burrito Method
Making a pillowcase is unbelievably simple if you follow my tutorial using the Burrito Method.
This method is so quick and easy that you’ll be making pillowcases for everyone.
And, in this tutorial you will learn how to sew a French seam. It’s simple, it’s fun, and you will be amazed at the results.
Note: Watch the video for more details. See below.
If you can sew a straight seam then you can make a pillowcase with a French seam.
I’m going to teach you something I call the Burrito Method to assemble your pillowcase and remove any fear you may have regarding French seams.
Let’s get started!

How to Make a Pillowcase Using the Burrito Method
Supplies:
- Main Fabric: 1 yard.
- Cuff Fabric: 1/3 yard.
- Trim Fabric: 1/4 yard. Note: This is totally optional.
- Thread
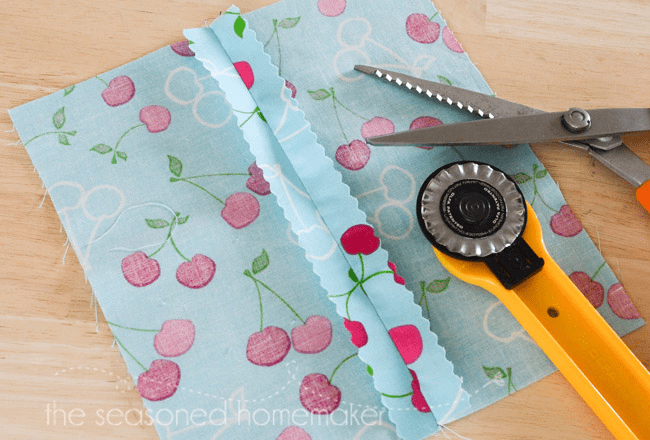
- Scissors
- Size 90/14 or 100/16 Heavy Duty Needles
Want an ad-free, printable copy of this tutorial? Scroll to the bottom of this post for more details!
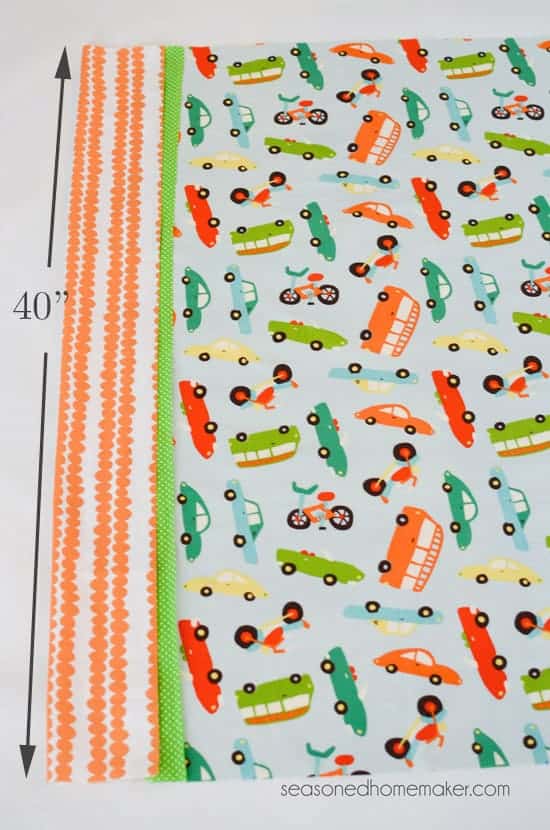
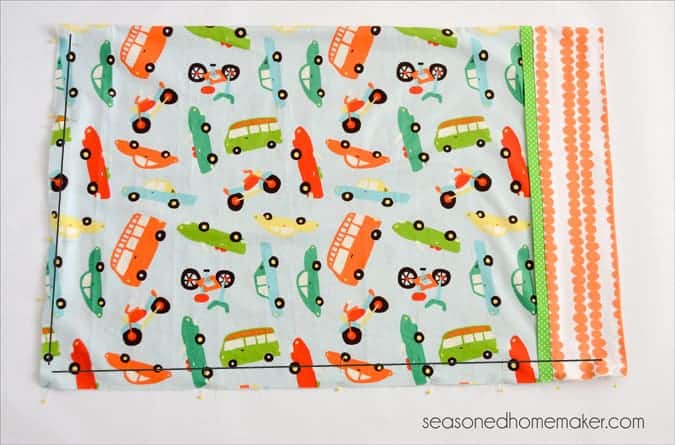
Step 1: Cut Out Fabric Pieces
From Main Fabric, cut 1 piece that is 27” x 40”
From Coordinating Fabric, cut 1 piece that is 9” X 40”
From Trim Fabric, cut 1 piece that is 2” X 40”
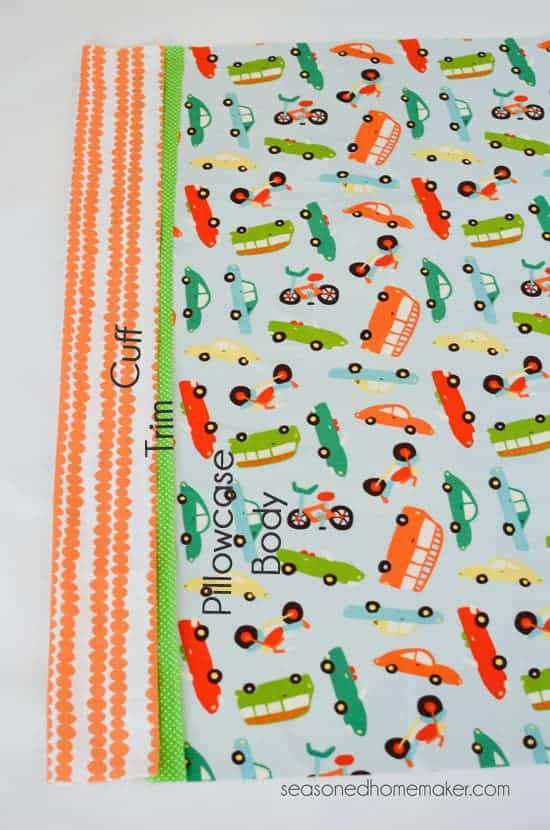
Step 2: Understanding the Process
It is important to understand what each piece is called.
- Main Fabric is the Pillowcase Body.
- Coordinating Fabric is the Cuff and will wrap around the Pillowcase Body. Kind of like a burrito.
- The Trim will be in between the Pillowcase Body and the Cuff.
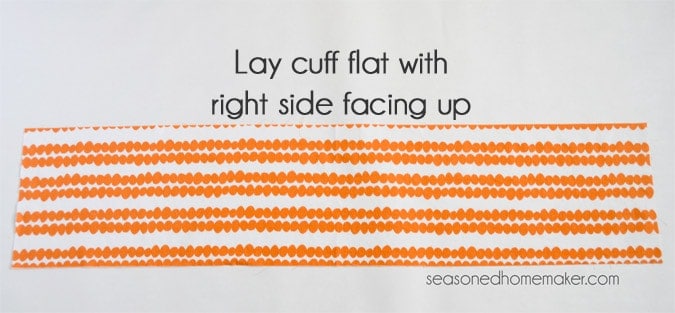
Step 3: Assembling the Pieces
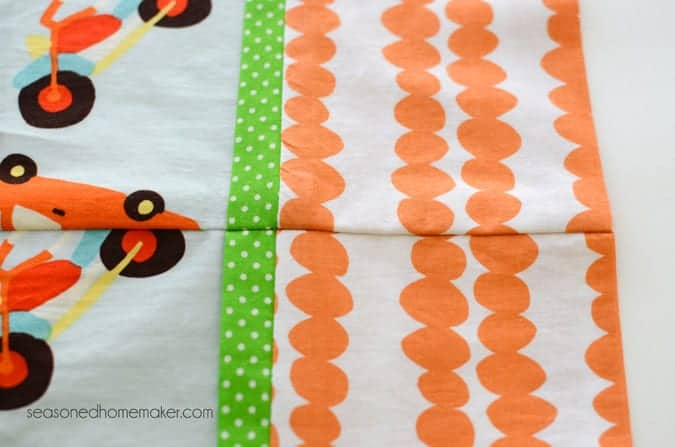
Lay the Cuff out flat with the right side facing up.
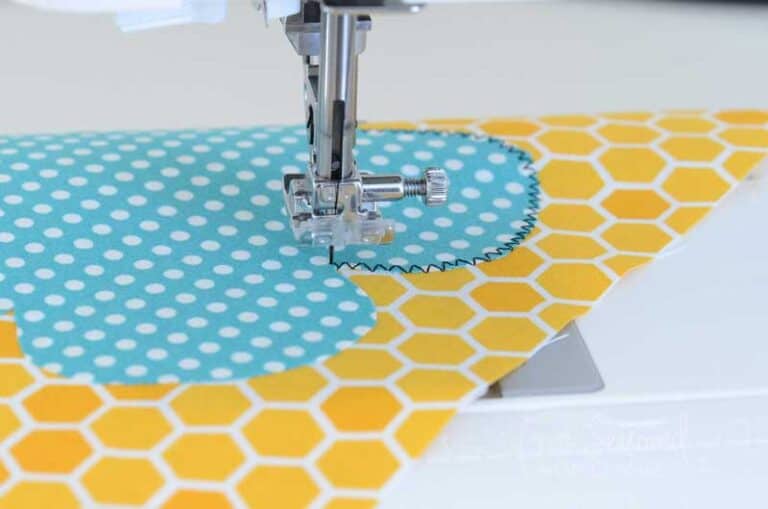
Fun Idea: Embroider or applique a name on the cuff before assembling the pillowcase.
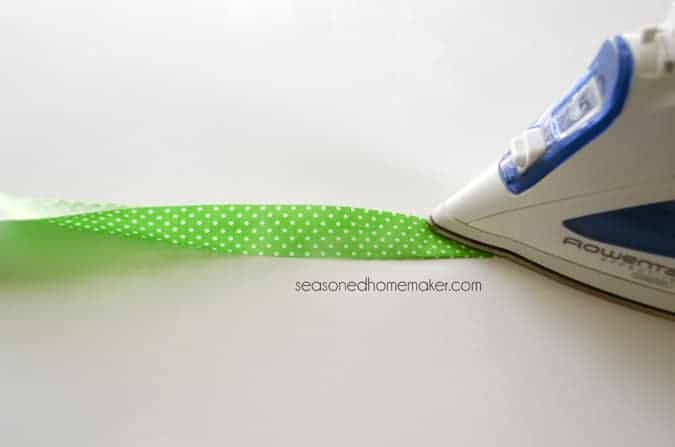
With wrong sides together, fold the Trim piece in half lengthwise and press.
Match the raw edges of the Trim along the top edge of the Cuff.
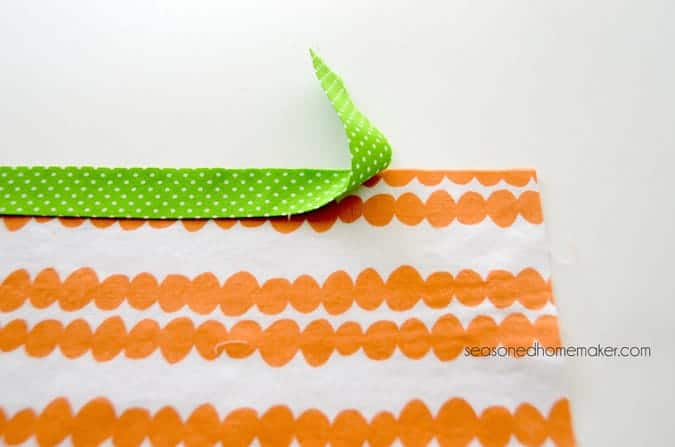
Pin to keep the Trim from shifting.
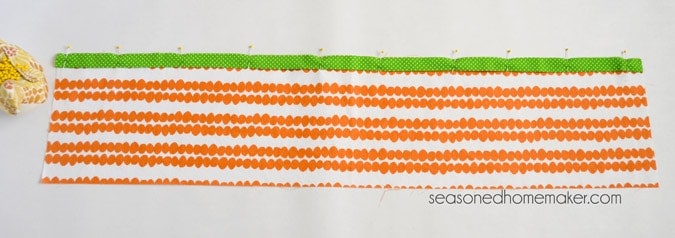
Place the Pillowcase Body on top of the Cuff/Trim with right sides together and pin.
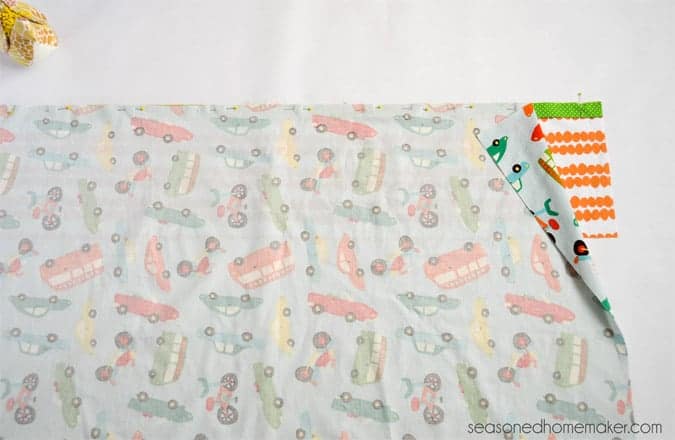
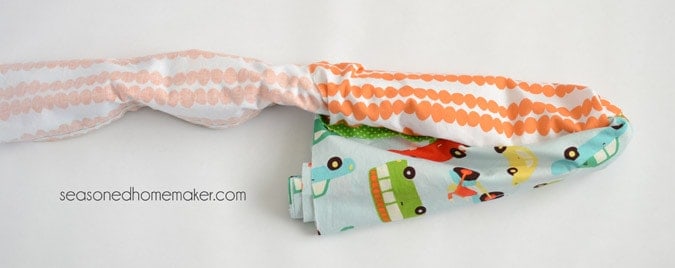
Step 4: Why It’s Called a Burrito
Starting at the bottom of the Pillowcase Body, begin rolling the fabric towards the top edge.
Continue to roll up the Pillowcase Body until it is a few inches from the top edge.

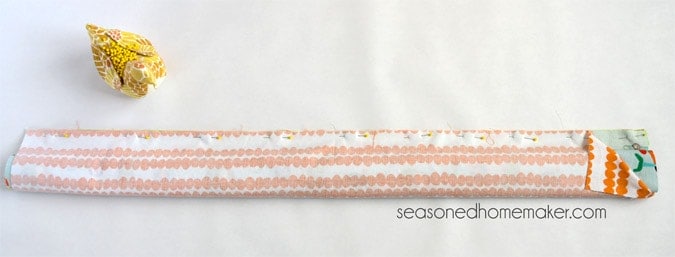
Take the bottom edge of the Cuff fabric and wrap it over the rolled up Pillowcase Fabric.
See how the Cuff wraps over the Pillowcase Body, like a burrito.
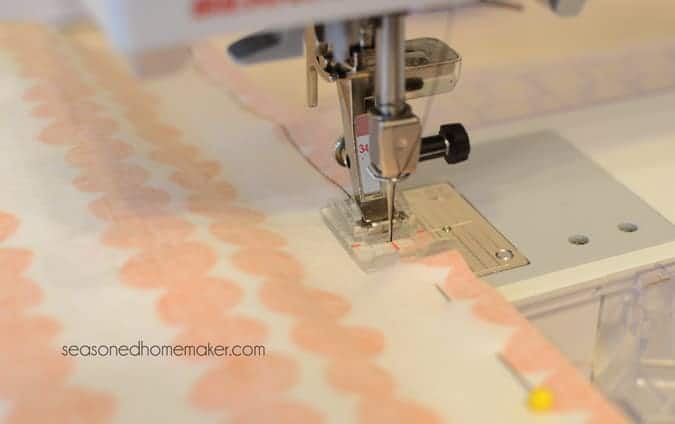
Pin through all layers of fabric.

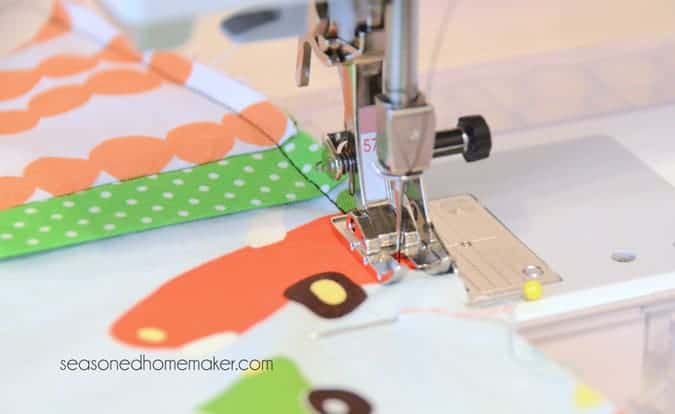
Using a 3/8” seam allowance, sew along the raw edge.
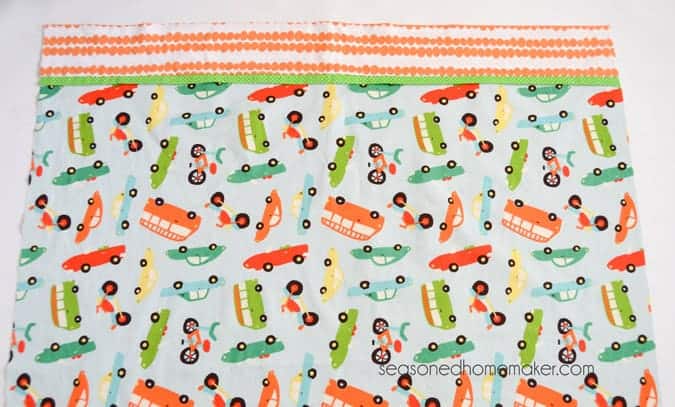
Fold back the Cuff and carefully pull out the Pillowcase Body.
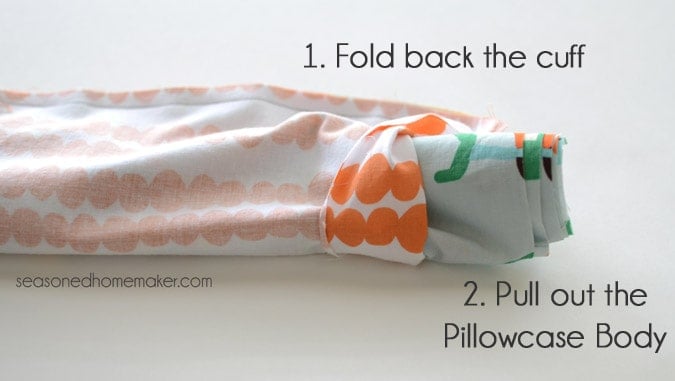
Keep pulling!
Almost there!

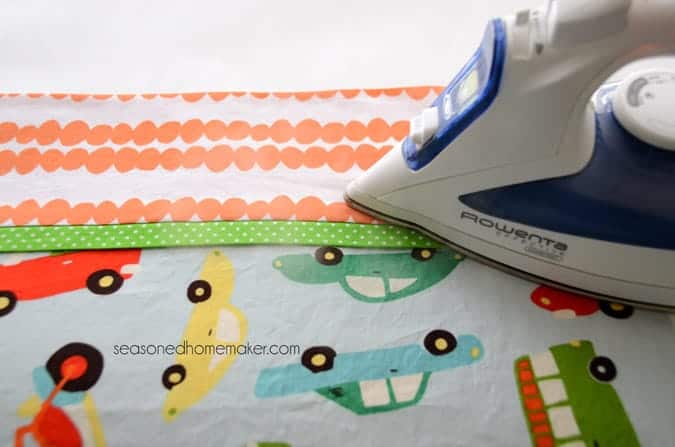
Press the Cuff and Trim on both sides.
Step 5: Side and Bottom Seams
The next step uses a French seam. If you’ve never sewn a French seam before, you can review the process here.
Fold Pillowcase in half wrong sides together, matching up the Cuff and Trim fabrics on the seam line.
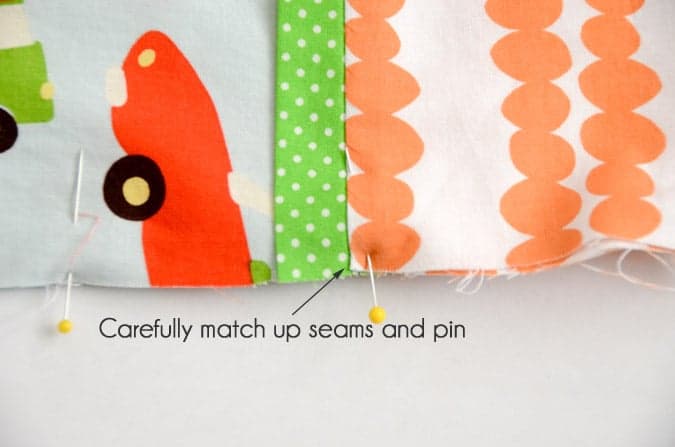
Pin around the raw edges on the side and bottom of the Pillowcase.
Stitch together down the side and across the bottom using a 1/4” seam allowance.
Be sure that the Cuff/Trim seam is even. I actually sew this first, then go back and do the rest.
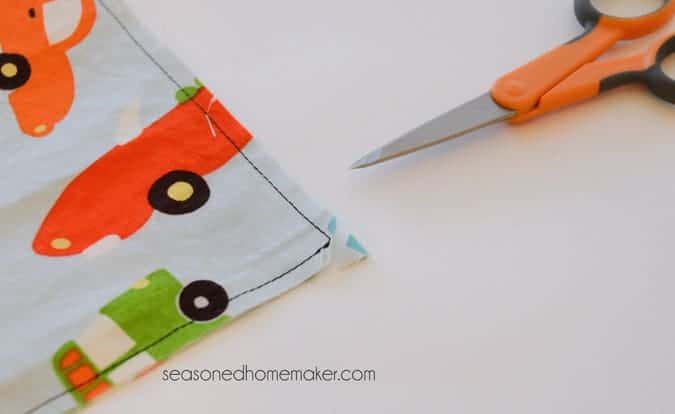
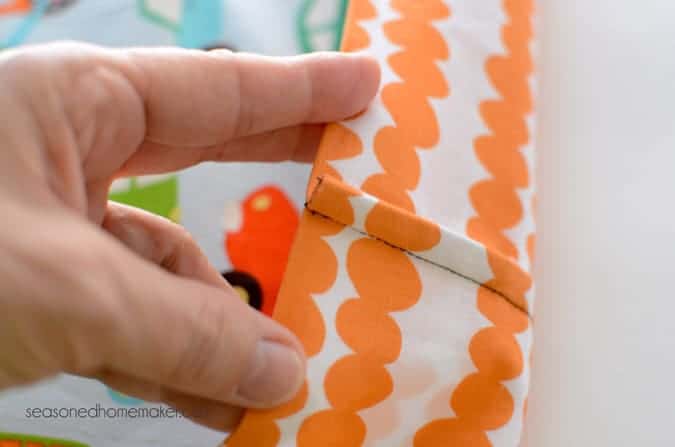
Clip the corner where the side and bottom seam meet. This will help with the bulk when you turn the pillowcase.
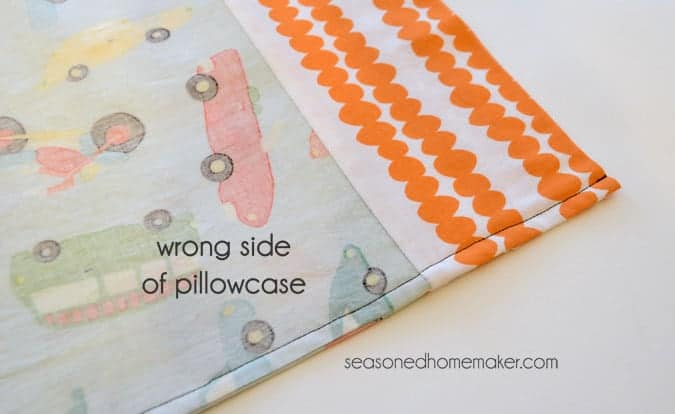
It’s time to flip the Pillowcase wrong side out and press the seams down. Using something like a knitting needle or chopstick, push out the corners.
Now, the Pillowcase is facing right sides together. Pin the side and bottom seams.
Stitch the side and bottom seams using a 1/2” seam allowance.
Step 6: Finishing the Pillowcase
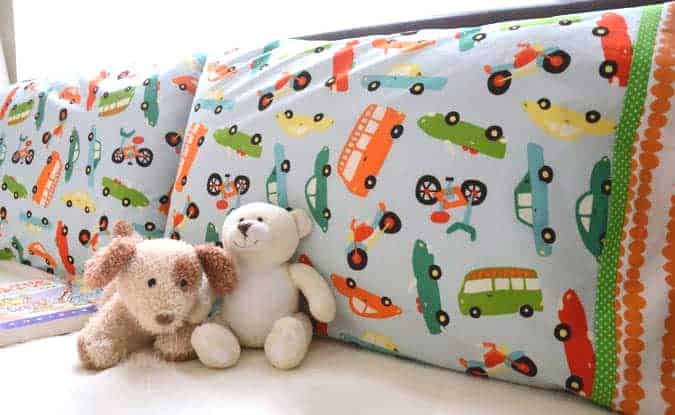
Turn the Pillowcase right side out and press the seams flat.
You now have enclosed French seams and the Pillowcase has no loose threads on the inside.
Voila! Finished size 30″ x 19″.
>>> Want a printable version of the post? Click the pink button, and download the Printable PDF instructions
Here’s a quick step-by-step video, too!

Great tutorial, thanks for sharing!
Thank you, thank you. This is the best tutorial for this method I’ve seen…you addressed the fact that you only have two seams on the body and not three as I was thinking. Your fabric is adorable!
do you know the name of the fabric? would love to buy some
This is from almost 10 years ago. I think it was a Riley Black fabric, but I can’t remember the name.
This fabric is Riley Blake Peak Hour line Out of print. I have looked high and low for it. If I find any I will let you know.
I made my gr grandson pillow cases for his big boy bed when he moved out of his crib. I am raising my (now) 3 year old gr grandson since his mum died. I am finding so many little things to do that please him no end. I did cat in the hat pillow cases. He loved them/
Following you now.
Janice
Just adorable, you have some lucky little boys. MY son has his special first pillow and case. It is almost time for me to make number two. They grow up too fast ; ( thanks so much for sharing on Super Sweet Saturday.
Steph
Great pillowcases!
These are darling and I love the colors. Thanks for sharing on I Gotta Try That.
Hugs,
Marcie
Just a tip for anyone adding a name or applique on the cuff, one you put it all together, the bottom of the name (the bottom of the letters) become the TOP of the cuff where the trim and main fabric get pinned. I have ripped and re-sewn 3 times to figure that out! Also, make sure you sew/applique the name on only the center of one half of the 9 inch cuff and not in the middle of the 9 inches. If you do not, the name will be folded in half once sewn. Learned that the hard way too!
Great tip ~ I’ve made these same mistakes myself.
I am having trouble figuring out which way to orient the embroidered cuff when I am assembling the burrito. Any suggestions?
I suggest printing or drawing what you want to embroider. Then do a mock-up on the cuff. That way you will get perfect placement.
Also on the embroidered cuff, fold the cuff in half, iron crease, fold one side in half again, iron…that crease becomes the center of one side ef the pillow case.
I LOVE how finished these pillowcases are! I’m making some for my girls’ nursery bedding and they’re turning out SO lovely! Thanks for the thorough and well-explained tutorial. <3
Glad I could help!
I have seen many pillowcase tutorials (and have not tried one) simply because I could NOT understand how the fabrics pinned together then rolled up could possibly work …. yours was so easy I now know I can make them! Thank you!!
It’s so easy – just like making a burrito.
I would like to know what size to cut fabric out for a queen size pillow case. Thank you
I didn’t know there were queen size pillow ~ who knew.
Bridgett, did you ever get an answer about the queen size pillow? That’s just what info I’ve been looking for. Thanks
Maybe measure out your current queen-size pillow case and add seam allowances. Good luck!
Thanks for the fabulous tutorial! Just made a pillowcase and my daughter loves it!
That is wonderful! Thanks for sharing 🙂
Where did you get the adorable car fabric? Glad I just found your website (thanks to GF Crockpot BBQ Chicken 🙂
Thanks! The fabric is by Riley Blake, but it is discontinued. You could try doing a search on Etsy and see if anyone has a few yards to sell.
I just finished making one by following your easy step-by-step tutorial. One question: When the pillowcase is complete, what do you do about the thick bulge in the bottom corner, due to the french seam?
Great question. There will be a bit of bulk, but one way to counter that is to push out the point with a chop stick or knitting needle. Press with steam, and repeat. It will flatten it some, but there will always be a bit of bulk in that corner.
Thanks for the answer, I will try that. My 2 year old slept with his new “big boy” pillow last night and was a little bonkers, he was so excited! He has 3 older brothers, he dthought that he should start out on the floor with them since they were having a campout in a bedroom. It was adorable!! Love boys!
What a precious story. I agree – I love boys, too.
Thanks so much for posting this great tutorial! I have a question: does the trim get sewed down at any point?
I just finished unrolling my burrito, and it looks so nice, but the trim seems like it needs to be top stitched or something… will it lie flat after the whole pillowcase is completed?
Thanks again for sharing your talents with us!
Jennifer
Top stitching is a personal choice. It should lie flat. Hit it with some steam….
If the trim is not sewed down it often gets wrinkled and messy after washing. I either sew it down or have found that making it a bit narrower (2″) and sewing it to the cuff and the main body before rolling the burrito makes the trim a solid piece of the pillowcase. It does require another seam but you don’t have to sew it down later and it always looks neat.
Thanks, Leslie- steam did the trick. I’m so pleased at how the pillow case turned out. Off to make more!
Thanks for the update. With any sewing, steam is usually the answer. I usually use a piece of silk organdy for steam pressing.
I just made one of these for my daughter’s new toddler bed and she loves it! This is the best tutorial I’ve found, and I love that all the seams are finished and beautiful on the the inside. Thanks again!
Thank you for sharing this. It is such a blessing to know that you could make something special for your daughter.
thank you thank you thank you! i just used your tutorial and loved it! b
Thanks for the great tutorial. I’ve made at least a zillion pillowcases using this method.
I find that a “special” pillow case makes a great gift for someone who is ill or shut in.
The first cases I made were for my 3 step grandsons. They called to thank me for their “jumping bags”. I laughed so hard but figured that as long as they liked them they could do whatever they wanted with them!
xoxo
jill
Jumping bags ~ this made my day!
Do you know that I’ve seen tutorials all over for this, but none of them have seemed clear or easy to follow so I’ve give up on trying this. But yours is so clear! Thank you for posting this. Your tutorial is excellent.
Awww! This made my day!
I attended a Girl Scout weekend for leaders and learned to make this version of the pillowcase, i lost the instructions until i came across your site.. THANKS.. im making 9 pillow cases for my neices and newphews..i have mine i made at the weekend and my kids know when i say get “MY PILLOW” its the one i made myself, it has gingerbread little men on it.. i feel like a kid and im pushing 40!!!
Does anyone know the fabric measurements for a king-sized version?
I’m sorry to say I don’t have those dimensions. Hopefully one of my readers can help!
Thanks for sharing these dimensions.
The pillowcase would be cut at 36″ x 44″ for a king sized pillow
This is a perfect tutorial, thank you for including all measurements including length and width. The other tutorials i looked at did not…. Many failed attempts later i found your site, and success! 🙂
Really like the fabrics you chose. I love the “burrito”! In sewing classes I’ve given to kids, we always make one of these. It’s sooo simple and fun and is a very impressive finished project. They kids have always been so proud of themselves when completing these pillow cases and they have something they will use over and over again. Love it and I really enjoy your blog. 🙂
Thanks for this great turtorial. I just made my grandson a great pillow case for his 7th birthday on Monday. Thanks for the measurements & photos. Brenda
I made 2 yesterday following your instructions to the letter. Turned out perfectly and I slept great !!!
Thanks for the clear directions. I will be making many more for sure.
That’s awesome.
Love this. I’ve been quilt making all year and would love to make coordinating pillowcases. Also thanks for the guidance on the French seams. Great tutorial!
hi how would you make this using a fabric that has a one way design???? would it be the same just an extra seam at the end 3 instaead of 4
thanks so much
I just muddled through this and am replying so I can remind myself next time 🙂 My cuff and body both have directional prints. The cuff is laid out right side up with fabric in the correct direction. The body is placed with the print going in the wrong direction. So it’s upside down, right sides together with the cuff print. Came out great!!
THANK YOU for such a well thought out thorough tutorial! Your photos are wonderful and your fabric picks even better! I can’t wait to make these for Christmas gifts!
Thanks for the tutorial! A friend of mine made a goal to donate 200 pillowcases to a local battered women’s shelter before Christmas and she recommended this tutorial for those of us that need help sewing our pillowcases. I just finished the first one, and it went so quick + I’m very pleased with how “sturdy” it feels. Thanks, and happy holidays!
Glad that this tutorial was helpful. I think you have some lucky great nephews!
Enjoyed your instructive video. Although I’m a long time sewer, I’ve never made a regular pillow case! My 26 yr old son admired some moustache fabric pillow cases in a store so unknown to him, I’m making him a set for Christmas! He grew a beard for “movember” so these cases will be perfect for his apt. I’ll be using ur burrito method–should be fun and easy! Thanx so much for doing this.
This is one of the best tutorial’s I have seen! It is so clearly written and explained. Great Job!
I have been looking for a tutorial that is easy to follow for this pillowcase method. I am going to give yours a try, it looks like a winner to me. Thank you.
Found you on Pinterest and thank you for a great tutorial! I’m a beginner sewer (have been seeing less than a year) and JUST discovered grain line. So, when you say the pillow should run along the grain, that means the long part of the pillowcase should be along the grainline? So no “stretch” longways? Thanks!
I did this years ago, but lost the pattern, thanks so much for getting it for me. I am going to use it to teach sewing in a woman’s rehab center.
I love this method. I make pillow cases for charity and I can make a lot in no time at all and they are so EASY.
I love these pillowcases and have made many. Your tutorial was really GREAT! I always have one problem. The point at which the three pieces of fabric join in the French seam is so thick that it will barely go under my presser foot. Any ideas how to reduce this bulk? Thanks!
I’d love to make these. Are your measurements (what you need) for one pillowcase or two?
Measurements are for one pillowcase.
Thanks for this picture tutorial. I bought a pillo case kit recently and though the directions seemed simple I could not figure them out. I am so glad I found your website!
I love your clear instructions but I’m having so much difficulty trying to figure out how to make this for a toddler pillowcase so that the final pillowcase measures 20″ x 14″
Can anyone help me?
I saw in the directions where you said to fold the trim in half and press it, but I didn’t see where you said to fold the cuff in half and press it. Aren’t you supposed to also fold the cuff in half and press it?
No, this gets done when you roll the pillowcase into a ‘burrito’.
Thank you for this tutorial. I made two pillowcases this afternoon. I used your burrito method and they both turned out nicely. Thanks again for taking the time to post the tutorial. Mary
That’s awesome!
This is a very good tip especially to those new to the blogosphere.
Brief but very accurate information… Thank you for sharing this one.
A must read article!
These came out great, thank you!!
Love this! It’s a pillowcase Christmas for all the little ones in my family.
Thank you soooo much. Am making pj’s for grandkids for Christmas with matching pillowcases. Just tried my first one on scrap fabric & it is awesome! This is such a great pattern. Have sewn for years but am always pleased when I try something new & it turns out so lovely the first time!
Love your site.
I was thinking that it might be easy to use pinking shears on the inside seams. That would help with the bulk because of the french seams.
Pinking sheers would work but wouldn’t be as clean as French seams.
I love the French seams. They don’t seem bully to me. Trim them down. The pillowcase looks so wonderful!
Does anyone know what the dimensions are once the pillowcase is finished? I’m wondering if this will fit a standard sized pillow.
The finished measurements are just above the final photo and the pillowcase fits a standard sized pillow!
Thanks so much. I made 10 these for Christmas gifts for grandkids. They are so beautiful. Really thankful for this page. Who knew I could make a french seam? Happy to finally be able to make a professional looking pillowcase instead of my throw together ones. Merry Christmas!
Thank you for your kind words. Congratulations on your graduation to French Seam Expert!
I just have to add my thanks for this great tutorial. Made a cute pillowslip for my 2 year old granddaughter. I did downsize it slightly due to the size of her pillow, being a first pillow, and was a bit worried at the end when the contrast fabric was suddenly half the width after turning! Silly me for not reading through the instructions thoroughly first, but I had allowed a bit of wriggle room and all was well.
I got a sewing machine for Christmas. This pillowcase was my first sewing project since junior high sewing classes (I’m 20 now!) and it turned out so well that I made another just for fun!
Thanks for such an awesome tutorial and such clear instructions!
I found the directions for this burrito technique on several “you tube” videos, but your written directions and photos were better than the videos. I tried to use French seams, but the type of fabric I used made the seams too thick. After ripping out the French seams, I used regular seams and sewed them with a special zig-zag finishing stitch to prevent raveling.
Your directions for the burrito pillowcase techniques are the best I’ve found. I used a traditional seam sewed with a zig-zag finishing stitch to prevent raveling instead of French seams. Thank you.
Thank you. Your directions were clear and easy to follow 🙂
Hope you can help…I have to make a pillowcase for a friend and the design of the fabric is going from selvage to selvage. I do not want it to go that way ..can I turn the fabric to the side and make the pillowcase that way? The fabric I am using is the green Little House on the Prairie scene of Laura running in the fields. I fear that if I do not change the direction – it will not end up going the correct way! Thanks for your help in advance!
I’m sure it would work. Just be sure your fabric is squared correctly.
This is a fabulous tutorial. I am not a great sewer but feel I can make some cute pillowcases for my toddler grandson’s nursery makeover now. Thank you! What a timely post.
PS pinned to my nursery board on Pinterest.
Great tutorial, Leslie! Your instructions make a lot more sense than other’s I’ve seen. I too gave up trying but with these instruction, feel confident my grands will get monogrammed pillow cases for Christmas this year!! LOL Have a blessed day!
Another EXCELLENT tutorial. You have such a gift at being able to explain what is normally so difficult to grasp. Love the fabric you used. These are really cute pillowcases. Thanks so very much for this post.
After sewing side seams, I make sure to fold the corner carefully to minimize bulk in the corner.
Ha! Fabulous tutorial!
I bought a pillow case at a farmers’ market 2 weeks ago, and was wondering how it was put together.
Today I was cruising through a Pinterest page, and whoa! … your tutorial showed up.
Now I see how this is done … so very clever! Must haul out the stash!
Thanks so much!
Awesome site. When it comes to sewing, I know just enough to make me dangerous and your step-by-steps promise to keep me in line. Never made a pillowcase before, but when shopping for another project, I found a pattern that I had to get. Store-bought pillowcases sometimes have that satiny trim along one side of the cuff that I assumed was bias tape, so I picked some of that up as well, knowing I’d figure out what to do with it. Yet, your tutorial uses a regular cut of fabric for the trim. Are there any advantages or disadvantages to using pre-made, single-fold bias tape instead?
You can use pre-made bias tape, but use the 1/2″ double fold in order to get a wide enough piece of trim. It will also be a little stiff, but this washes out quickly.
Shouldn’t your pieces be cut an inch or so bigger than needed to allow for shrinkage when you wash and dry your fabric prior to cutting to exact size?
I’ve never had a problem with shrinkage,however, I do recommend washing and drying your fabric before cutting.
I love your explanation. Years ago I had a friend introduce me to French seams and found it very intimidating. I recently bought a pillowcase at a thrift store and was impressed that it was obviously homemade and made with French seams. I was trying to analyze how it was constructed. Now I know! I have made similar pillowcases without French seams simply serging them. Now I will always make them with the Burrito method! Thank you!
Thank you for the easy to follow pattern and pictures. I can not wait to get started.I am going. To serg the first seam of the French seam then sew with the reg machine to enclose. I hope it works!!! I will let you know. I am sewing these cases for a project for our quilt show in sept. How many do you think I can do.Ha! Ha!
Great stuff very easy & neat to follow instructions. Did for my boys they loved them..
Thank you! I used this for my very first sewing project. I had great results.
Would you by any chance have the fabric measurements needed to make a toddler pillow case in t he burrito method? The pillow is 12×16. Thank you
I don’t have specific measurements, but start with the pillow size and add a few inches each direction. I’d try it on some scraps, first.
It’s obvious this wonderful tutorial took a LOT of time and work! Thanks so much for sharing it. Hugs!
I really like the pictures that go with the directions, easy to follow. Do you have the yardage for the fabric amount to make a King and Body pillow? Also for the size to cut out for each size?
Unfortunately, I’ve never done a tutorial for either of these sizes. However, it would just be a matter of taking a couple measurements and adding to the overall size. I’d practice with muslin or an old sheet, first.
I was a little confused how the rolling, wrapping and sewing would turn out, but it came out really nicely.
Thanks for sharing your easy instructions to make a totally personalized pillowcase!
Thank you for giving the whole story! That is: putting the fabric on grain and pre-shrinking! It is “pound foolish” to hurry so fast when a bit of care makes for a much more stable and long lasting pillowcase that doesn’t twist or shrink upon first wash!
Thank you so much, made my son an avenger quilt for Christmas now he will be able to have a matching pillowcase?
Just made my first one using this method & it works great. Thanks for the detailed instructions!
Great directions! You are correct. Took about 15 min. Thanks
Thanks so much for this. 2 questions. Can I use flannel for the body and regular fabric for the cuff? Should I prewash them? Thanes so much!
Yes and it’s up to you!
I love this method! I have made some but the material was pre-cut out by somebody else. So my question is now that I have tracked down the directions…Are the fabrics cut on the fold or on a flat single piece? Just looking for clarification.
Thank you for this!
The are cut on the fold. There should only be one side seam.
I just made one of these for my son. Still not sure how it works- but it does! I feel like a fabric WIZARD! thank you!
Loved it, very easy will definitely use again, converted everything to centimeters though! Can’t insert a picture but I did a dinosaur skeleton pillow slip omitted the trim and a black thin cord cuff.
It is obvious that you are a great teacher. Your written instructions and photos are clear and reinforce one another. I’ve heard about the burrito pillowcase. Now I know how to make it. Thank you. I’m ready to make some for our homeless shelter. Gratefully —
Cute designs. French seams are great because the fabric won’t ravel with laundering or wear. They’re similar to the flat felled seam (like the ones on the outer leg seam on jeans), but the French seam is on the wrong side of the fabric, rather than the right side of the fabric. The flat felled seam is stitched one more time, flat against the fabric. (It’s usually a gold, heavy thread seam on jeans.)
One note about pinning the fabric for stitching a seam — Place your pins at a right or 90 degree angle to the seam, rather than along the seam line. If you pin it at a right angle to the seam you can actually sew over the pin (the needle won’t break, but instead will push the pin to one side or the other of the stitch).
Thank you, Leslie! If I am going to take the time to make my own pillowcases then I want them to be made without raw edges; like these. Great instructions!
They are great instructions. Thank you so much for them.
My first project with my new sewing machine. Thank you for making a GREAT tutorial to follow…I’m not exactly a seasoned sewer, but I found your directions easy to follow.
Really great idea. Thanks for sharing your creativity with us. I just love to stitch my very own pillow cases for comfort level basically.
Regards
Anju
Do I really need a yard of main fabric if I just cut it down to 27″?
The 1 yard amount is to allow you to square up the ends. If you have a squared piece that is 27″ then feel free to use it. However, most fabric cuts will need squaring at both ends. The additional 9″ of fabric allows for this. If you don’t square this piece, you will end up with a twisted pillowcase – which gets worse after washing.
Thank you Leslie for a great tutorial. I made 2 of these out of princess fabric for my 4 year old and 2.5 year old granddaughters. They are visiting next week and I wanted something special for them. These were perfect. I am a seasoned quilter, but never made pillowcases before. The directions were so easy to follow and I made both cases in less than an hour. Thanks again!
love this method..do you have measurement for king size cases?
Unfortunately, no I don’t have those measurements. I recommend measuring the pillowcase and adjusting the pattern accordingly.
Thank you for the excellent tutorial!
I used big Ric Rac for the trim and embroidered a name on the cuff. I am very pleased with the result.
Just a note for anyone who wants to embroider a name on the cuff: Be sure to first divide your trim piece into quarters and place the name in the center of the upper right quadrant, with the bottom of the name closest to the unfinished edge of the cuff piece. So, in the picture of the cuff piece in step 4, the name would be upside down, centered, in the upper right portion of the cuff.
Thank you again, this is truly a top-notch tutorial!
I stumbled across your blog after someone posted you on Pinterest. I am so BLESSED to have found you! My boys are growing up to appreciate the handmade thanks to this blog, which is a joy in a world of phones and text messages. And thanks to you, they and their hockey teams are now the proud owners of iPod/iPhone cozies and skate bags from a duck fabric material. This is the first year of no broken phones and rusted blades thanks to you!
Appreciate the information and insightfulness (like the buttonholes in the pj pants which I had only like five or six times forgotten about but now do not thanks to your blog).
Thanks for the time you put in. I hope this is making a wee bit of cash for you to do more fun things with!
~MinneMommie
Thank you for your kind words!
This was so FUN! I made about 15 of these, assembly-line fashion, out of Christmas fabric for grandchildren, my mom and for our AirBnB. The burrito method is amazing–and easy to do.
One instruction I would add: If you’re using white, light or a thin fabric for your cuff, after you make and sew the burrito and before you ‘undo’ the burrito. make sure you trim the seam allowance and get rid of threads so they don’t show through.
Thanks for this tutorial.
Thank you so much! As always, cutting is the critical part of the process and takes the longest. Great instructions. I tailored the size to the kids’ new pillows. I used large remnants from my granddaughter’s dresses previously made and small pieces of irresistible fabric collected from here and there. Last night I wiped up 7 pillowcases that turned out beautifully. The one fabric combo that was the most questionable turned out the looking the cutest and is darling. It is easy and fast enough to take some chances. I top stitched the lower edge of cuff and lower edge of trim which I think will help reduce wrinkling. I layered/trimmed where the 10? layers of fabric are and that helped my machine over the hump. I shouldn’t exaggerate, I didn’t quite whip them out. Estimate about an hour per case from start to finish. Pre-wash fabric and do pay attention SH’s tip to avoid the aggravation of a twisted case. Thank you!!! Can’t wait to explore your website!!!
I’ve heard about this method of making pillowcases for years, but never tried it or any other method. However, literally yesterday I was given several yards of train fabric and today attended a birthday party for a three year old train lover. Guess what he received? (And which turned out PERFECTLY!)
Thanks for sharing such a heart-warming story.
Thanks for this! Great instructions and enough illustration for a newbie. Made a couple for my son and they came out great.
I love how professional these pillow cases turn out!!! Since all the seams are enclosed they probably last longer in the wash too. They sew up so quick and easy, thanks to your wonderful directions. Thank you!
I’ve made these before but my big problem is always how to cut the fabric. I cut the body fabric wrong on one occasion. Ruined! Is the salvage edge the length of the fabric? So many tutorials just gloss over this essential piece of information that I’m very leary to cut another pillowcase.
I feel the trim is too wide. I plan to cut it in half next time.
That’s the beauty of this pattern. It’s infinitely changeable.
Excellent tutorial! Very clear; left no doubts about steps. Thank you for having your thoughts and steps organized! I have been a seamstress for 47 years!
From one “seasoned homemaker” to another, thank you for this wonderful tutorial! My grandson will soon be transitioning from a crib to a toddler bed. I bought a toddler pillow and made three different pillowcases for him, with fabulous results! (BTW, cutting dimensions for a 13” x 18” toddler pillow are: 32” x 17” main fabric; 32” x 2” small accent fabric; 32” x 9” for end cuff fabric.)
I’m not a great sewer, but I knocked two professional looking pillow cases out in less than two hours. Awesome tutorial. Thank you!
Perfect tutorial! I’m new to sewing, and this was second thing I’ve ever sewn, but it turned out great. Thank you!!
I am making a pillow case for my daughter, but the pattern design will look much better if I lay it vertical to teh grain- sea turtles swimming wont look right if they aren horizontal on the fabric. What will end up happening to the pillow case if I do it this way? Thank you
Your grain will be running in a different direction and you may need additional fabric. As long as you pay close attention to getting the grain correct, the pillowcase won’t have a fabric twist.
…WITCHCRAFT!!!!!!!!
But seriously, theres no other explanation. AWESOME tutorial!!!
You are a gift!!! This is an absolutely genius method and I can’t wait to go cut my fabric. Thanks for sharing your talents with us!
Can one use wide bias tape for the trim?
It’s possible but it’s easier to just cut the trim in the tutorial.
I love this simple design, but I was wondering if there is a way to add a flap closure. It drives me crazy when the pillow trys to sneak out of its case every night!
So true! I think you could just use similar measurements and apply them to my envelope pillow pattern.
Great tutorial! I’ve made 3 & they were easy as pie. My next one has a directional print for the main fabric so I’m going to have to cut it differently. I’m struggling with how to cut it. Instead of one main piece that is 27” x 40”, does it make sense to cut 2 main pieces 27” x 21” and seam them together w a French seam, then trim it to 27” x 40” and continue the assembly from there? If yes, would you seam the front & back main pieces in opposite directions so that if the cuff is on the right or left the main print is still going the right direction? Thank you!!
It depends. I recommend you baste the pillowcase and then see how it works. But your ideas sounds good.
I bet when you posted this, you never expected you’d still be getting responses seven years later! This is a clear, well-written tutorial with very helpful photos. The project is a great stash-buster, too (although I must confess to buying two remnants as I didn’t have any trim or cuff fabric that matched the fabric I intended to use). I love how my first one turned out (even if my trim is a little wonky due to uneven pinning, oops!), and am already planning to reduce the pattern down so I can make little bags to carry my knitting projects. Thank you for such a wonderful tutorial!
This is one of the best tutorials. Clear and concise with great photos. I have made many and the grandchildren love them. Thank you for sharing.
Just made 4 Trick or Treat/Pillowcases after candy is gone. Big hit with grandkids and me the sower. Thanks.
Hi Leslie! I am an occasional sewer and tried your pillowcase using the tutorial provided. Great instructions that were easy to follow! I’m so thrilled with the way my pillowcase turned out, so I’m going to make one for each of my four grandchildren. Thanks so much!!
I love your tutorial because of the pictures that match the written directions. I printed the sections showing the “burrito ” rolling and made it to a quick reference guide!. I am a visual learner and this helps me to sew the case in the right way. I intentionally make the cases a bit long , so the pillow doesn’t show at all. The grand kids loved my first set! A new Christmas tradition has been formed.!
Pictures are clear and thread is visible which I totally appreciate!
After checking a number of websites, yours is the best and easy to follow. Thank you for sharing your talents. This Grandma will have one for each of my grand children ages 20, 15, 13 and 10 months.
I just finished the umpteenth pillowcase using your tutorial. Yay! Thank you.
Two things I have discovered make the the construction a little easier:
1) I cut the trim piece 1.5″instead of 2″ or 2.5″. It is a little less forgiving if the seams aren’t straight, but the trim comes out less “flippy”.
2) I don’t cut the individual fabric pieces to the 40″ width. I cut it to 40″ after sewing and flipping the burrito.
I have also used fabric narrower than full width by seaming them together with a french seam. Very satisfying.
Thank you for an excellent tutorial. I made my first pair of pillowcases and because your tutorial was so precise, it was a breeze to make. I am a beginner sewer and if I can do it anyone can. Thank you again for your time in explaining this technique.
I return to your tutorial every time I make another pillowcase. Just completing 6 for the guest room. I use linen for the base and then coordinating fabrics from the bedding for the cuff and trim. They always turn out so sweet. My granddaughter saw one in my guest room and loved it so much she made one herself.
Best tutorial of all! I must have watched/read a dozen different tutorials and yours is by far the best! I can never find pillowcases I like at the store so I thought why not make my own.. I like to buy thrift store sheets and use them for sewing projects and this is perfect for them. Thank you!
Here it is 2021 and I just found this! Well done! Thank you! I now get to recycle 5 other sets of instructions that never made a bit of sense!
Thank you for posting the first coherent directions for this that I’ve found. All the others say things like “lay the cuff on top of the pillowcase” with no directions on exactly how to position it. Nice job with the illustrations and labelling them.
I made 10 cases for my family for Christmas. I used flannel, they came out so cute. I recommend adding an inch or so to the cuff width for flannel as the flannel likes to stick together when pulling out from the burrito. I also used a directional print for the cuff and I cut it lengthwise to make the print run along the cuff. I bought 1 1/4 yards for the directional print.
I LOVE your tutorial for the pillowcase. I’ve been making them for a while now, but your directions and tutorial are the best I’ve seen so far, and even though I know the basics, I never make one without loading your page for reference. I am SO thankful you’ve make the tutorial printable, as my computer is not readily accessible from my studio (which used to mean a lot of running from the den to the studio to reference the tutorial between steps. Now I can print the pdf and take it with me to the studio when I make pillowcases. Thanks!!!!
I made 20 at Christmas with your method , plus I embroidered names. They were a big hit. Thanks for the method, very simple.