

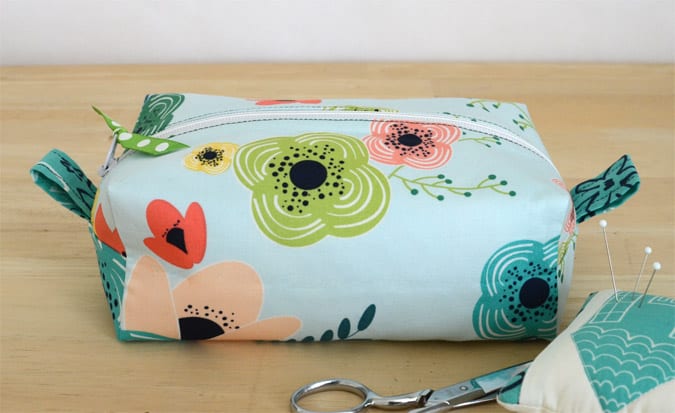
DIY Zippered Box Pouch Tutorial
This post may contain affiliate links which won’t change your price but will share a commission.
Inside: DIY Zippered Box Pouch Tutorial
Who doesn’t love a Zippered Box Pouch. They have so many practical uses, especially with back-to-school being followed by Christmas sewing.

Before writing this tutorial I was looking for a box pouch tutorial because I wanted something small to carry around a few hand sewing supplies. Every tutorial I found had exposed seams in the lining. This was never going to work for me because those seams would eventually fray and have lots of loose threads.
If you’ve ever made a simple zipper bag, you know how easy it is to hide the seams; so, I have taken it upon myself to create a DIY Zippered Box Pouch Tutorial that has hidden seams.
All you need are a few fat quarters and the ability to sew a straight stitch. Remember this post: DIY Pom Pom Napkins with Mitered Corners. I still had some leftover fabric from the fat quarter bundle and knew it would be perfect for a making a DIY Zippered Box Pouch.
Materials:

- Several Fat Quarters
- One 14″ Zipper
- Pellon Woven Fusible Interfacing
- Quilting Ruler
- Water Erasable Marking Pen
- Rotary Cutter
- Cutting Mat
- Clover Wonder Clips
- Matching Thread
- Usual sewing supplies:(sewing machine, iron, ironing board, scissors, pins, etc.)
Want an ad-free, printable copy of this tutorial? Scroll to the bottom of this post for more details!
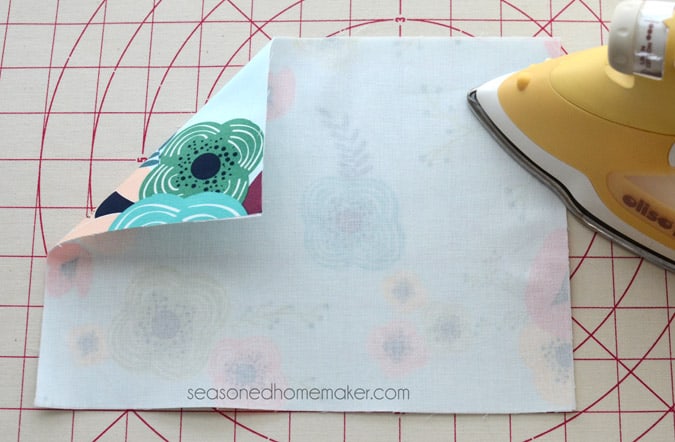
Step 1: Prepare Fabrics
Most fat quarters come folded so press each fat quarter until there are no creases.

Cut out the following:
- Outer Fabric: 2 pieces 10″ x 7 1/2″
- Lining Fabric: 2 pieces ” 10″ x 7 1/2″
- Interfacing: 4 pieces 10″ x 7 1/2″
- Coordinating Fabric for Zipper Pull Tabs: (1) piece 2 1/4″ x 7″

Step 2: Add Interfacing
- Follow the directions on the fusible interfacing package and fuse the interfacing to the wrong side of each piece of Outer Fabric and Lining Fabric. Lay the bumpy side onto the wrong side of the fabric and press with a hot iron for approximately 10 seconds.
- The Zipper Pull Tab fabric does not need interfacing.
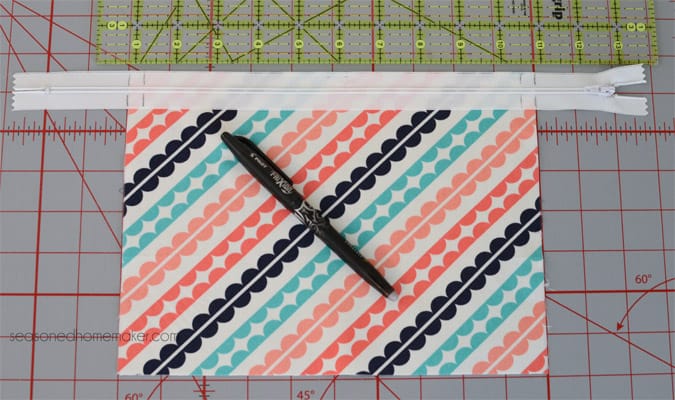
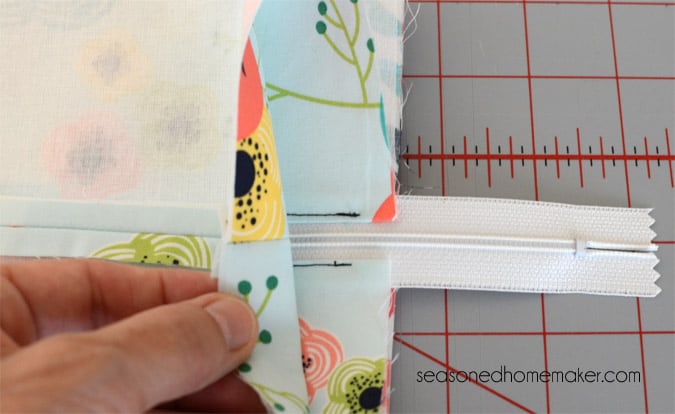
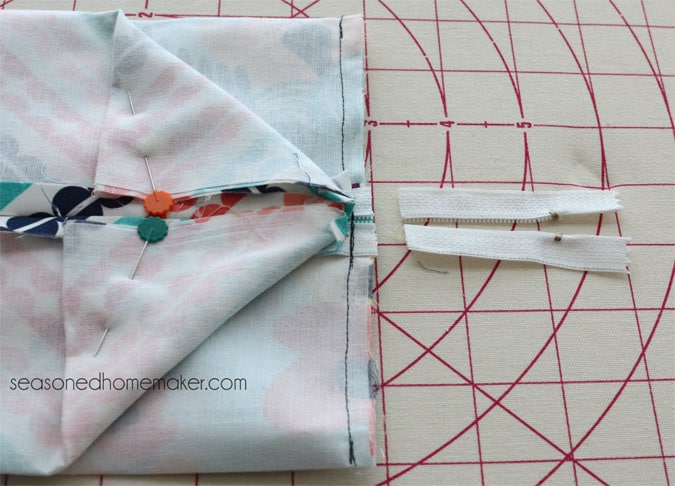
Step 3: Zipper Placement
- The zipper is purposely longer than you will need for this project. Later in the tutorial we will be cutting down the zipper to precisely fit our bag so feel free to use any size zipper as long as it is at least 14″.
- Lay the zipper right side up on top of the right side of the Lining Fabric. It should be placed so it equally extends beyond the fabric. Mark a line where the zipper meets the fabric.
- Mark a second line 3/8″ in from the fabric’s raw edge. You do not want to sew beyond this mark. You will need the small amount of space that this provides when you’re attaching the Zipper Pull Tabs and sewing the bag side seams.
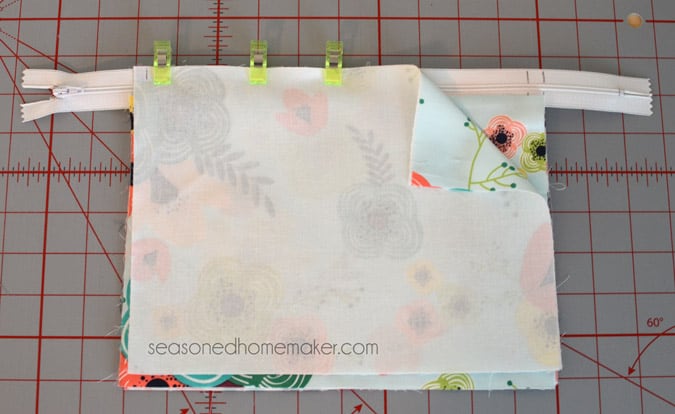
Step 4: Clip Zipper
- Place the Outer Fabric right side down over the zipper, lining them up evenly.
- Your fabrics will now be right sides together with the zipper sandwiched between them. Rather than pinning, I prefer these Clover Wonder Clips because of the zipper’s raised edge. Clip the zipper and fabric together.
- Make a mark 3/8″ from each end to remind you where to start and stop.
Step 5: Stitch Zipper
- Put a zipper foot onto your machine. Stitch the three layers together starting at the second line 3/8″ from the fabric’s raw edge. It is very important to leave this unstitched for now.
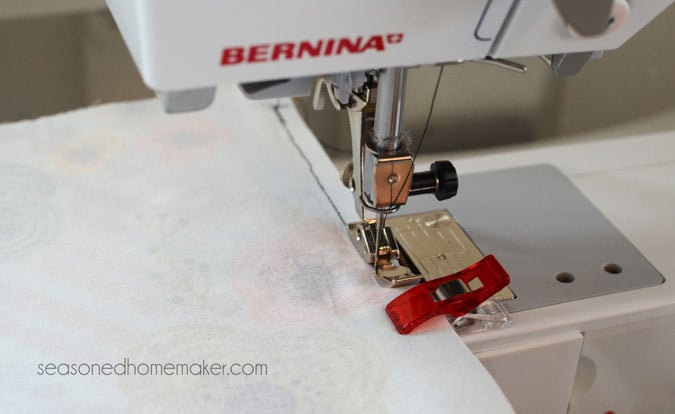
- This is what it looks like with the zipper-side up.
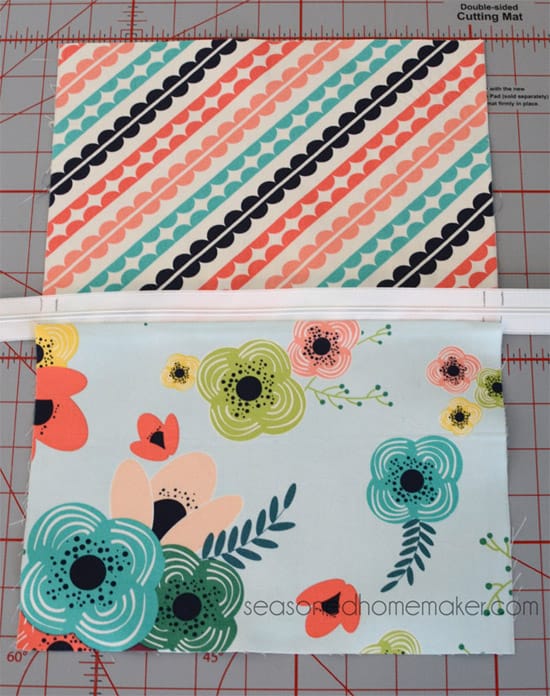
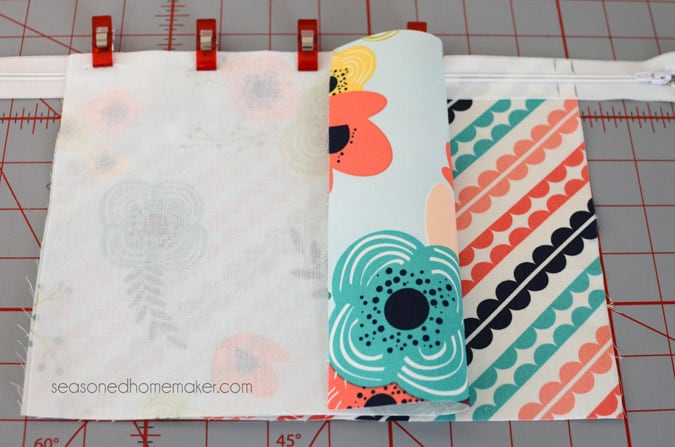
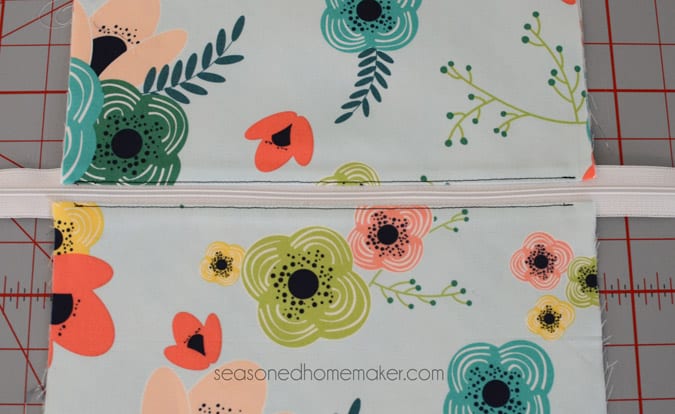
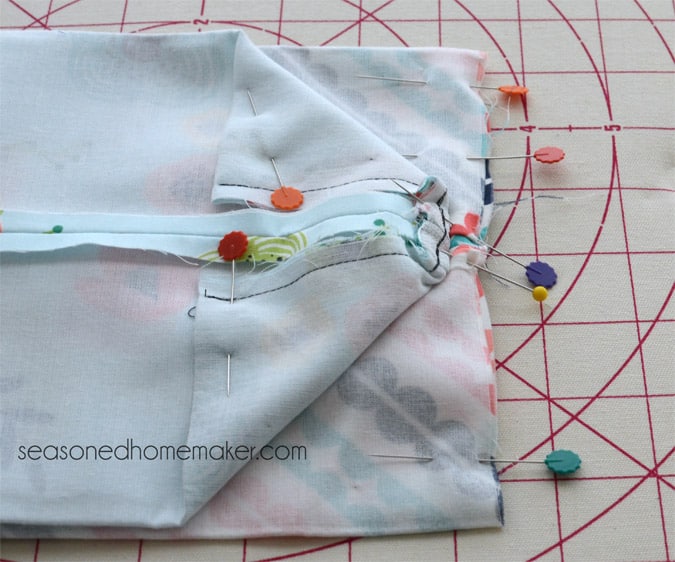
Step 6: Other Side of Zipper
- Now for the other side of the zipper. Lay the other piece of Lining Fabric flat and place the zipper’s edge along the top edge of the fabric. The Lining Fabrics will now be touching right sides together.
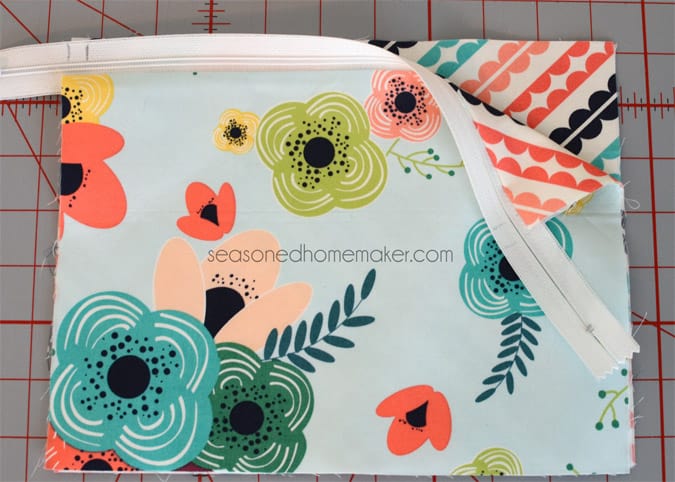
- Place the Outer Fabric on top of the zipper, lining up the edges. The Outer Fabrics will now be touching right sides together. Clip to hold. Stitch together using a zipper foot.
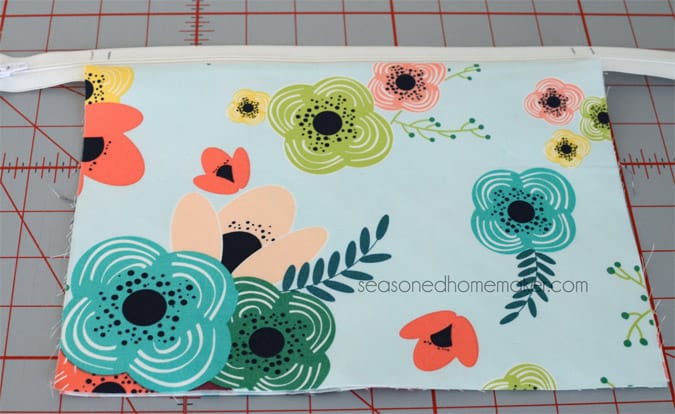
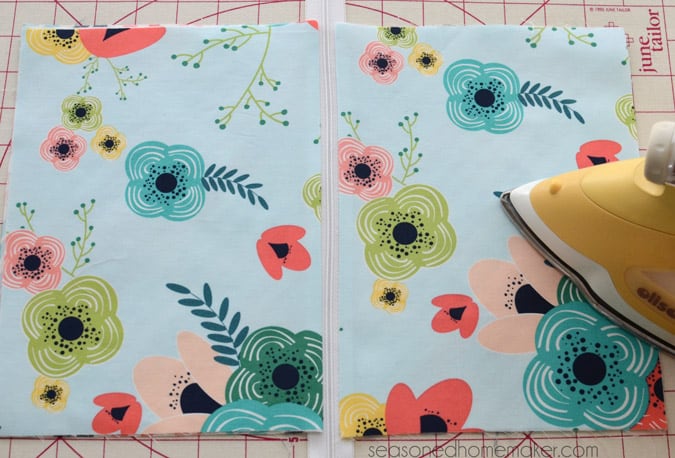
- Press your Outer and Lining seams flat. Your bag is starting to take shape.
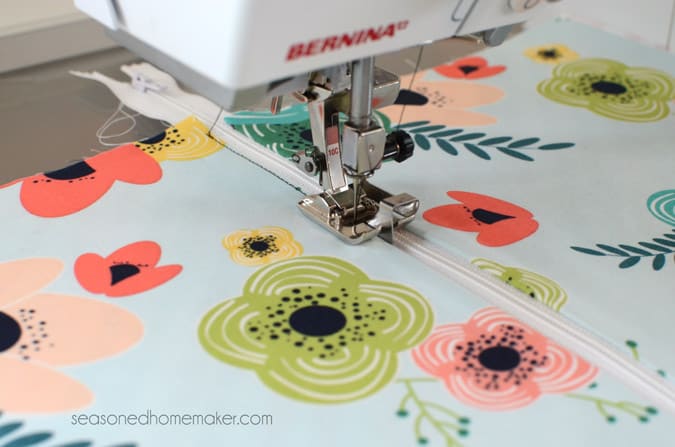
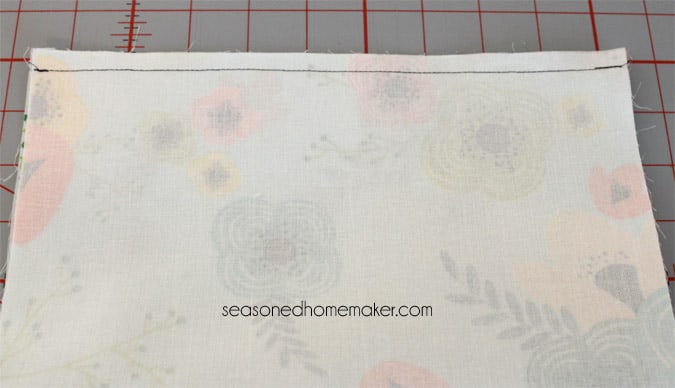
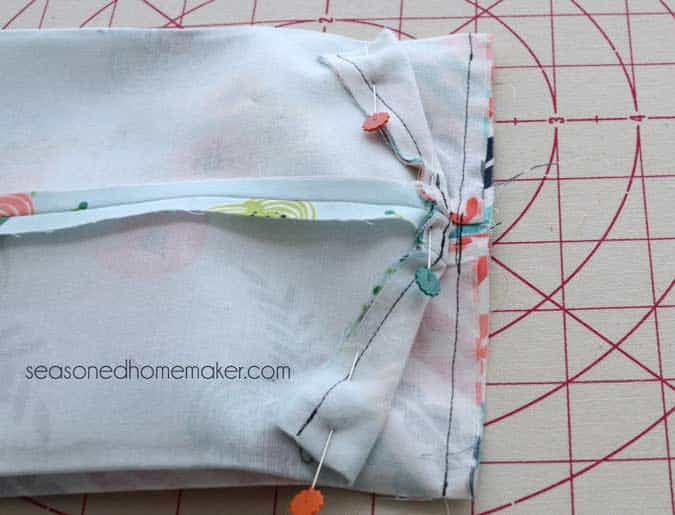
Step 7: Topstitch
- You want to topstitch next to the zipper. This prevents the fabric from getting caught in the zipper once you are using the bag.
- Starting 3/8″ from the edge, top stitch next to the zipper. Repeat on the other side. If you have an Edge Stitch Foot this is an excellent place to use it.
Note: I am using a darker thread in order to demonstrate.
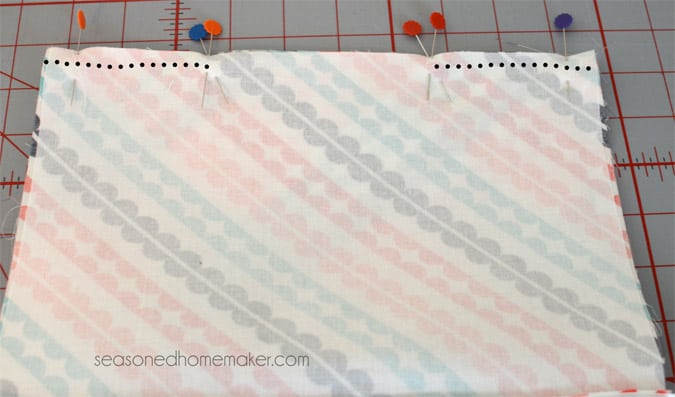
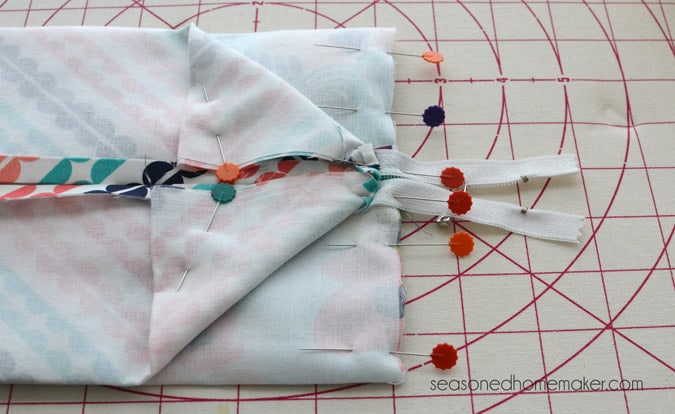
Step 8: Sewing Lining
- On the end opposite the zipper, pin the Lining pieces right sides together. Be sure to leave a 3-4″ opening for turning. One trick I use is to put double pins at the two stop points.
- Use a 3/8″ seam allowance.
- Starting at one end, stitch until you reach the double pins, back stitch.
- Starting at the next set of double pins, back stitch, then stitch to the other end.
- When you turn your bag these stitches have a tendency to pop open if they aren’t back stitched.
Step 9: Stitch Outer Fabric
- Pin the Outer fabric pieces right sides together. Using a 3/8″ seam allowance stitch from one end to the other. (It isn’t necessary to leave an opening.)
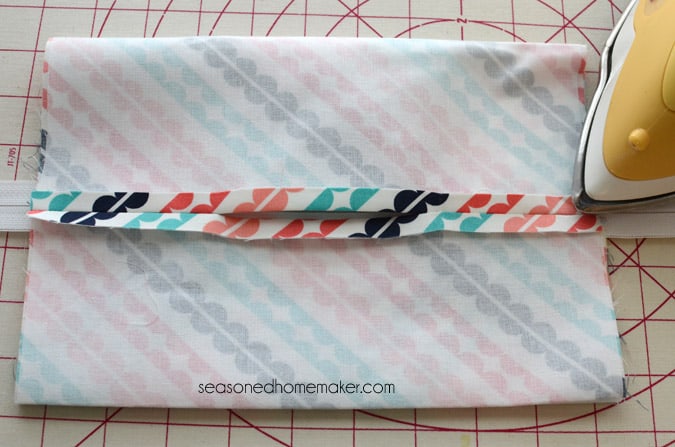
Step 10: Press Open
- Refold your bag so the seams and the zipper teeth align. Press open the seams on one side, flip over and press open the seams on the other side.
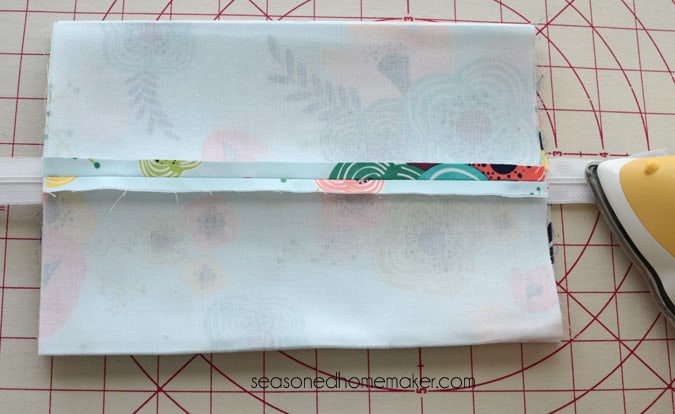
- Don’t forget about the opening on the Lining Fabric. Be sure to line up these seams when pressing.
- Set the bag aside.
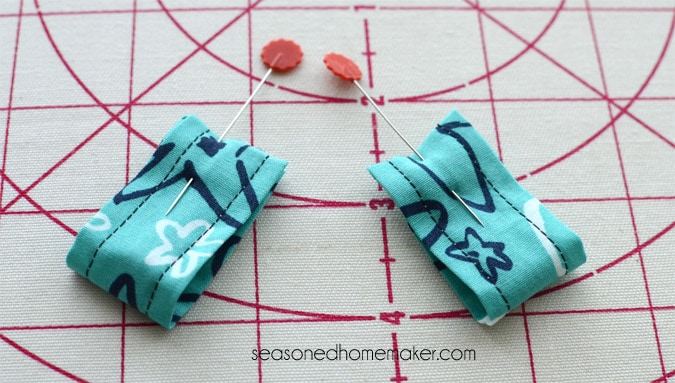
Step 11: Make Tabs
- Time to make the tabs. Take your piece of 2 1/4″ x 7″ tab fabric and fold right sides together. Using a 1/4″ seam allowance stitch down the long edge.
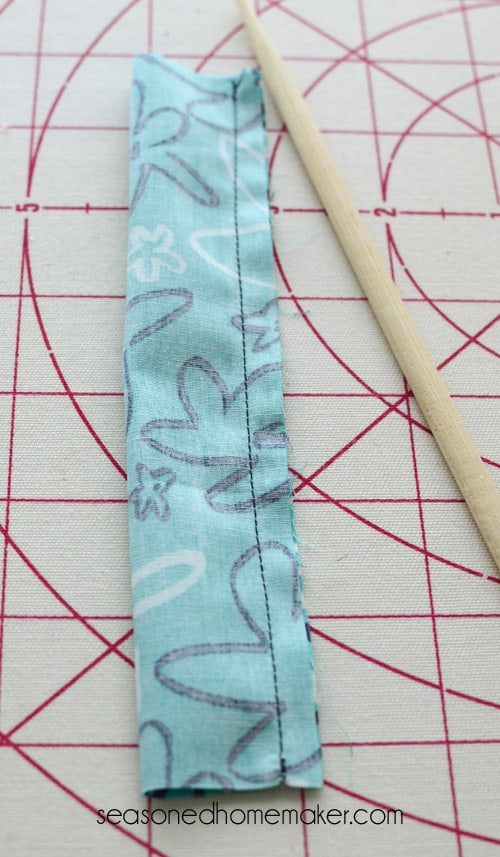
- Using either a turning tool, safety pin, or chopstick, turn the tab right side out. Press with the seam in the center.
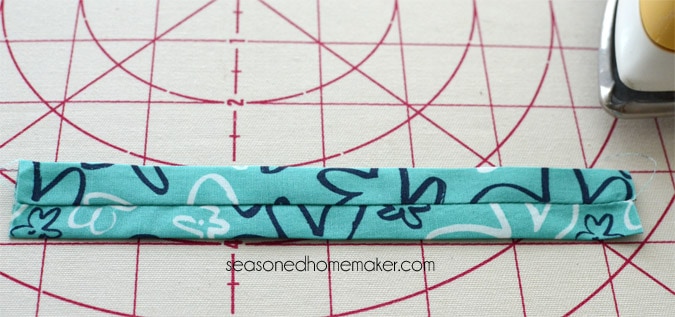
- Topstitch on both outer edges.
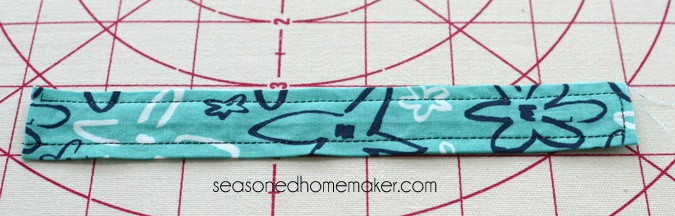
- Fold in half lengthwise and cut in half. You will now have two tabs that are approximately 2″ x 3 1/2″.
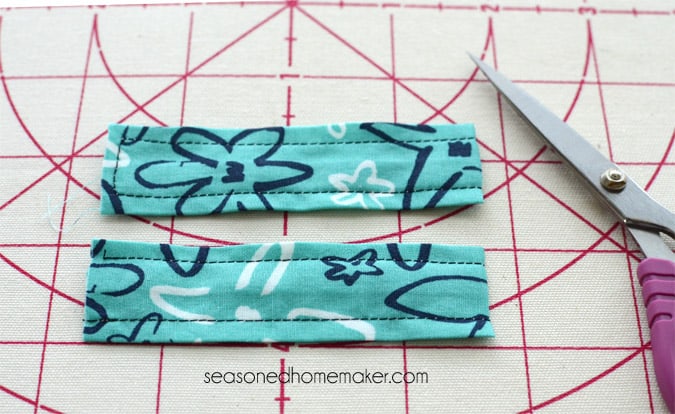
- Take each of the tab halves and fold them in half with the seam sides facing each other. Pin to hold.
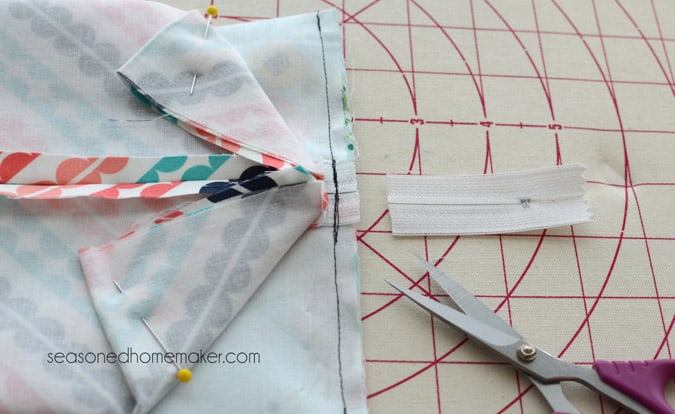
Step 12: Side Seams
- It is very, very, very, very important that you follow these next steps in exact order. If you don’t you will not be able to turn your bag right side out.
- For this step you will only be working with the Outer fabric. On the side of the bag with the zipper stop, open up the end of the fabric. Insert one of the tabs in between the right sides of the fabric matching it to the raw edges. Pin in place.

- With right sides together, pin the Outer fabric together. It is important to make sure the Lining Fabric does not interfere with this step. I like to pin mine back and out of the way so I don’t accidentally sew it into this seam.
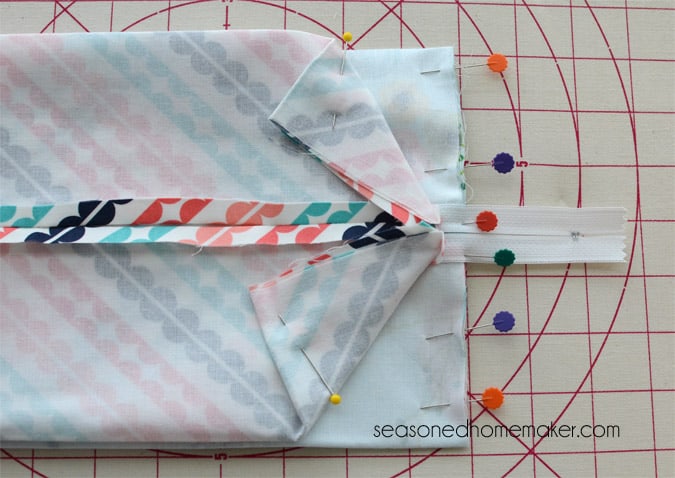
- You may want to use a zipper foot for this seam. Stitch together using a 1/4″ seam allowance. Go slowly over the zipper teeth. For extra security you may want to back stitch over the zipper.
- Trim away the excess zipper.
Step 13: Open Zipper
- OPEN THE ZIPPER at least 2/3’s of the way across. If you don’t open the zipper, you will not be able to turn your bag. Open the zipper. Open the zipper. Open the zipper.
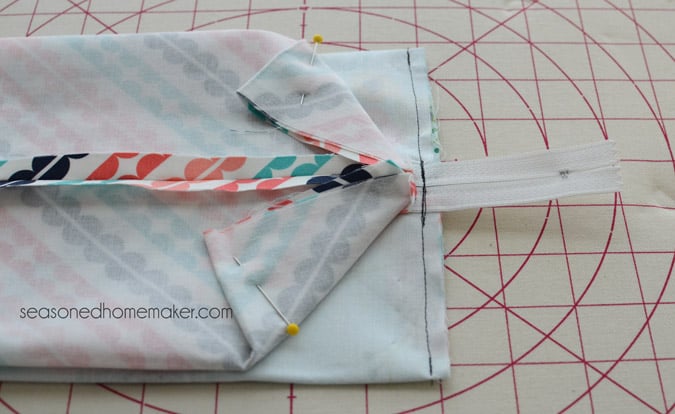
Step 14: Sew Other Side
- Repeat Step 11 on the opposite side. You will need to take a few additional precautions because your zipper is now open. I like to use a safety pin to hold my zipper together. I also use pins to make sure the zipper doesn’t move when I’m sewing it down.
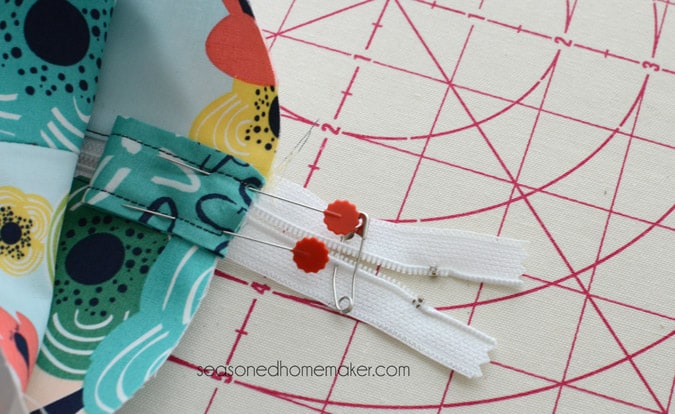
- Insert the Zipper Pull in the same manner as Step 11. Pin in place. Be sure the now-open zipper is correctly lined up and then stitch down. It is a good idea to backstitch when you sew over the zipper, just like you did in Step 11.
- Trim away the excess zipper at the seam allowance.
Step 15: Sew Lining
- We will now sew the Lining Fabric together in a similar manner. With right sides together, pin the Lining in place. Using a 1/4″ seam allowance, stitch the lining fabric together.
- Repeat this exactly on the opposite end of the bag.
- At this point you may want to trim down all of your end seam allowances down to 1/4″. This will make it easier to create the boxed ends on your bag. If you decide to do this, be careful when cutting over the zipper teeth.
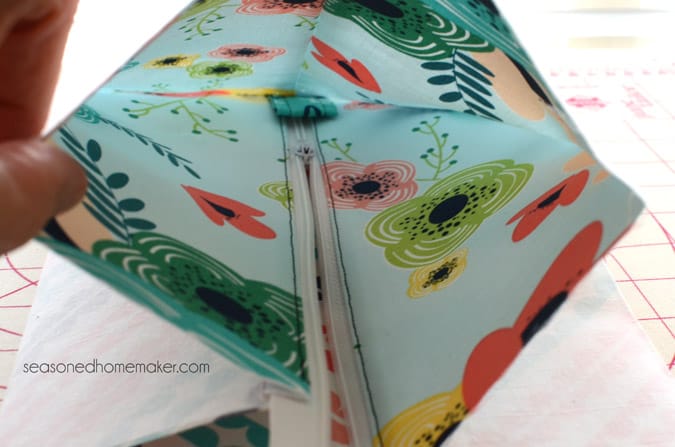
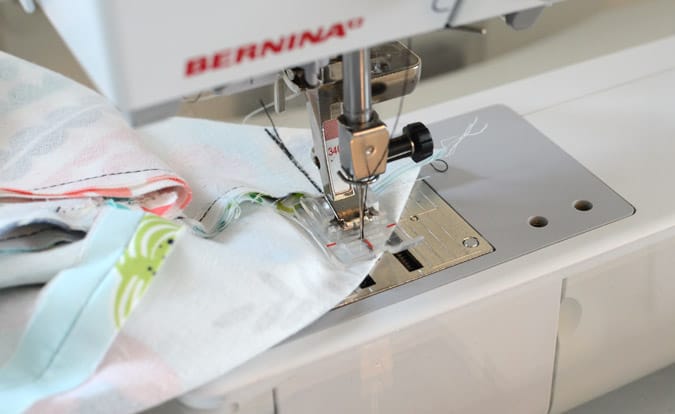
Step 16: Making Corners
- Creating the boxed ends is easier than you think. Starting with one corner of the Outer Fabric, fold the bottom corner of your bag so it creates a triangle in the corner. Match up the seam with he crease on the opposite side and it will line up perfectly.
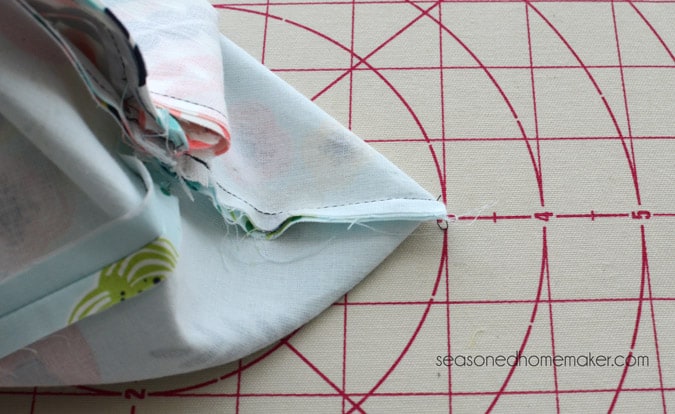
- Pin the corner and with your water erasable pen make a mark 1 1/4” in from the corner.
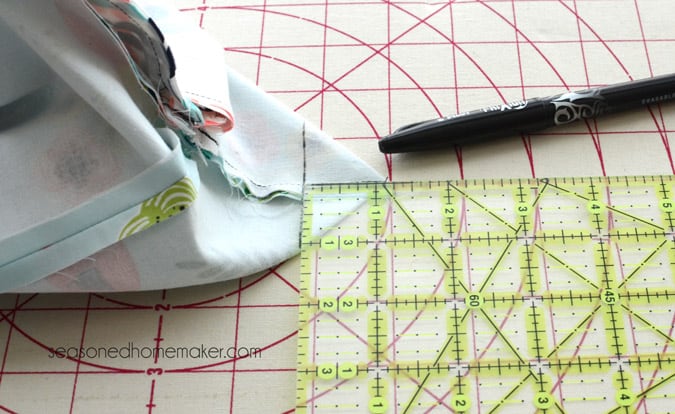
- Draw a stitching line and then stitch across to create a pleat.
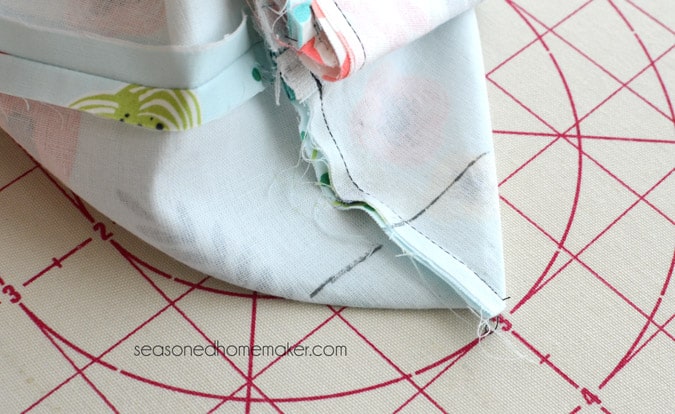
- Clip away the triangle, leaving a 1/4” seam allowance. Be sure to remove the markings with an iron.
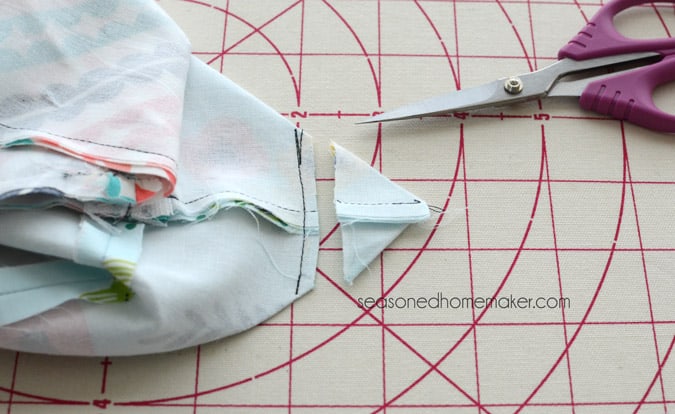
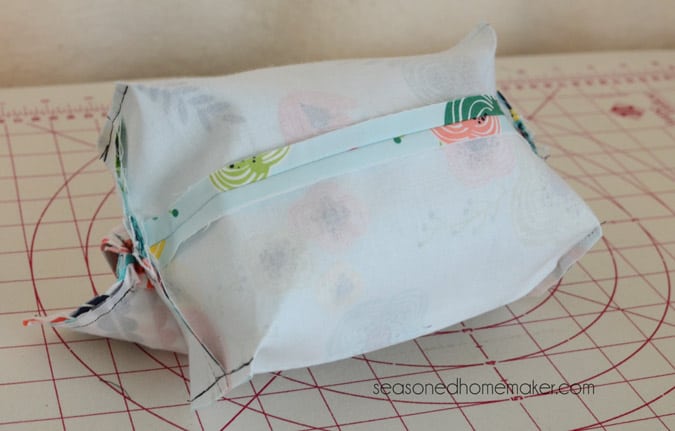
- Repeat on the other seven corners of the bag. Notice how nice and boxy the bag is!
Step 17: Turning the Bag
Time to give birth to your bag.
- Remember the opening we left in Step 7. Reach your hand into this opening and pull the fabric right side out.
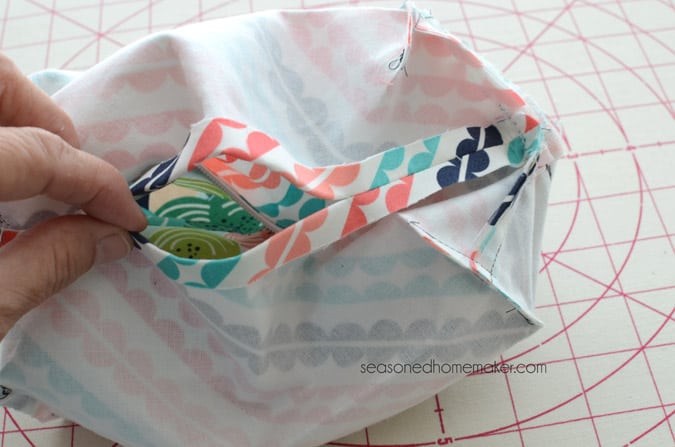
- Push the Lining Fabric back inside the bag. Using something pointy (like a chopstick), poke out all eight corners of the bag. This will give it a nice boxy shape. Press the boxy ends.
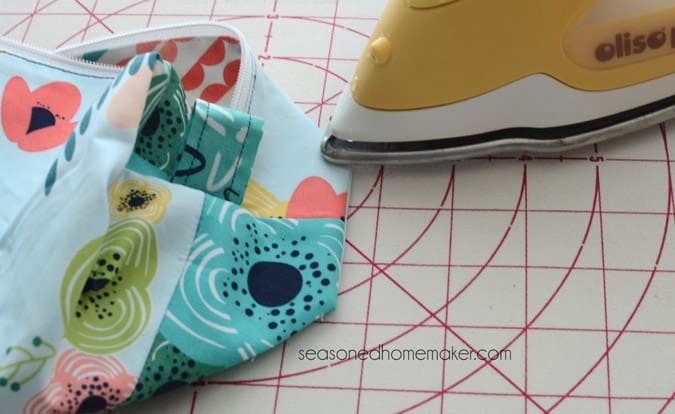
- You will need to sew closed the opening used for turning. You can do this either by hand or by machine. Personally, I prefer the machine because I don’t want any chance of it coming undone and something getting between the Outer fabric and the Lining.
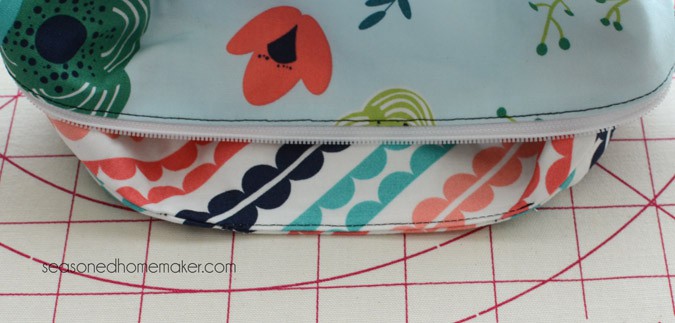
Step 18: Finishing Bag
- Carefully, iron out any creases so your bag looks amazing. You may need to use something like a sleeve board to properly press the bag.
- The finished size of this bag is 7″ W x 4″ D x 3″ H. For a larger bag, adjust the starting measurements.
And you are done!
Now fill the bag with whatever you desire. I’m using mine for hand sewing supplies. I plan to make several more that I will use when I take a sewing class. That way I can separate out supplies like threads, bobbins, etc.
This bag is really super easy to make. The first one may be a challenge, but after that you should be able to whip them out in no time at all.
>>> Want a printable version of the post? Click the pink button to get the Printable PDF instructions.

Here’s a short video showing the steps.

What a great tutorial – very easy to follow – well-illustrated – well-written! Must make some of these wonderful bags soon!!
Great DIY – I love the fabric choice. I’m gonna have to try sewing again.
Thanks for an easy to understand tutorial. The biggest thing missing? The finished measurements of the pouch.
she didn’t forget the measurements are just before the last picture of the bag.
Oops. I added measurements. They are at the bottom of the post.
Great tutorial, and wonderfully useful bag.
WOW – fantastic tutorial. You do such an excellent job with your instructions and your pictures.
You’re so right about those exposed seams – and yes it’s hard to get a pattern with a separate lining, so thanks for this very well done tutorial.
I’ve been wanting to make such a bag as a gift for a man, so you’re right on time! I will be adding a handle, as that seems traditional for the “male” version.
Thanks for this tutorial. I have to try!
first visit here; coming from the linky at Crystal & Comp. What a beautiful project and the instructions and photos are extremely helpful.
Great tutorial so many of them leave you guessing on their description you did a fantastic job! think I might actually try one again.
Fantastic tutorial. Thank you. THIS is why I read your blog! 🙂
Super tutorial, Leslie, very helpful. Many thanks.
I love everything about this! I love the pouch, the pictures, the detailed tutorial, everything!! Great work! Your friend, Linda @Crafts a la mode
I love this bag…and your tutorial is so easy and simple to follow! I can’t wait to make one and find a use for it! 🙂
I absolutely love this tutorial. So practical and the fabric is so cute. My sewing skills are barely past sewing on a button but hopefully I will get there one day. Featuring this post at Wonderful Wednesday Blog Hop and pinning.
Love it! Totally going to make this for an EPP kit. So, it looks like you really just need two fat quarters, and a bit extra for the tabs? (not counting interfacing and stuff of course)
Great tutorial! Thank you! One question, if you choose to machine close the opening in the lining, how do you go about that? I hate hand sewing. 🙁
Hi dear ,I was longing for a project. This is perfect one. I tried. The instructions was perfect and the pictures. I was successful. My children appreciated me. Thank u so much for sharing. Can I share my pouch picture
I’d love to see photos of your project!
Hi Leslie,
Such a great tutorial! I loved the pictures and very easy to understand and follow instructions. Well done!
I am going to make one or two, or maybe more. Great gifts. I have lots of fabric in my stash and I need to get this stash down.
Thank you
So proud of myself, I’ve just made this gorgeous little pouch in an afternoon. The instructions are really clear and it wasn’t too difficult to make. I hand-stitched the opening in the lining, couldn’t work out how to machine stitch but apart from that I found the tutorial excellent, with clear photographs and lots of hints for first timers like me. 🙂
Here’s another hint to keeping those stitches from ever coming out. Apply a small beat of Unique Stitch Fabric Glue. It will be sealed forever…
I absolutely love this and the fact that the seams are hidden and I was part way through your tutorial before I realised the key was to use 2 pieces of fabric each for the lining and outer fabric. I am struggling to size the pattern down as I want to use it for something specific and would like the finished dimensions to be 7 1/4 inches W x 2 1/2 inches D x 2 inches H. Any suggestions or advice on working this out would be greatly appreciated please.
Oh my this is exactly the project I’ve been looking for! I’ve been teaching a coworker/ friend how to sew, to the point of need to make something with a zipper, she likes making bags/ totes. This is perfect. I can see myself making lots of these. Gift ( boxes) for Christmas , secret pal gifts, …
I have always had hand sewing projects sitting next to my chair & in my work bag for break times- usually items in Tupperware dishes & tins….this is going to change that. ? Thank you so much! The tutorial is so well done my beginner pal is going to be able to follow it with just a little guidance.
I made one of these this weekend, was going to send it to my ( this month’s secret pal) but I Love it & think this first one is going to be mine. ? I will make her a different one, in her favorite colors. I did make mine a little larger…finished size is 9″ X 6 1/2″ — just because I had a 22″ zipper to use, decided I needed to make it bigger. My pal will get one in your sizes because I have a 14″ red zipper to use. ?
Thank you so much for this great project / tutorial!
Couldn’t figure out how to attach a picture to show you mine…
Wonderful tutorial, I think I can do this one with your excellent instructions! Thank you so much!!!
Thanks, this is a great tutorial! One question – why use a 14″ zipper when you just cut off about 2+ inches from each side? why not use a 9″ zipper instead, this way you don’t cut the ends off and wouldn’t need to sew over the zipper part at all?
Great question! Yes, you could use a 9″ zipper, but I find that the zipper top and bottom metal pieces make things difficult to maneuver. A longer zipper prevents this and allows you to sew that zipper in quickly.
I wondered the same thing as well.
I’m in the middle of making my third bag (I need two for our kindergarten teachers and the first one is mine 🙂 and I made things easier for myself by simply removing the metal bits from the zipper. When first sewing the two pieces of fabric to the zipper I even slid the pull off, so it didn’t mess with my seam + I was able to leave closed the second end that was supposed to be open but then kept sliding around, safety pins and all.
(First I pulled it closed and slid the pull off. Then I slid it back on on the lower end and “closed” the zipper to 2/3. That way both ends stayed closed and I was still able to open it enough to turn the bag.)
I love your instructions. It’s so much fun making these, although I barely could sew straight when I started and have never sewn a zipper before.
Great tutorial Leslie! This is like a mini-Dopp kit. I have tried making two Dopp kits so far and they are just TOO big. So I really appreciate the finished measurements you provided here. This is more my size.
what a great tutorial definitely going to try one out
I have been sewing 33 years and never knew of a topstitching foot! Low and behold, my machine came with one. I’ve had it at least 10 years! I am in love. I’ve made a boxy pouch before and didn’t like the exposed seams inside. I also like the tip to use a longer zipper. No need to worry about the pull! Thank you for teaching an old dog new tricks!
Thank you. Just what I was looking for. I wish you did a video tutorial of it. Cheers, Olivia
Some day.
I made this boxy pouch and, wow! Your instructions were clear and precise. Thank you !!!
This is brilliant! I’ve made loads of unlined box bags, but never figured out how to line them. This is a brilliant solution. Will have a go tonight. Thank you!
Leslie, this is the best tutorial I have ever seen for a boxed zipper pouch! Your instructions and pictures are perfect! Thank you so very much for sharing this. Hugs!
thank you. A great bag & tutorial.
Love this!! I’m going to start making a few Today! Thanks for the great, easy to follow tutorial!
Fantastic tutorial! I was looking for a tutorial which showed how to sew a boxy pouch without showing all the joint fabric and the messy edges inside. You showed that this is possible by sewing the lining separately. thank you ever so much, all very clear now!!
Thank you so much for this awesome tutorial, Leslie! It’s super friendly and really helpful! I’m going to do it right away! Was so frustrated trying to figure out how to hide the seams that I decided to do away with the “box” design earlier today.
This is an excellent tutorial! Simplified and right on point.. thanks.
Already did mine with a Jean material and it came out great.
Thank you so much for sharing this, your instructions are so clear and easy to follow and exactly what I’ve been looking for. I’ve been using binding to hide the seams up to now, but this is so much easier and tidier. What would you recommend for making the lining waterproof and would it be as easy to put together?
I finished one of these today & I’m so so pumped with how it came out!! My first zipper & my second bag. Really great job on clear instructions & photos. Thank you!
When I make more, if I change the size how do I calculate how much corner to trim off when creating the boxed shape? Is there some simple rule of thumb? Or formula to use if I know how big I want the finished bag? Thanks!
I don’t know of any rule of thumb for this calculation, but for every inch or two, I would only increase the corner trim by no more than 1/2″. And do a few practice pieces on scraps.
Okay, I’ll play around with it and see. Thank you!
I’ve looked at other tutorials for this bag-type and yours is the best so far! Very clear pictures! I’ve been sewing since I was in Elementsry school but couldn’t wrap my head around how to make one of these in my head, ha!
What an absolutely TERRIFIC tutorial. THANK YOU for putting it together, and so beautifully!
Thank you for this tutorial. I was wondering how to hide the lining seams. I would like to make a large boxed pouch (12 x 6 x 7, with the zipper along the 12″). I tried putting it together and came out with an oddly shaped bag and the zipper in the wrong spot. I found a use for it, but still need a bag in the original size. Your notes say “adjust beginning dimensions” but I have no idea how to do that. I aced calculus in high school but sewing math is a completely different beast! Please let me know what my starting dimensions should be and how to figure out other dimensions for the future.
Thanks!
I am with Heather – can you assist with beginning dimensions for enlarging this pattern? I am hoping to to 8″w x 5″ D x 5″ H for a specific use. Thank you so much for the tutorial!!!! Looking forward to putting it together!!
This by far is the best tutorial for this project that I’ve seen. Pinning and will definitely try this. I have such lovely fabric I’ve been wanting to use for this very thing. Thank you!
Best tutorial! Thanks so much!
So there is no need to use a serger to hem the edges? They won’t fray?
In step 16, after cutting off the corner, do we need to restitch to make sure those stitches (right where the scrissors cut) won’t come undone?
It wouldn’t hurt to restitch.
Recently a reader asked this Question: Just looking for the cute simple pin cushion pattern…what it is filled with.
Answer: A great filling for pin cushions is ground up walnut shells. Many quilt stores carry this. I also like poly fiber fill if the pin cushion is tall-ish.
Thanks, Leslie, for your thoughtful, detailed tutorial. I am one of those people who learns best by reading instructions and following along–your tutorial is exactly what I need!
Would it be possible for you to send me a copy of the download? I saw it offered to people newly signed up to follow you; as a current subscriber I’d really appreciate receiving a copy but don’t know how to get one.
Great instruction!!! What is the finished length of the pouch? I am trying to figure out if I want to make mine a bit longer.
The finished size of this bag is 7″ W x 4″ D x 3″ H. For a larger bag, adjust the starting measurements.
This is a FANTASTIC post! Great descriptions and the pictures were so helpful 🙂 Managed to complete my pencil case in just 3 hours; so happy with myself! The tabs are ingenious, I never would have thought of them. I did add a little more zazz with some lace though 😉 THANK YOU SO MUCH. Subscribed straight away 🙂
This is a great tutorial! I’ve looked for a boxy bag like this without visible seams and this is the only one I could find that ACTUALLY makes sense!
It was such an easy bag, you know, except when I didn’t open the zipper and ended up cutting off the zipper pull ?
Thank you!!!!
I am going to make this to take to a class I’m going to soon! Thanks for making it look so easy!
This is such a great tutorial. Good to have so many clear photos at each step. I made a bag this afternoon and it came out really well. I’ve been frustrated with my previous box bags as they have had raw edges inside finished with zigzag stitch so I was delighted with this and a properly finished lined bag. Thank you!
Boy, I never make comments, but I have to thank you for doing this–I’ve wished for a pattern where the raw edges were hidden–and never managed to wrap my brain around figuring it out myself. Thanks for doing the hard work–super fun to make these!
Thank you for such a careful, helpful tutorial.
It is much appreciated.
Thank you so much, Leslie! I followed your tutorial to the letter and my 3 little bags turned out perfectly. Your instructions and pics were clear and easy to follow step-by-step. I will come back to your tutorial again, should I want to make more in the future!
I looked for weeks for a boxy pouch.
What excellent instructions. These are for Xmas presents. Thank you for taking the time to share. X
I knew there had to be a way to hide those raw seams inside and it didn’t dawn on me to make one seam shorter than the other on the zipper in order to make it happen — THANX for the precise directions! I will be making many more for gifting
I’m a beginner and still struggling to understand correct needle sizes for projects involving interfacing and other layers. For this project will an 80/12 universal work throughout, or do I need to switch to a 90/14 universal when in the stages where several layers are involved? I keep searching for sites that help with the interfacing and layers issue, but I don’t see any specific guidance for needle choice other than what is usually given about using the right needle for the fabric and thread.
I would start with a 90/14 needle.
Thanks for posting the detailed tutorial. I made the bag today in a larger size and it turned out nicely. I had a small problem where the zipper met each edge I ended up with a hole in the lining probably I didn’t quite keep the 3/8″ distance in from the edge of the zipper. I sewed the holes up by hand and they are now invisible.
Leslie, Thank you for providing the 90/14 needle size advice and for the considerable time and effort that goes into providing a tutorial of this quality. I like this project so much. I have all of the materials cut out, and I’m looking forward to making the bag. The instructions are beautifully detailed and certain to reduce a beginner’s anxiety.
My daughter loves hers and her friend wants one too!! Excellent tutorial, easy to follow and good photos.
I absolutely agree with you about exposed seams on boxed zipper bags. I immediately skip the tutorial if the finished product has exposed seams. Thank you for the tutorial!