

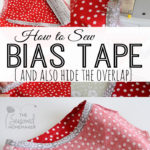
How to Attach Bias Tape
This post may contain affiliate links which won’t change your price but will share a commission.
I learned all about attaching bias tape when I was making 4-6 aprons a day for my Etsy shop. This was several years ago when I sold aprons, not apron patterns.
If you are going to make and sell aprons then you are going to be attaching bias tape. But bias tape is also great for armholes and necklines.
How to Attach Bias Tape
This post will show you how to attach bias tape to the armhole opening of a sleeveless top. I have another tutorial that shows you how to make bias tape. Click the red button below to learn more.
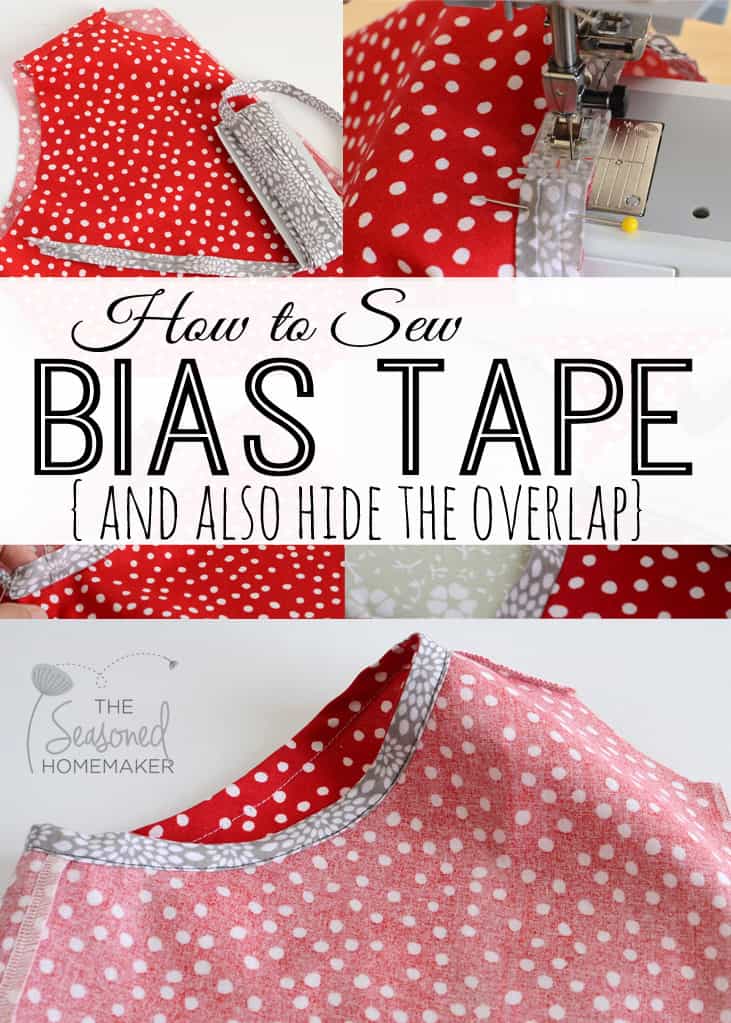
Step 1: Preparing the Garment
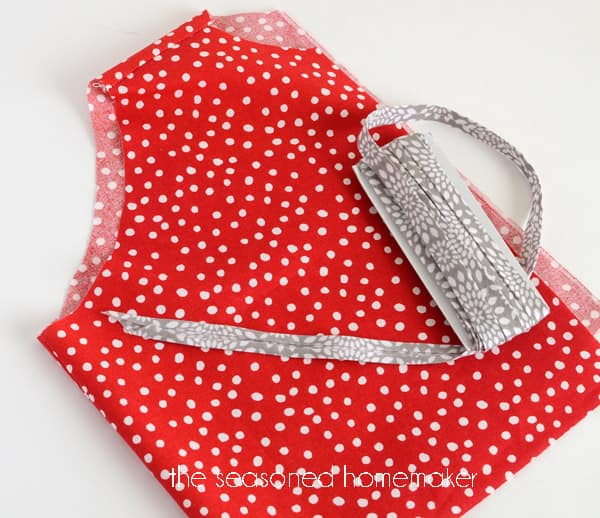
I’ve made a small mock up of a top to demonstrate how to attach bias tape around the armholes since I wanted the armhole openings to be clean and unembellished.
Step 2: Determine how much bias tape is needed
Estimate how much bias tape you will need for the armhole. Do a quick run around with the tape measure and then add about 6 – 12 inches.
Remember, there needs to be some overlap to encase the bias tape. You never want to come up short.
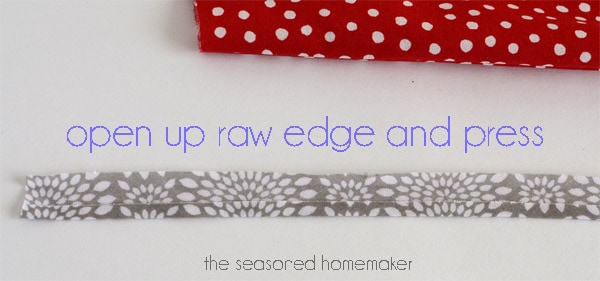
Step 3: Prepping to sew the bias tape
Open one of the folded sides of the bias and press open.
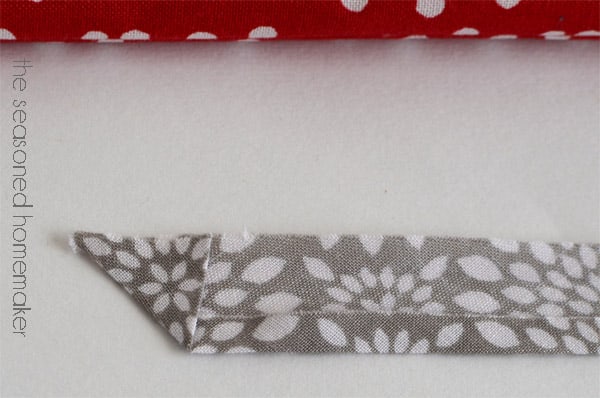
Make a triangle by folding over the raw edge of the end.
Match the top edge to the side edge and press. Doing this will nicely finish where the bias tape overlaps.
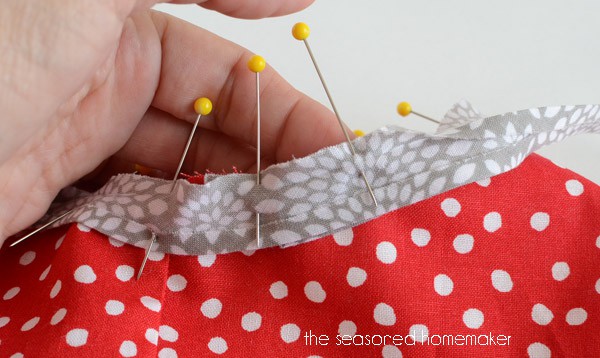
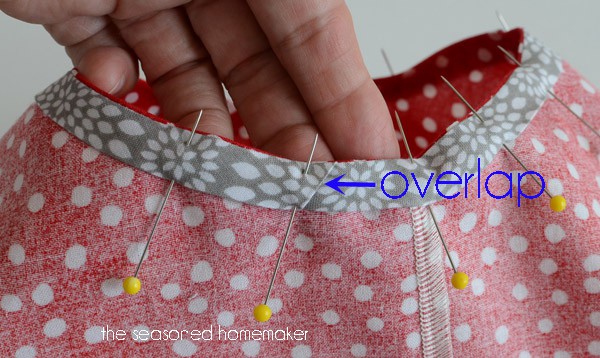
With right sides together, pin the raw edge of the bias strip to the raw edge of the armhole opening. Use lots of pins.
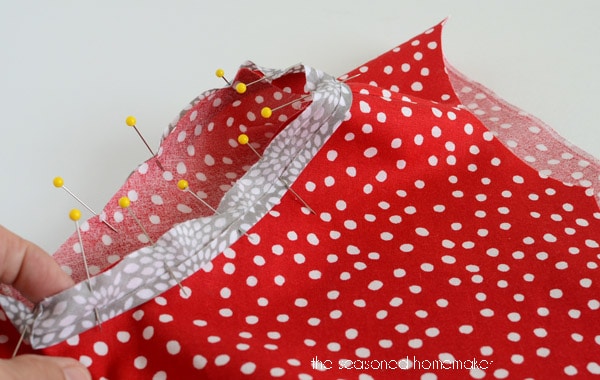
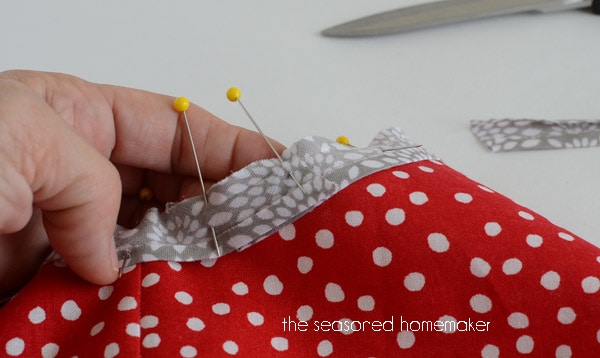
Pin all the way around the opening. When you get back to the start you will come to the folded triangle.
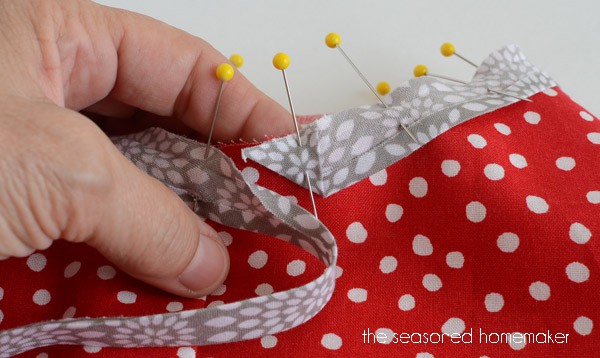
Overlap the raw edges about 1″ and pin to hold.
Cut away excess bias tape.
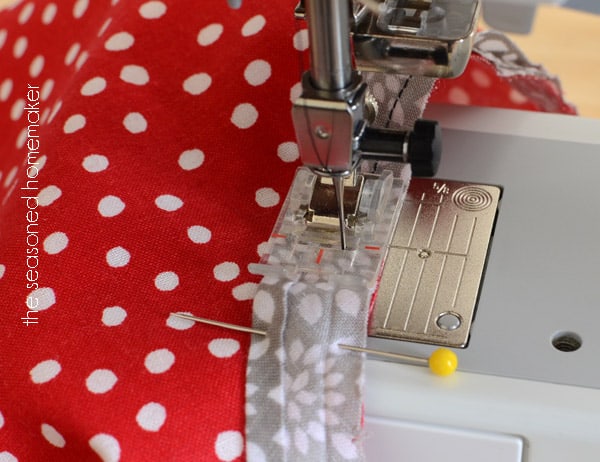
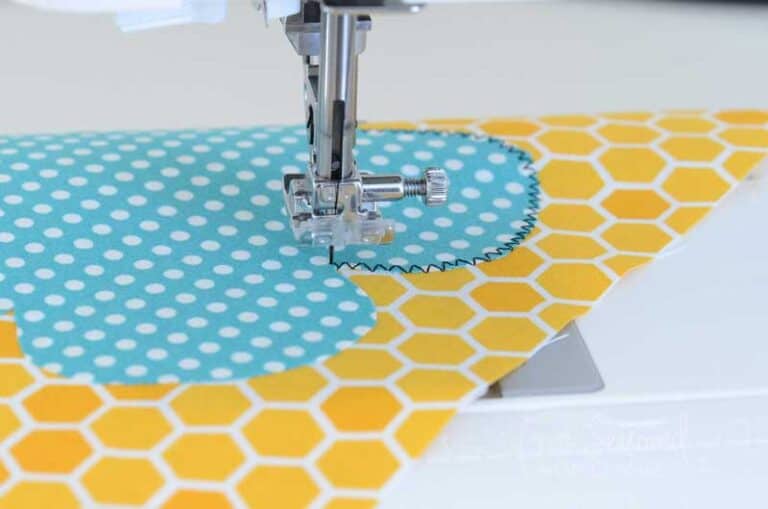
Step 4: Sewing the bias tape to the garment
Stitch around the entire opening and back stitch when you reach the start. You don’t want this coming apart.
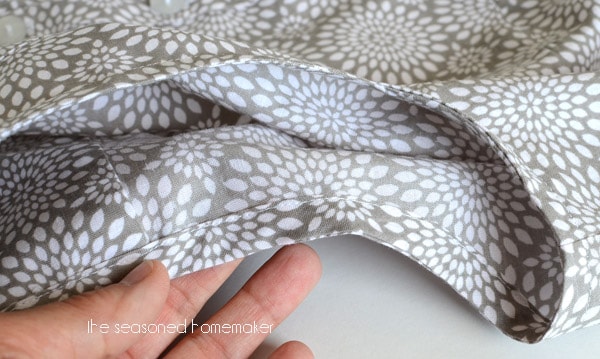
Press the bias tape flat.
Press the seam towards the bias tape.
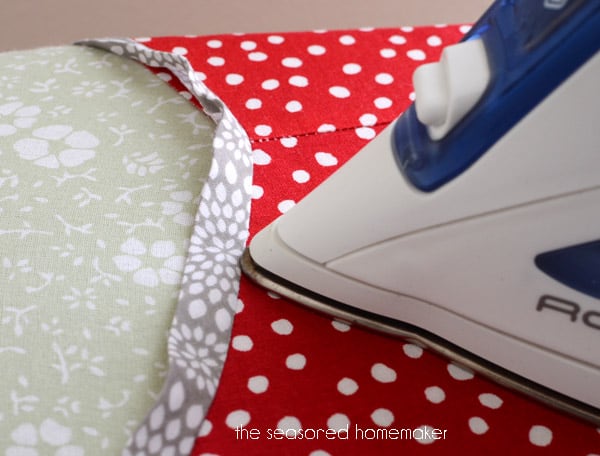
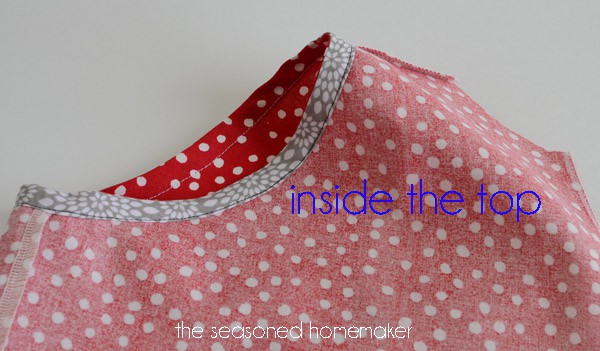
Fold the bias tape inside and press. Pin around the opening.
Notice how nice it looks where the bias tape overlaps.Stitch down close to the edge.
If you have an Edge Stitch Foot this is a great place to use it.
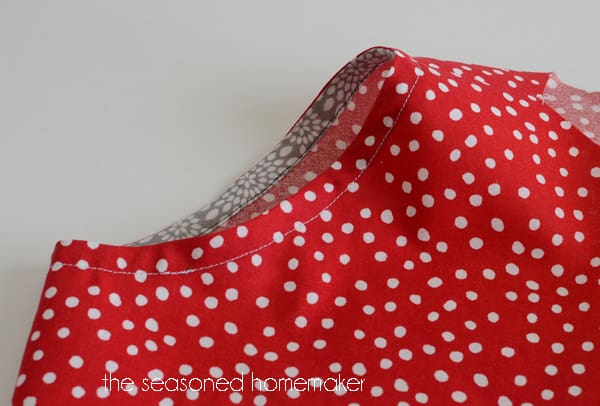
The best part is how nice it looks on both the inside and the outside. Learning this technique will open up amazing possibilities for your sewing as well as use some of those scraps.
Imagine the possibilities.


Great tutorial! Thanks! 🙂
Genius! Thanks a heap!
I make item for deceased tiny babies and always has problems with the edges of the bias binding you have just shown me the real way…the triangle really easy ‘if only you know’ thankyou
Just read how to make it so had to read how to use it. Love that you give such simple and easy to understand directions. I have used bias tape, incorrectly. Now I know where I went wrong. Thanks!
Love this tutorial, and the one on making bias tape yourself. So useful! I’m pinning both of them, thank you so much for sharing them at my link party!
This is great. Thanks for sharing. I can do this now, I think.
I just figured out this process a few months ago. What a difference it makes in the appearance of the finished garment! The trick you show about making the triangle end will be very helpful – I hadn’t figured that out yet. Thank you. 🙂
I have been putting bias tape on for years and never knew the triangle trick, thank you for sharing. Can’t wait to try this.
Great tutorial! I’m always annoyed with bias tape, lol.
Thank you so much for this tutorial. I sew A LOT, but I don’t use bias tape much, but when I have needed to I have never really known the right way to attach it and after reading this tutorial I know now why I’ve had such trouble. Thank you, thank you, thank you! Definitely pinning this one & using it next time I am using bias tape! Visiting from Someday Crafts Link Party!
oh I love the tip of making a triangle on the end… need to try that! I just made a dress and HATED the facing… going to do this next time for sure!!! E
The triangle at the end really does make a difference. It was one of those things passed down to me by a more experienced sewist ~ which is always a great way to learn something.
Hi – found you over at the Live Laugh Rowe link party. Love your tutorial. Great step by step with images.
well I’ve been doing this all wrong!!
I’m sure it wasn’t all wrong ~ just an undiscovered, creative approach.
Your sewing is so neat and tidy. You give great tutorials, and your pictures are bright and clear. Wonderful job you’re doing here! I want to be you when I grow up. 😉
Thanks for the awesome tutorial….great details. I’m so glad you linked up with Twirl and Take a Bow! Join us any Tuesday…we’d love to see more projects! ~Tammy
Thanks so much for this tutorial, I’m always struggling with bias tape! I’ve put a bias tape maker on my Christmas wish list so hopefully I’ll be making plenty in the New Year!
Good morning, Thank you for the help with bias tape. I am going to start selling Apron’s (need to bring in income as I am single now after 20 years of being a stay home Mom, I am 52 so not to many companies looking to hire me with a stay at home Mom resume). I see that you have experience with making and selling aprons, do you have any tips for me? I need to make more apron’s before trying to set up website. Thank you TJ
I suggest that you make each apron unique and individual. Choose interesting fabrics and trims to make them stand out and you will be successful. I wish you lots of luck with this new season in your life.
Thank you thank you thank you. I have been using a terrible, fiddly, and not very attractive method to attach my bias binding. I used yours instead and was done in one third of the time with much prettier results!
I have trouble with corners on square items that I’m putting bias tape on, could you show a tutorial on that technique?
I like that. I have an idea for a post that covers this and other ‘corner’ related issues.
i just tried to click on the “how to make bias tape” and it’s now broken. I’d *love* to see it if possible. I’m just starting to teach myself to sew and am loving your site!
The link should be working,now.
This is such a great comment and thank you for bringing it up. Yes, for the most part, bias tape is used to enclose AND embellish a seam. However, it also makes a great facing for a sleeveless top. The method I demonstrate shows this.
thank you!
Thank you, thank you so much! I’ve looked everywhere for how to do this, fabulous tutorial thanks again 🙂
Great tutorial! I love how you folded the ends of the tape for your overlap.
I have a dress pattern which includes lining but don’t want to line the dress. This is a great way to finish armholes and neckline. Thanks so much.
That little triangle makes all the difference!! I have had to do bias binding on hundreds of garments, this makes it look so much better!!
Hi Leslie, I am a new subscriber and already have learned alot about bias tape. Great tutorials, thanks 🙂 I am making a dark green diaper bag for a friend and wanted to give it a bit of a lift so I used your tutorial to make bias tape from the lighter green lining and put it around the pockets and flap. I’m really happy with it now. thanks again!
Thanks for sharing. I’m glad the tutorial was helpful.
Thank you. Love the triangle clean edge. Have been using tape for a while and yours gives clean finish will be using your method from now on.
Thank you for the succinct directions for attaching bias tape. It has puzzled me for years and years!
Thank you for this post. I am making an apron for someone and it has been more difficult than I thought because of my somewhat limited sewing experience. These pictures turned on the light bulb for me regarding bias tape!
I love this technique! Now I need to read your other posts on making bias tape. Great photo examples. Thanks! Karen
Just found this on Pinterest. Great tutorial, really easy to follow. Thanks so much.
You are so smart. Thank you thank you thank you
Genious
How do you attach knit trim to the neck and armholes. How do I also make knit trim? Help me please!
I have a basic sewing maching and I wanted to know hat type of sewing foot did you use in this tutorial?
I used a universal foot.
Love this l make soft rag dolls and often use bias tape. This looks so neat and professional
Love it, you make it look so good, thanks;Barbara
Thank for sharing, is a good tips.
How do I prevent it from rippling on me. I’m careful not to stretch as I go. Very frustrating.
thank uou.
As you go around curves there can be a slight amount of rippling. It may be your thread or needle.
I’m very new to sewing on a machine. What is the seam allowance for sewing the bias tape to the garment? Thanks
It depends on the width of the bias tape, but 1/4″ is standard and 3/8″ is occasional.
Hi Leslie, thankyou for your instructions, a wonderful asset to my sewing projects.
I’m new to sewing and have had the hardest time trying to figure out how to do this. This was so helpful and easy to understand, thank you so much!